3D PLM Enterprise Architecture |
User Interface - Dialogs |
Dialog Programmer's GuideProgramming step-by-step |
| Technical Article | ||
AbstractThis article provides a canvas of the steps to perform to create a dialog window or box, exposes the main options you can take, and points to the appropriate articles dealing with each of these steps. To have full information about a given object, refer to the Dialog Class Catalog. |
You should first spend a bit of your time on designing what is your dialog for, and what it should contain. It roughly falls in the following categories:
Once you have determined the type of dialog window you need, try to figure out what it should contain. A dialog window or box contains, from the end user standpoint, only controls, but you can add structuring objects to help controls that have something in common to be displayed together. To do this, you often use frames, sometimes tab containers and tag pages, and possibly containers or splitters. In addition, you can add labels to name controls that have no implicit titles, such as spinners or sliders, and horizontal and vertical separators to clearly separate areas, for example in a frame. Controls are sensitive to end user interactions, and you must supply to each of them the expected behavior using methods that will be triggered when the end user will push on the push button, click the spinner arrow, or select a combo line. These methods are contained in, or called from, callback methods set to react to the notifications sent by the controls when they are activated by the end user. When this is done, you should provide the resources of your dialog box, used to set the text and graphics to dial, and to enable translation.
[Top]
Most of the time, you create your own dialog class by deriving the CATDlgDialog class.
[Top]
The methods of a dialog class are:
Build method[Top]
The constructor must just provide a NULL pointer for each dialog object or
control referred to using a pointer stored as a data member, but must not
allocate. This avoids having objects created without their associated resources
being loaded. The Build method, which must be called just after the constructor,
will instantiate these objects. The constructor just set the dialog window or
box parent, its identifier, and its style. The style is here not explicitly set.
DialogWindow::DialogWindow(pParent, pIdentifier, Style)
            : CATDlgDialog(pParent, pIdentifier, Style),
              _pFirstDataMember(NULL), ...
{}
|
Since the caller can set the style as a concatenation of the available style parameters, you need to provide callback methods for the OK, Apply, and Cancel push buttons, plan that the dialog box can be set to modal or to non resizable. If you want to explicitly set the style without leaving the caller set it for you, do not provide a style parameter in your constructor, and pass the style in the CATDlgDialog parent class constructor.
DialogWindow::DialogWindow(pParent, pIdentifier)
            : CATDlgDialog(pParent, pIdentifier,
                           CATDlgWndOKCancel| CATDlgGridLayout),
              _pFirstDataMember(NULL), ...
{}
|
Rule 1.6.1.3.2: the forth recommended styles for the buttons are:
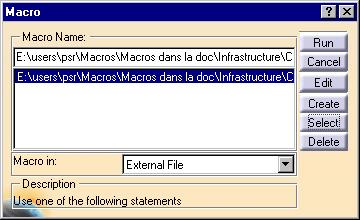
Let's take the example of the CATIA Macro dialog box to go on with a concrete example.

This dialog box is non resizable, and features the Help button in the title bar. Its constructor is as follows.
MacroBox::MacroBox(pParent, pIdentifier)
        : CATDlgDialog(pParent, pIdentifier,
                       CATDlgWndNoResize | CATDlgWndHELP |
                       CATDlgWndTitleBarHelp | CATDlgGridLayout),
              _pMacroNameFrame(NULL), ...
{}
|
[Top]
The Build method instantiates the objects making up the dialog box, manages
their layout, and sets the callbacks to the control notification you want to
react to.
void MacroBox::Build()
{
  // 1. Instantiate boxes, indicators, and controls
  // 2. Arrange the dialog objects
  // 3. Set callbacks
}
|
To make sure that the parent/child relations between the objects you create are properly set, instantiate each object at the place it lies on in the dialog box, possibly using line indentation. For example, assume you want to create the following dialog box. Its parent child tree structure is shown beside.
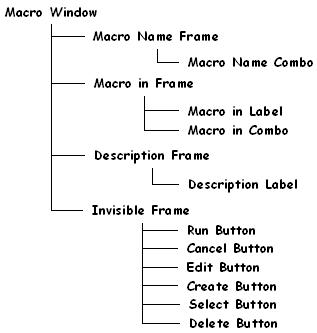 |
All the dialog objects instances making up the dialog box are declared as pointers to the appropriate classes. These pointers are stored as data members of the dialog box class. The containment parent/child structure is shown beside. It is used to set the parent of each object as the first argument of the constructors. |
The specifications of the dialog box are shown below.
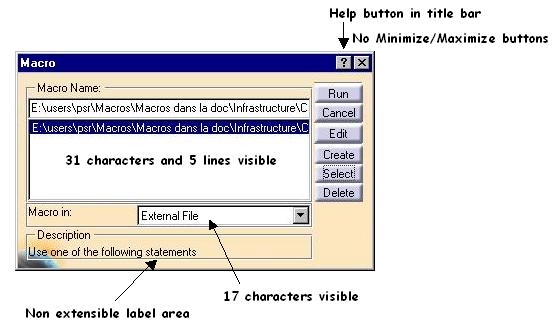
[Top]
The Build method of such as dialog box could be as follows.
...
  _pMacroNameFrame   = new CATDlgFrame(this, "MacroNameFrameId", CATDlgGridLayout);
    _pMacroNameCombo   = new CATDlgCombo(_pMacroNameFrame, "MacroNameComboId");
	_pMacroNameCombo->SetVisibleTextWidth(31);
	_pMacroNameCombo->SetVisibleTextHeight(5);
  _pMacroInFrame     = new CATDlgFrame(this, "MacroInFrameId", CATDlgGridLayout);
    _pMacroInLabel     = new CATDlgLabel(_pMacroInFrame, "MacroInFrameId");
    _pMacroInCombo     = new CATDlgCombo(_pMacroInFrame, "MacroInFrameId");
    _pMacroInCombo->SetVisibleTextWidth(17);

    CATUnicodeString ucMacroInComboString ;
    ucMacroInComboString  = CATMsgCatalog::BuildMessage("MacroBox",
	                                     "MacroInComboText",NULL,0,
	                                     "External File");

   _pMacroInCombo->SetLine(ucMacroInComboString);
   _pMacroInCombo-->SetField(ucMacroInComboString);

  _pDescriptionFrame = new CATDlgFrame(this, "DescriptionFrameId", CATDlgGridLayout);
    _pDescriptionLabel = new CATDlgLabel(_pDescriptionFrame, "DescriptionLabelId");
    _pDescriptionLabel->SetTitle("                                          ");

  _pButtonFrame      = new CATDlgFrame(this, "ButtonFrameId", CATDlgGridLayout);
    _pRunButton        = new CATDlgPushButton(_pButtonFrame, "RunButtonId");
    _pCancelButton     = new CATDlgPushButton(_pButtonFrame, "CancelButtonId");
    _pEditButton       = new CATDlgPushButton(_pButtonFrame, "EditButtonId");
    _pCreateButton     = new CATDlgPushButton(_pButtonFrame, "CreateButtonId");
    _pSelectButton     = new CATDlgPushButton(_pButtonFrame, "SelectButtonId");
    _pDeleteButton     = new CATDlgPushButton(_pButtonFrame, "DeleteButtonId");

...
|
To assign the resources to the combo lines use the CATMsgCatalog class
[1]. Where MacroBox is the CATNls file
which contains the following lines:
... MacroInComboText.Title ="..." ; ... |
[Top]
To arrange boxes, indicators, and controls, use the grid layout [2]. You can manage object arrangement as the objects are instantiated, and thus mix object instantiation and object layout code lines. You can also, if you prefer, clearly separate object instantiation from object layout. Each box layout in separately described:
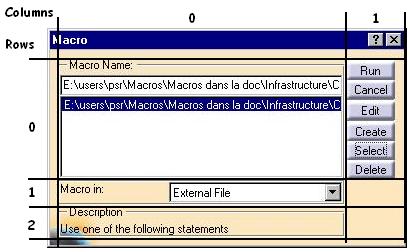
... _pMacroNameFrame->SetGridConstraints(0, 0, 1, 1, CATGRID_4SIDES); _pMacroNameFrame->SetGridRowResizable(0,1); _pMacroNameFrame->SetGridColumnResizable(0,1); _pMacroInFrame->SetGridConstraints(1, 0, 1, 1, CATGRID_4SIDES); _pMacroInFrame->SetGridRowResizable(0,1); _pMacroInFrame->SetGridColumnResizable(0,1); _pDescriptionFrame->SetGridConstraints(2, 0, 1, 1, CATGRID_4SIDES); _pButtonFrame->SetGridConstraints(0, 1, 1, 1, CATGRID_4SIDES); _pButtonFrame->SetGridRowResizable(0,1); _pButtonFrame->SetGridRowResizable(1,1); _pButtonFrame->SetGridRowResizable(2,1); _pButtonFrame->SetGridRowResizable(3,1); _pButtonFrame->SetGridRowResizable(4,1); _pButtonFrame->SetGridRowResizable(5,1); _pButtonFrame->SetGridColumnResizable(0,1); ... |
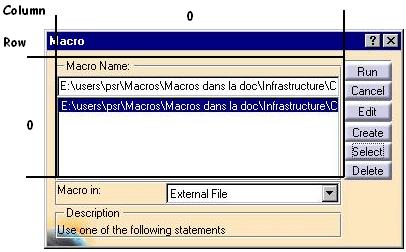
... _pMacroNameCombo->SetGridConstraints(0, 0, 1, 1, CATGRID_4SIDES); ... |
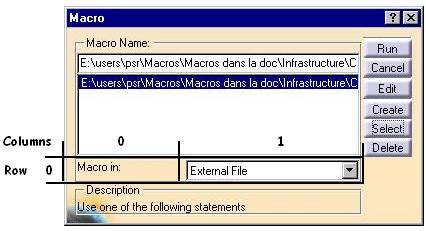
... _pMacroInLabel->SetGridConstraints(0, 0, 1, 1, CATGRID_4SIDES); _pMacroInCombo->SetGridConstraints(0, 1, 1, 1, CATGRID_4SIDES); ... |
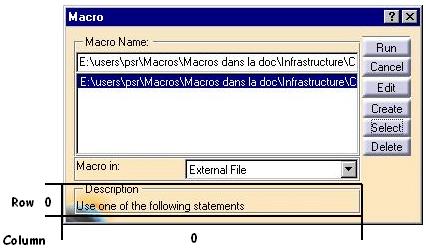
... _pDescriptionLabel->SetGridConstraints(0, 0, 1, 1, CATGRID_4SIDES); ... |
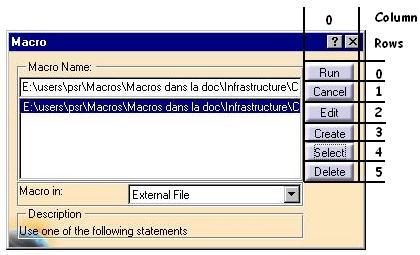
... _pRunButton ->SetGridConstraints(0, 0, 1, 1, CATGRID_4SIDES); _pCancelButton->SetGridConstraints(1, 0, 1, 1, CATGRID_4SIDES); _pEditButton ->SetGridConstraints(2, 0, 1, 1, CATGRID_4SIDES); _pCreateButton->SetGridConstraints(3, 0, 1, 1, CATGRID_4SIDES); _pSelectButton->SetGridConstraints(4, 0, 1, 1, CATGRID_4SIDES); _pDeleteButton->SetGridConstraints(5, 0, 1, 1, CATGRID_4SIDES); ... |
The callbacks are set for the controls to specify the appropriate method to call when a given control is activated, that is, send a given notification. For example, this is the callback set for the Run push button:
...
AddAnalyseNotificationCB(_pRunButton,
                         _pRunButton->GetPushBActivateNotification(),
                         (CATCommandMethod)&MacroBox::RunButton
                          NULL);
...
|
The arguments to pass are a pointer to the push button, a pointer to the
notification sent, retrieved thanks to a method of the push button class that
retrieves such expected notifications from the push button, and the method to
execute when such a notification is sent by that push button. This method is
described in Coding the Callback Methods. The fourth
argument is set to NULL, but could contain data, namely a void * pointer, to
pass to the RunButton method.
[Top]
The callbacks methods are usually methods of the dialog box class, and should be as follows, for example for the Run push button.
MacroBox::RunButton(CATCommand           * pSendingCommand,
                    CATNotification      * pNotification,
                    CATCommandClientData   UsefulData)
{
...
}
|
You can retrieve the activated control from the first parameter, and the notification instance sent by this control from the second parameter. The third argument lets you retrieve the data you possibly pass as the fourth argument of the AddAnalyseNotificationCB method.
[Top]
As a C++ rule, the destructor should delete the pointed data members. For pointed dialog objects that are descendants of the dialog window class, you shouldn't deal with it, since the children are recursively retrieved form the dialog window instance, and are automatically deleted. You have only to set a NULL pointer to each dialog object member. Usually, a dialog window destructor looks like this:
MacroBox::~MacroBox()
{
  _pFirstDataMember = NULL ;
  ...
}
|
Of course, if you have added data members as pointers to other objects, you must take care of their deletion and set a NULL pointer to each of them.
[Top]
This is explained in the referenced article [1].
[Top]
| I use a grid layout, and the grid rows, columns, and span numbers I assigned seem to be OK. Nevertheless, in the window, or in some of its container, a controls doesn't appear. | |
| The grid layout parameters aren't set for this control. | |
| Set the grid layout parameters using the SetGridConstraints method for this control. |
| I have created the resources for my controls in the appropriate files, but they don't display. | |
| The resources are not found at run time. | |
| launch mkCreateRuntimeView |
[Top]
Creating a dialog window or a dialog box implies to code a constructor and a destructor that are quite empty, and to create a Build method that contains the control creations and layout, as well as the callback declaration. Then you need to create the callback methods. The last step is to create the resource file to associate text and images to your controls.
[Top]
| [1] | Assigning Resources to a Dialog Box |
| [2] | Arranging Dialog Objects Using Grid |
| [Top] | |
| Version: 1 [Jan 2000] | Document created |
| Version: 1 [Fev 2003] | Document updated |
| [Top] | |
Copyright © 2000, Dassault Systèmes. All rights reserved.