RADE |
JAVA Interactive Dashboard |
Customizing IBM Rational Software Development PlatformHow to set up the CAAV5 tools for a JAVA development environment |
| Technical Article | ||
AbstractThis article is intended for those of you who wish to develop JAVA code in the CAA development environment. Here, you will find how to write your JAVA code while having access to all the CAA development tools and how to debug your code in IBM Rational Software Development Platform (IRAD). This article describes the functionalities offered by the JAVA Visual Dashboard, its menus and commands and how it interacts with the IRAD environment. In the rest of this article, labels of buttons or menus from the JAVA
Visual Dashboard are written using " |
After installing JID on a workstation, you can activate the customization of IRAD. This activation step must be performed if you want to access JID tools from IRAD.
File menu, access the
New->Project menu.New Project window,
select Java Project.
Click Next>.Project name field,
enter the name of the project and click Finish.Window menu, select
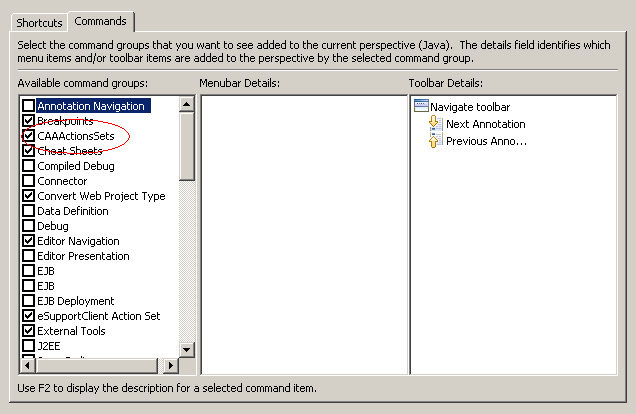
Customize Perspective.... The
Customize Perspective window opens.Commands tab, check
CAAActionsSets and click
OK.

Now, the new menus CAA Project and Source Code Management are available in IRAD. The CAA Output View will appear when needed by the dashboard (see below).

The JAVA Visual Dashboard is an interactive application that allows you to:
These functionalities are available through the menu items.
Your last project is reopened when launching IRAD. You simply need to open it for CAA to initialize the tools.
Window menu, select
Show View->Navigator.Navigator view, right-click the
workspace that you want to open, such as MyProject in this example, and
select Open CAAV5 Workspace. The Open CAAV5
Workspace dialog box is displayed.
|
|
|
CAA Project menu,
select Update/Generate Source Folders....
A file tree appears which can be expanded/collapsed to respectively display
or hide internal modules.|
|
|
OK to include the selected frameworks
and modules into your source path. You can find information on how to access Code Builder commands in Working with the RADE Dashboards - Part 2.
You can find information on how to access Source Code Manager commands in Workflow Management.
You can find information on how to get started with the JAVA dashboard and create your first elements in Getting started with the JAVA Dashboard.
Now you are ready to work using both the Java Interactive Dashboard environment and CAAV5 tools. The next article we advise you to read is Working with the RADE Dashboards - Part 1 [1] where you will find explanations about how to use the others commands. If you are familiar with mkmk commands or Workspace Manager commands, you will find the corresponding Java Dashboard menus and commands in Workbench Commands Mapping [2].
[Top]
| [1] | Working with the RADE Dashboards - Part 1 |
| [2] | Workbench Commands Mapping |
| [3] | Getting started with the JAVA Dashboard |
| [4] | JID Troubleshooting |
| [Top] | |
| Version: 1 [Jan 2000] | Document created |
| Version: 2 [May 2005] | Document updated |
| [Top] | |
Copyright © 2006, Dassault Systèmes. All rights reserved.