RADE |
JAVA Interactive Dashboard |
Working with the RADE Dashboards in IBM Rational Software Development PlatformGetting started: Step-by-step |
| Technical Article | ||
AbstractThis article is a starter toolkit for people new to the JAVA Interactive Dashboard environment. In this article, they will find the first steps to create a JAVA application, from within the software development environment of IBM Rational Software Development Platform (IRAD). In the rest of this article, labels of buttons or menus from the JAVA
Visual Dashboard are written using " |
Before starting, install the JID product provided on the RADE CD. Make sure that IRAD has previously been installed on the machine because the RADE installation detects it and installs the JAVA Interactive Dashboard within its environment. If you install IRAD after JID, you must manually launch the Setup tool provided with RADE. Refer to Customizing the RADE tools for more information on the Setup tool.
Once the JAVA Interactive Dashboard has been installed, you can start IRAD. If the CAA Project menu is not available in your JAVA Perspective, customize IRAD to make it available, as described in Activating IRAD Customization.
The type of project you create depends on the type of application you are targeting. If you want to create a CAAV5 Java Application, or if you want to create JAVA code to integrate into the LCA Portal, create a CAA V5 Project.
This procedure shows you how to create a CAAV5 JAVA Project. If you have already created your workspace, please refer to How to Work on a Workspace in the JAVA Dashboard.
File
menu, select New->Project.
The New Project window opens. Java
Project. Click
Next. The New Java Project window opens.
Finish.Once the project has been created in IRAD, open it.
Navigator
view and select Open
CAAV5 Workspace. This step is
described in How
to Work on a Workspace in the JAVA Dashboard.The type of project you create depends on the type of application you are targeting. If you want to create a CAAV5 Java Application to integrate into Websphere Application Server, create a CAAV5 Web Project.
This procedure shows you how to create a CAAV5 Web Project. The first step is standard IRAD procedure to create a Web Project. If you have already created your workspace, please refer to How to Work on a Workspace in the JAVA Dashboard.
File
menu, select New->Project.
The New Project window opens. Web
node and select
Dynamic Web Project. Click
Next. The New Web Project window opens.
Finish. Do not modify the Context root default value
given by IRAD. Once the project has been created, open it.
 Open
   CAAV5 Workspace
.
This step is described in
How to
Work on a
Workspace in the JAVA Dashboard. File
menu, select New->Other.
The New dialog box is displayed.
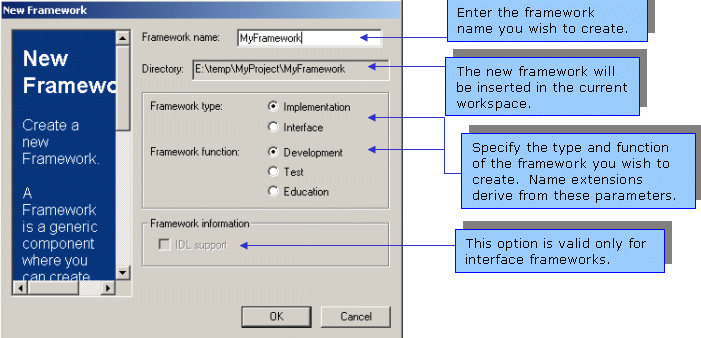
Next. The New Framework window opens.
OK. The JAVA interactive
dashboard will create the new framework file tree in your workspace and
integrate it inside the IRAD
Project.File
menu, select New->Other. The New dialog box
displays.
CAAV5 Module. Click Next.
The New Java Module window opens.
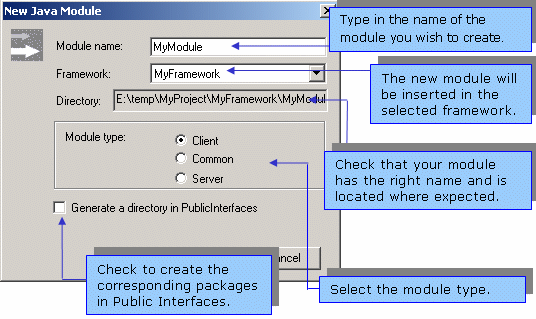
OK. The JAVA interactive
dashboard creates the new module in your workspace and integrates it into the
Project.You can now then define your CAA V5 Prerequisites as described in Set up Prerequisites, and start your JAVA coding using standard IRAD functionalities.
If you want to get standard IRAD javadoc tooltips mechanism for
prerequisite code (which is not in your current project), the prerequisite
frameworks/java modules need to be built using the command
mkmk -a -zip. The -zip option produces java source archive files .zip
while compiling, and the zip file for each java module is located in
MyModule.mj\Objects\intel_a\MyModule.zip.
Once zip files are correctly built for prerequites, run
CAA Project->Get prerequisites... or
CAA Project->Update libpath based on makefile...
for your current project. This will automatically reference these zip
files as Java Source Attachment for each jar in the classpath. Then you will
get standard javadoc tooltips mechanism for all java classes even if the source
code is not in your current project.
If you want to get javadoc in the standard external browser for your java classes and prerequisites java classes, you need to have javadoc built in your workspace and in each prerequisite workspace:
CAA Project->Generate
   javadoc...
generates automatically the javadoc in directory
your_workspace_dir/Doc/docs/api.Once html files for javadoc are correctly created in Doc/docs/api
directories for your prerequisites and for your current workspace, relaunch the
command CAA Project->Get prerequisites...
or After that, you can place the cursor over the
element whose Javadoc information you want to view (a class name or a method
name, for example), press Shift+F2. The standard external browser is opened
showing the corresponding documentation.CAA Project->Update libpath based on
makefile....
In Short
Now you are ready to work using both the Java Interactive Dashboard
environment and CAA V5 tools. The next article we advise you to read is Working
with the RADE Dashboard [1] where you will find
explanations about how to use others commands. If you are familiar with
commands or
Workspace Manager commands, you will find the corresponding Java Dashboard
menus and commands in Workbench Commands Mappingmkmk [2].
[Top]
     [1]

     Working with the RADE Dashboard


     [2]

     Workbench Commands Mapping


     [Top]
History
| Version: 1 [Sep 2002] | Document created |
| Version: 2 [May 2005] | Document updated |
| [Top] | |
Copyright © 2006, Dassault Systèmes. All rights reserved.