RADE |
RADE Interactive Products |
Customizing the RADE Interactive toolsHow to setup the options and settings of the RADE interactive tools |
| Technical Article | ||
AbstractThis article is intended for people administrating the RADE interactive products, or more generally for people wishing to customize the options and settings provided by the various RADE interactive products. |
After installation of the RADE CD on a workstation, all users are provided with a default working environment enabling them to work with the C++ Interactive Dashboard within Visual Studio.NET or with the Java Interactive Dashboard within IRAD.
This default environment however may not be adapted to the user's individual needs, and many options are open to him. These options are conditioned by the authorizations he has on his workstation, and an administrator has more possibilities than a simple user.
In order to launch the interactive Setup Tool, simply start the program called CATVBTSetup located in the RADE installation directory. This can be done by double-clicking on the product through a navigator, or by typing the name of the program (with its full path) in a simple command prompt.
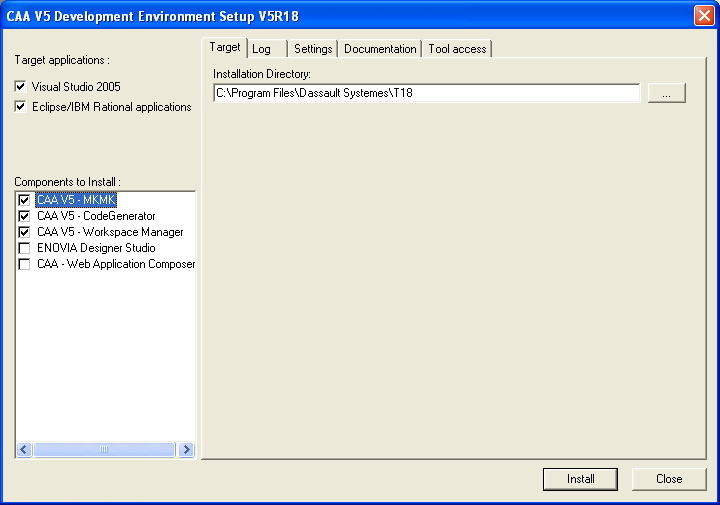
The complete appearance of the Setup Tool looks like this, but appearance may vary from one configuration to the other:
 |
Note on the left-hand side the various target applications you wish to install the products on. Currently, Eclipse/IBM Rational applications and Visual Studio 2005 are available.
The target applications condition the list of components that appear underneath. For example, the ENOVIA Designer Studio and CAA - Web Application Composer do not appear if only Visual Studio 2005 is selected. The list of components is also determined by the number of products you have installed from the RADE CD.
[Top]
The following options do not require administrative privileges, and can be modified by an individual user.
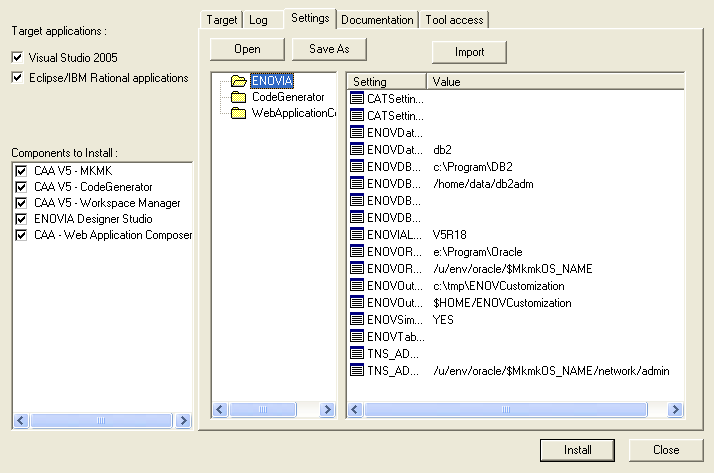
The Setting tab page enables you to customize variables used by the various interactive tools.

There are currently three categories of variables:
CATCompanyName: The generated code has a standard header.
You can modify the name of the company developing the software. Default
value is Dassault Systemes, but you can insert your own company name in
its place when developing your code.CATSettingPath: The setting path of the ENOVIA server installationENOVDataBaseAliasName: ENOVIA database alias nameENOVDataBaseType: the type of the database. Possible values:
db2 or oracleENOVDB2_HOME: Installation path of DB2 if db2 database
installedENOVDBAID: Id of the ENOVIA database administratorENOVDBAPSSD: Password of the ENOVIA database administrator
(this value is not kept)ENOVORACLE_HOME: Installation path of ORACLE if ORACLE
database installedENOVOutputDirectory: UNIX directory where generated libraries,
SQL orders and metadata files are copied to facilitate deployment.ENOVSimulatePublish: Default value for publish (YES for
simulation, NO for NoSimulation, ie. database modification)ENOVTableSpace: Name of the ENOVIA tablespaceTNS_ADMIN: For Oracle only. The default value is the installation
path of oracle with /network/admin suffixed.[Top]
The documentation of the dialog boxes of the interactive tools is supplied on the CAA CD. To be able to access this documentation by pressing F1 on one of those dialog boxes, you must enter the field: Documentation installation Path. For example, if the CAA CD was installed on: E:\Program Files\Dassault Systemes\B17, enter: E:\Program Files\Dassault Systemes\B17\CAADoc.
If the CAA CD was installed on another workstation, checking the box: Use local copy of the documentation will copy the documentation in your RADE installation, thereby bypassing the network delay to access the documentation over the network. Be aware however that the documentation is copied in the RADE installation directory.
Finally, you can change the Tool Tip that appears at initialization of the RADE Interactive tool by providing your own html file and giving its location in the field Tip of the Day configuration file.
[Top]
The Tool Access tab page allows you to modify several tool initialization options.
[Top]
The Tool Access tab page also enables you to build your software on a UNIX platform.
[Top]
Once you have set all the options you required, press the Install push button to modify the options in your directory.
In the Log tab page, notice that the various steps and warnings are listed to guide you in case a step should fail. If the user does not have administrator privileges, he is warned first, but setup will continue for those operations not needing it.
Note that in some cases, a target tab page could appear. This page allows you to copy the installation of the RADE products to another location. This option requires administrative privileges because it modifies the registry and is not supported.
[Top]
You have now seen how to modify the various options available in the RADE interactive products. By modifying these options, you can customize the tools to best fit your needs. The use of those tools is explained in the list [1] where you will find explanations on how to use each of them.
[Top]
| [1] | Working with the RADE DashBoard |
| [2] | Working with the RADE Dashboard and Source Code Manager |
| [3] | Using the Java Interactive RADE Dashboard |
| [Top] | |
| Version: 2 [July 2005] | Document updated |
| Version: 1 [Jan 2000] | Document created |
| [Top] | |
Copyright © 2005, Dassault Systèmes. All rights reserved.