RADE |
Workflow Management |
Working with the RADE Dashboards and SCMSource Code Manager features in the dashboards |
| Technical Article | ||
AbstractThis article describes the use of Source Code Manager (SCM) commands that can be found in IBM Rational Software Development Platform (IRAD), other commands (especially mkmk and related functionalities) are detailed in another article: Principles of use - How to Open and Build a CAAV5 Workspace. If you are working with the C++ Interactive Dashboard and your Developer Studio environment has not been set-up for CAAV5 tools, we advise you to read Customizing IRAD in which you will find information to help you to set it up and to migrate a CAAV5 File Tree in a format which is usable by IRAD. Finally, if you are familiar with the use of CAAV5 commands, the Workbench Commands Mapping article will give you the correspondences between DOS/shell commands and Developer Studio or Java Dashboard menus and dialog boxes. Note that in the rest of this paper, labels of menus or window items are
written using |
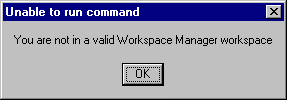
Even if they appear in IRAD menus, Workspace Manager commands do not work until you open a workspace which is managed by it.
| If you try to use them before opening a workspace you will get the following message: | |
There are three situations to study:
Navigator view,
right-click a project and select the Open
CAAV5 Workspace command. The Open CAA V5 Workspace dialog box
displays.With: combo box,
select Mkmk & Source Code Manager
to enable the last three fields. You
will also access mkmk commands (instead of the
Mkmk choice which does not give access to Source Code Manager
commands).
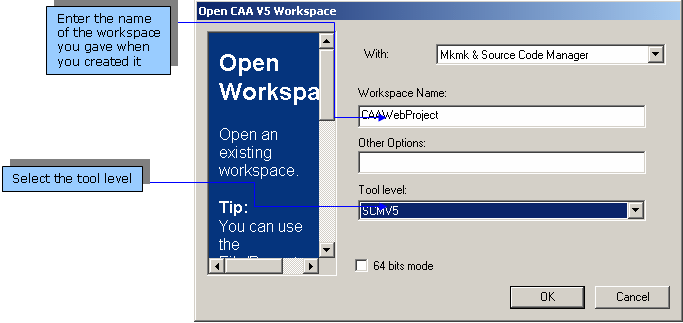
OK. A log window appears while your
environment is updated and the workspace opened. When this window has
disappeared, IRAD loads the project
files it stored in your workspace and you are ready to work.Source Code Manager commands are useful for workgroup support, that is when several people work on the same software and need to share their files. Using the Source Code Manager each person create its workspace, all workspaces declared in a base are organized in a tree whose top is called BSF, intermediate levels are typed project and leaves are development workspaces: the commands available from the dashboard are those needed in this kind of workspace, if you need other commands you can open a DOS window in which you can run any of them from the workspace currently opened in IRAD.
Window
menu, select the Open command window
command.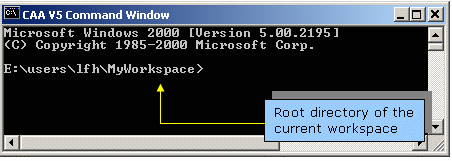
When working with the Workspace Manager any action performed on the content of the workspace file system must be declared - registered in a repository - to the Workspace Manager:
New CNext directories must be declared only if they have been created in your workspace, not if they have been copied from another workspace (because they might have already been declared from this other workspace).
Source Code Management menu, select the
Declare Directory in Database...
command.
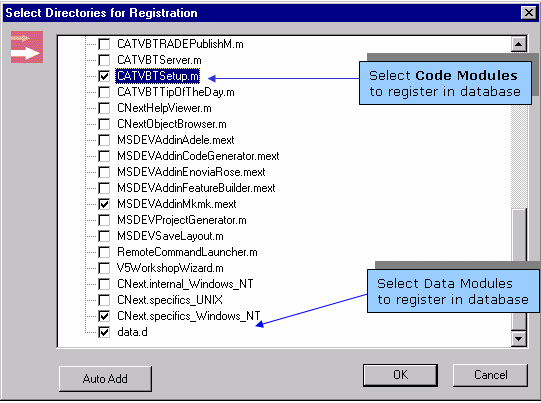
Note that:
Attach
   Frameworks\Modules
command from the
Source Code Management menu.Like for directories, files created in your workspace must be registered in
the Workspace Manager repository. To do so, select the
Declare File in Database... command from
the Source Code Management menu.
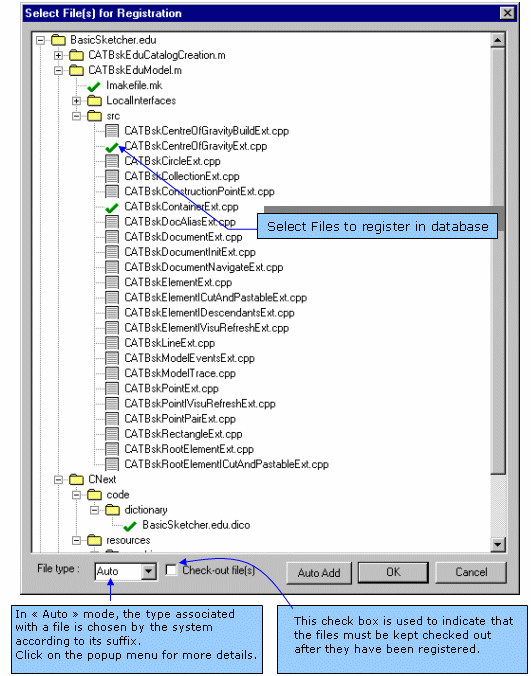
When you click OK,
a log window is
displayed while the files are being registered. After the completion, the
selected files are no more writable except if you checked the
Check-Out check box, in this case each file
is checked out after its
registration, so you can continue to work on it.
|
|
Any (source) file needed to build a component must be declared to the Workspace Manager because the tool doesn't browse your file system to find what has been created, modified or deleted. If you want to know if all has been registered you can ask the Workspace Manager to check your file system. |
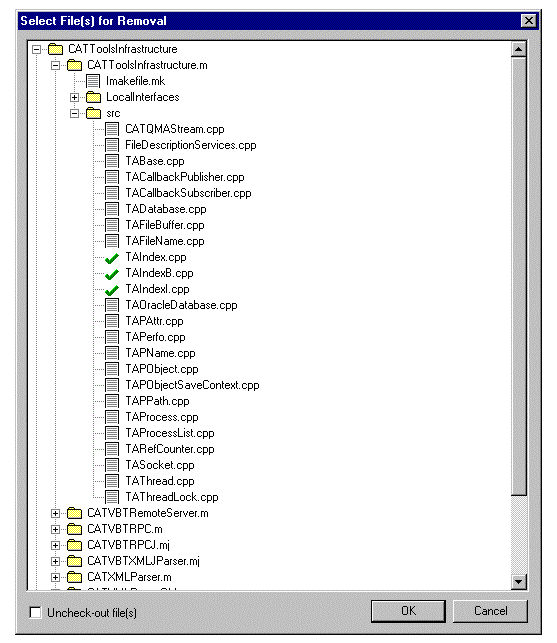
Any file or directory can be removed from any workspace, however, considering the deletion of components is not a task devoted to developers, no command to remove a directory has been provided through IRAD.
|
|
Note that:
|
To delete a file, from the Source Code Management
menu, select Move/Rename/Remove->Remove a File.
The file which is automatically selected is the one currently edited in
IRAD.
You can select files in the file tree.
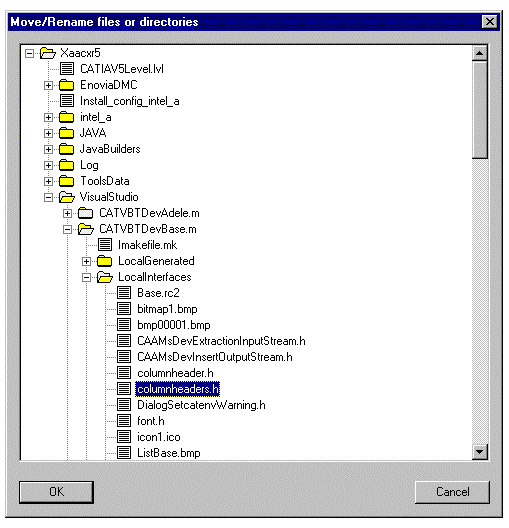
You can move and rename directories or files by using
Move/Rename...
available in the Source Code
Management->Move/Rename/Remove sub-menu.
To Move a file or a directorySelect the file or directory to move, and drag & drop it to the destination directory, or use the Cut and Paste contextual menu items. To Rename a file or a directorySelect the file or the directory to rename, and click once more to
modify the name, or use the |
 |
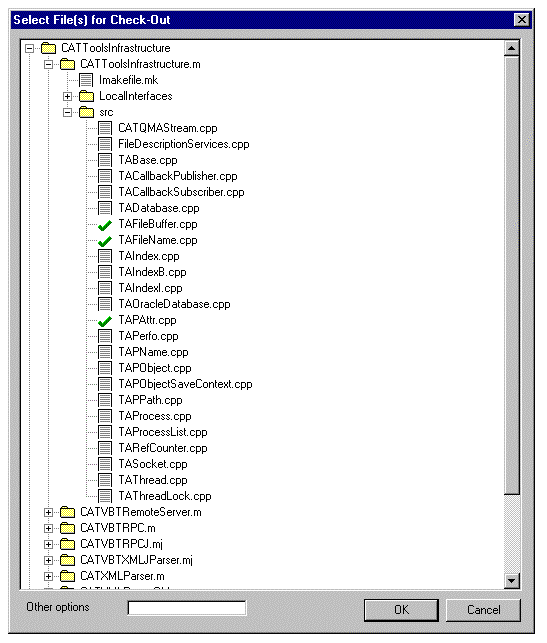
Before modifying a file, check it out from the Workspace Manager repository, the main interest being to indicate that this file is being modified and that any further command should take care of it:
To check-out a file, select Check-Out
from the Source Code Management menu.
The current edited file is selected by default. As you may want to check-out
several files at the same time you can select several files in the file tree.
The purpose of checking your workspace against the (Workspace Manager) database is to detect files which are not yet managed or which have been edited without checking them out. This command helps you prepare your workspace to be delivered to other people because only modifications declared to the Workspace Manager will be delivered afterwards.
Source Code Management
menu, select the Information->Check Workspace command. A
dialog box is opened in which you can select the framework to check, which
can be useful for a workspace containing many frameworks.Check messages are displayed in the Mkmk
output window that lets you run omitted commands without losing these traces.
The detected errors can be:
To fix these errors, you can:
Declare File in Database....
- Make a copy of your file
- Check-out the file using
Check-Out: this will produce an error asking you to move a file - given by the Workspace Manager - to overwrite the file you modified. Overwrite it.- Check-out again the file, this won't produce the previous error message.
- Overwrite the checked-out file with your copy.
When working in a development workspace, only 2 commands are necessary to exchange data with other people. A development workspace has a father workspace and no son, so the only data flow is to or from the father workspace:
Promote.. from
the Source Code Management menu.
Promote..., you can run a simulation by selecting
Simulate the promotion.Source Code Management
menu, select Synchronize.|
|
Most of the time, these three commands do not require any parameter, however particular options can be specified in the common dialog box, consult the adl_promote and adl_sync reference pages to learn about their usage. |
|
|
If you work in a project workspace and if you
want to use Workspace Manager commands from IRAD, open a DOS
window to run commands such as adl_collect
or adl_publish. |
A multiplaform workspace is a workspace having one database representation and two file system representations: one on a Windows machine and another one on a Unix machine. The process to create such a workspace is broken down into three steps:
If you consider that one workspace can have two file system representations, it is possible to work on only one platform at a time. When you work on one platform and you need to work on the other one, two commands can prove useful:
adl_sync,
adl_promote).
- Open the same workspace on the other platform
- Run adl_refresh.
|
|
To run one of these 2 commands from
IRAD, from the Source Code Management menu, select
Unix -- NT->Photo or Refresh. |
This section gathers commands used to obtain information on your current workspace. You can:
From the Source Code Management
menu, select Information->Display Workspace Status.
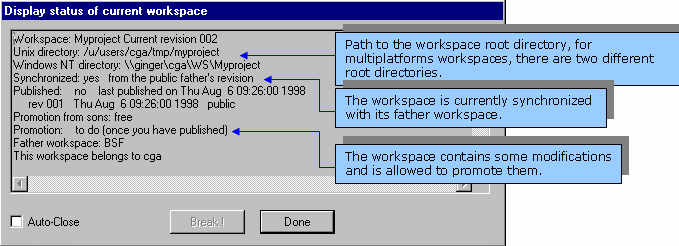
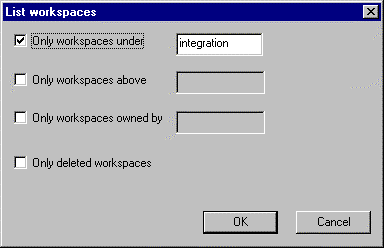
This command can be used to display the names of existing workspaces and how
they are organized. From the Source Code
Management
menu, select Information->List Workspaces.
| You can choose to display workspaces under
or above a given workspace or to display workspaces owned by a given
user.
It is possible to list deleted workspaces because, even if they cannot be used any more, they still exist in the repository. |
 |
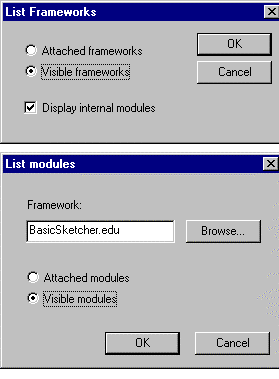
This command is especially useful to know what frameworks and modules can be
attached to the current workspace. A workspace can attach only copies of
frameworks and modules which are managed in its father workspace.
From the Source Code Management menu,
select Information->List Frameworks
or List Modules .
In the dialog boxes opposite, the
Attached ... radio button corresponds
to data already present in your workspace while the
Visible ... radio buttons allows you to
display also what can be attached. |
 |
This command lists the files you have checked out since the last photo of
your workspace, a photo is done each time you ask for it (Source
Code Management->Information->Photo) or when you exchange data
with another workspace (promotion, synchronization). Note that the command
lists private files too.
To list checked-out or private files, select
Information->List Checked-out files from the
Source Code Management menu.

[Top]
[Top]
| [1] | Customizing IBM Rational Software Development Platform |
| [2] | Working with the RADE Dashboards - Part 1 |
| [3] | JID Troubleshooting |
| [Top] | |
| Version: 1 [Jan 2000] | Document created |
| Version: 2 [May 2005] | Document updated |
| [Top] | |
Copyright © 2006, Dassault Systèmes. All rights reserved.