3D PLM Enterprise Architecture
|
User Interface - Dialogs
|
Arranging Dialog Objects Using Tabulations
How to manage the dialog object with the tabulation layout |
| Technical Article |
Abstract
Arranging dialog objects in a dialog window, a dialog box, a frame or a
tab page, that is a container, consists in positionning each object at a
given place with respect to the others [1]. The
container layout will then not changed when the dialog window is resized.
The dialog objects can be precisely arranged in their respective containers
using tabulations attached to the container.
|
Object Default Layout
By default, each object you create has its own size which depends on its contents.
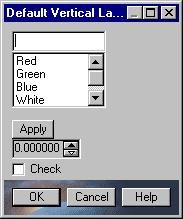
Let's take the example of a dialog window that derives from the CATDlgDialog class, and
that contains a combo, a push button, a spinner, and a check button.
 |
These controls are arranged horizontally side by side in their instantiation order and
attached by their top side to an implicit horizontal tabulation line if nothing particular
is specified since the SetDefaultOrientation(Horizontal) method is the
default for any container. |
 |
If you insert the method SetDefaultOrientation(Vertical)for the
container, your objects are then arranged vertically and attached by their left side to an
implicit vertical tabulation line. |
[Top]
Tabulation Layout
It is based on tabulation lines along which you can attach the sides of the containers
and objects.
[Top]
Tabulation Lines
To arrange complex windows, and also to help for resizing such windows, we will use
tabulation lines. These are horizontal or vertical lines located in a container. 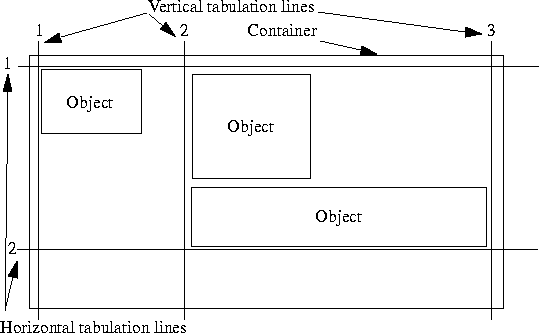
They are used to attach objects using their sides. Attachments are ordered as follows:
- Horizontal tabulation lines are ordered from top to bottom
- Vertical tabulation lines are ordered from left to right
Tabulation lines are identified using an integer number which grows, not necessarily
continuously, from left to right for vertical tabulation lines and from top to bottom for
horizontal tabulation lines.
[Top]
Attaching Containers and Controls along Tabulation Lines
You can attach containers and controls along tabulation lines as shown in this diagram:
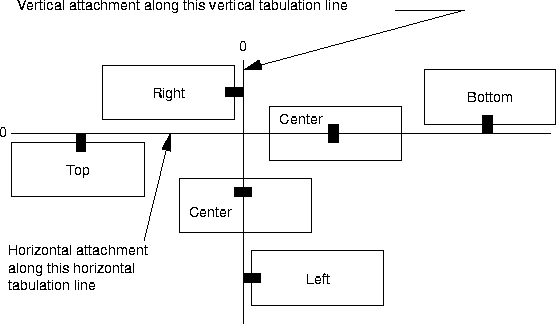
The way the object is attached, referred to below as the attachment mode, along the
tabulation line can be:
- for a horizontal tabulation line: Top, Center or Bottom
- for a vertical tabulation line: Left, Center or Right.
When you create tabulations lines, you assign them an integer number. Vertical
tabulation lines are positioned from left to right in the increasing order of their
numbers. Horizontal tabulation lines are positioned from top to bottom, also in the
increasing order of their numbers.
A given tabulation line can accommodate any number of containers and controls, but all
with the same attachment mode. In the same way you can not attach the same container or
control with the same attachment mode to two different vertical tabulation lines (or to
two different horizontal tabulation lines).
For each tabulation line, objects are laid out from top to bottom for vertical
tabulation lines, and from left to right for horizontal tabulation lines, in the order
they are listed in the method creating the tabulation line, with the methods
SetVerticalAttachment and SetHorizontalAttachment.
The space between two tabulation lines is determined by the largest object located
between them.
[Top]
Allowing for Container Resize
You can request that, when the user resizes a window, the different objects remain at
their location, and that containers, if any, remain at the same size, or you can request
that some or all the object locations and container sizes change according to the window
resize.
This is made possible thanks to the tabulation lines which can be set fixed or movable.
Everything happens as if a given tabulation line is attached to the preceding one. A fixed
tabulation line is attached with a rigid link to the preceding tabulation line, while a
movable is attached with a spring link.
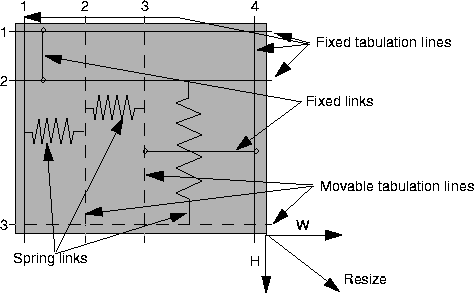
Suppose now that the user resizes the window defined above by dragging the lower right
corner according to the arrow direction. The size of the window increases of W
horizontally and H vertically. The result is shown below: 
The space between the horizontal tabulations 1 and 2 remains constant, since they are
both fixed, but the movable horizontal tabulation 3 shifts of H towards the bottom. In the
same way, the vertical tabulation 2 shifts of W/2 to the right with respect to tabulation
1, and the space between tabulation 1 and 2 increases of W/2. The vertical tabulation 3
shifts of W/2 to the right with respect to tabulation 2. The space between tabulation 2
and 3 also increases of W/2. Even if tabulation 4 shifts of W, the space between
tabulations 3 and 4 remains constant since tabulation 4 is fixed.
In the same way, if the user drags in such a way that the window size decreases, the
fixed tabulations stay at the same distance from their preceding tabulation while the
movable tabulations bring closer to their preceding one.
[Top]
To create tabulation lines and attachment modes, you can use the methods Attach4Sides,
SetVerticalAttachment, and SetHorizontalAttachment.
[Top]
Using Implicit Tabulation Lines
The Attach4Sides method is used to insert one object in a container. If
you intend to use this method for a given container, you must use it for all the objects
of this container. Objects are laid out horizontally and attached left and top to fixed
tabulation lines and right and bottom to movable tabulation lines. You do not explicitly
declare these tabulation lines.This makes the container and the objects it contains
resizable. Use this method as follows:
Container->Attach4Sides(PushButton);
Container->Attach4Sides(Spinner);
|
where Container is a pointer to a container instance, which contains two
controls: PushButton and Spinner which are pointers to a push
button instance and a spinner instance respectively.
For example, the following container, instance of the class CATDlgWindow 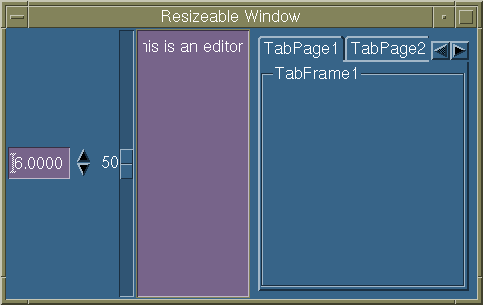
contains a spinner, a vertical slider, an editor, and a tabcontainer. It is coded as
follows:
...                       // instantiate the objects
Slider  = new CATDlgSlider(this, "Sl", CATDlgCtrVertical);
TabContainer = new CATDlgTabContainer(this, "TC");
Editor  = new CATDlgEditor(this, "E");
Spinner = new CATDlgSpinner(this, "Sp");
...
Attach4Sides(Spinner);          // lay them out
Attach4Sides(Slider);           // horizontally in that
Attach4Sides(Editor);           // order
Attach4Sides(TabContainer);
...
|
This container is fully resizable and each container or object contained herein is
resized in width and height proportionally to its initial size with respect to the
container resize. For example, below is a snapshot of the same container after a resize
which increases its width and reduces its height. 
[Top]
Using Explicit Tabulation Lines
The methods SetVerticalAttachment and SetHorizontalAttachment
are the two methods available to create vertical and horizontal tabulation lines
respectively. Use them to define:
- the tabulation line using the integer which identifies it
- the attachment mode
- the objects attached and their order.
They are to be applied to containers. For example:
Container->SetVerticalAttachment(5, CATDlgTopOrLeft,
              Frame, PushButton, Editor, NULL);
|
creates a vertical tabulation line in Container, a pointer to a container
instance, with 5 as vertical tabulation line number, CATDlgTopOrLeft
as attachment mode, and lays out from top to bottom along this vertical tabulation line Frame,
PushButton and Editor, which are pointers to a frame instance, a
push button instance and an editor instance respectively. Note that three keywords only
accommodate the five possible attachment modes: CATDlgTopOrLeft for top and
left, CATDlgCenter for center and CATDlgRightOrBottom for right
and bottom. Movable tabulation lines are declared using the same keywords suffixed by Relative.
[Top]
A Window Layout Example
The following example fully illustrates how to layout many objects in a window or a
container. The main container is a CATDlgWindow instance which contains containers and
controls.
Below is an example of such a window, showing the tabulation lines. The text printed in
each container or control is the identifier of its pointer in the code sample below,
otherwise this pointer identifier is labelled in the figure: 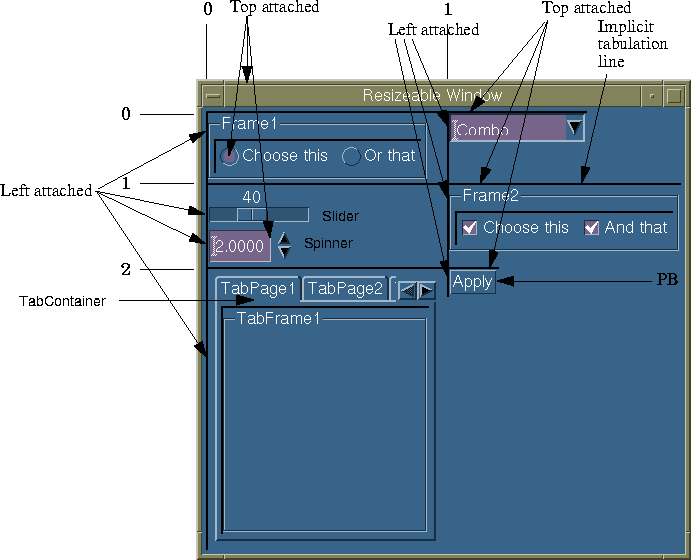
Tabulation lines are always declared, for a given container, from left to right for
horizontal tabulation lines (0 and 1 in the figure) and from top to bottom for vertical
ones (0, 1, and 2 in the figure). Note that each container contained in the window, that
is Frame1, Frame2, and TabContainer, has implicit tabulation lines, one vertical and one
horizontal. The controls located in these containers are laid out horizontally from left
to right by default along the horizontal tabulation lines.
The size of each container or control is determined using its actual contents. The
largest sizes are used to place tabulation lines. For example, TabContainer has the
largest width among the objects attached along the vertical tabulation line \xb0 0 and
thus this width determines the space allocated between the vertical tabulation lines 0 and
1. Space remain available beside Frame1, Slider and Spinner.
The code to achieve that is as follows:
int n = 0;
SetVerticalAttachment(n, CATDlgTopOrLeft,       // 2 vertical
  Frame1, Slider, Spinner, TabContainer, NULL); // tabulation lines
n += 1;
SetVerticalAttachment(n, CATDlgTopOrLeft,
   Combo, Frame2, PB, NULL);
n = 0;                                          // reset not required
SetHorizontalAttachment(n, CATDlgTopOrLeft,     // 3 horizontal
   Frame1, Combo, NULL);                        // tabulation lines
n += 1;
SetHorizontalAttachment(n, CATDlgTopOrLeft,
   Slider, Frame2, NULL);
n += 1;
SetHorizontalAttachment(n, CATDlgTopOrLeft,
   TabContainer, PB, NULL);
|
Note that neither the radio buttons nor the check buttons appear as parameters in these
methods which apply to the main container. As we said previously, they are arranged
horizontally by default in their respective containers Frame1 and Frame2. Note also that
the TabContainer layout can not be customized, even if it uses tabulation lines.
As a variant, we could have chosen to set some attachment modes to CATDlgCenter. For
example, choosing CATDlgCenter to the horizontal tabulation line 2 and to the vertical
tabulation line 1 gives the following result: 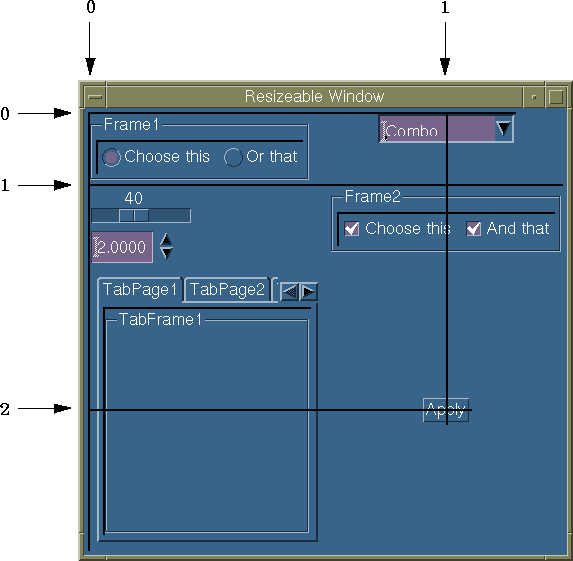
Combo, Frame2 and PB are horizontally centered with respect to the vertical tabulation
line 1. In fact, Frame2 has not moved compared with the previous layout, since this
container is the largest object and determines the space allocated horizontally for this
part of the window. Remind that the size of Frame2 is depends on the texts for each check
button. Note that PB, the push button labelled Apply, is centered in an area which seems
too big for it, this area being sized by its neighbors.
The attachment mode CATDlgRightOrBottom can also be chosen to attach containers and
controls. In the following figure, the vertical tabulation line 0 has a CATDlgTopOrLeft
attachment mode, while the vertical tabulation line 1 has a CATDlgRightOrBottom attachment
mode.
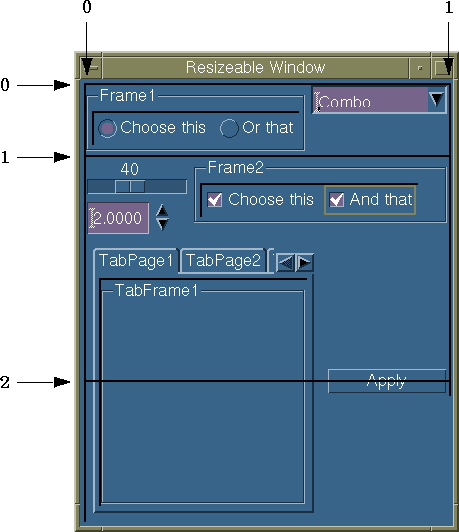
This window is a bit narrower, since space is better used. A Window Resize Example
What happens if the user resizes the window, for example extends it by dragging its
lower right corner. The figure below shows the result when applying such a resize to our
window. 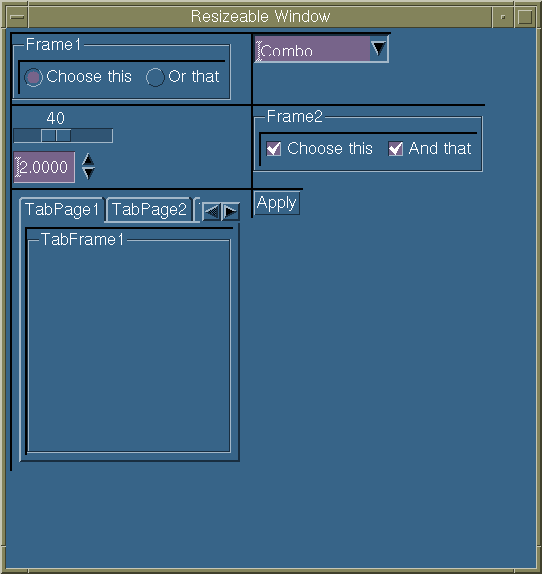
Empty space fills in areas between the objects and the right and bottom side of the
window. No object is resized with the window. In the same way, if the window area was
reduced, some objects might be partly or totally hidden. This is because we didn't use
movable tabulation lines.
Another way for more simple containers in which all the objects are laid out along an
horizontal tabulation line is to use the method Attach4Sides for all the
objects. We have seen that in Using Implicit Tabulation Lines.
Movable tabulation lines are set by means of the suffix Relative to the
tabulation line keywords. Use CATDlgTopOrLeftRelative, CATDlgCenterRelative,
and CATDlgRightOrBottomRelative in place of the previous CATDlgTopOrLeft,
CATDlgCenter, and CATDlgRightOrBottom. This allows for moving
the tabulation lines proportionally with the window resize.
For example, to make Spinner and Frame2 resize vertically with the window, you simply
need to attach them to an additional horizontal tabulation line with the keyword CATDlgRightOrBottomRelative
as follows:
n += 1;                                             // added
SetHorizontalAttachment(n, CATDlgRightOrBottomRelative,  // statements
                        Slider, Frame2, NULL);
|
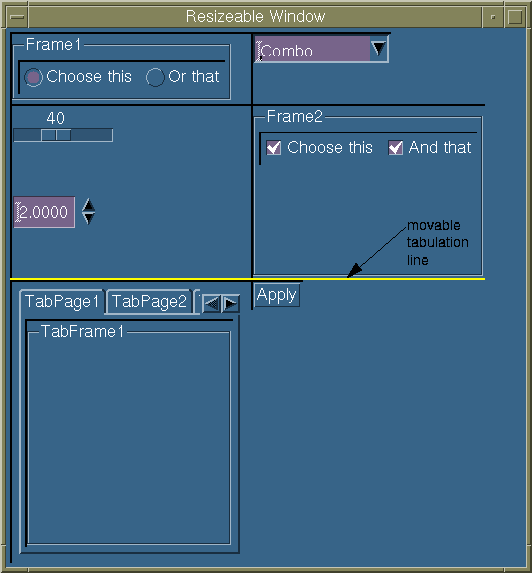
Spinner and Frame2 are resized vertically according to the new window size. Even if the
window increases horizontally, nothing moves since there is no vertical movable tabulation
line.
 Note that you cannot use the same tabulation line in two successive
statements
 SetHorizontalAttachment to attach an object, for example Spinner,
using the keyword CATDlgRightOrBottom, and another object, for example
TabContainer, using the keyword CATDlgTopOrLeft.
If you want that all your objects fully resize with the window, you need to attach each
of them to four tabulation lines: 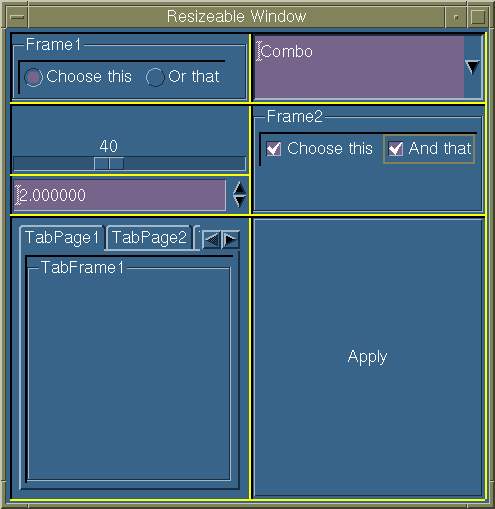
Note that the different objects occupy all the space between their respective
horizontal and vertical tabulation lines. For example, the area dedicated to press the
push button is very large.
This is coded as follows:
int n = 0;
SetVerticalAttachment(n, CATDlgTopOrLeft,
   Frame1, Slider, Spinner, TabContainer, NULL); n += 1; // Vertical
SetVerticalAttachment(n, CATDlgRightOrBottomRelative,    // attachments
   Frame1, Slider, Spinner, TabContainer, NULL); n += 1; // fixed and
SetVerticalAttachment(n, CATDlgTopOrLeft,                // movable
   Combo, Frame2, PB, NULL);                     n += 1; // alternatively
SetVerticalAttachment(n, CATDlgRightOrBottomRelative,
   Combo, Frame2, PB, NULL);  n = 0;
SetHorizontalAttachment(n, CATDlgTopOrLeft,              // Horizontal
   Frame1, Combo, NULL);                         n += 1; // attachments
SetHorizontalAttachment(n, CATDlgRightOrBottomRelative,  // fixed and
   Frame1, Combo, NULL);                         n += 1; // movable
SetHorizontalAttachment(n, CATDlgTopOrLeft,              // alternatively
   Slider, Frame2, NULL);                        n += 1;
SetHorizontalAttachment(n, CATDlgRightOrBottomRelative,
   Slider, NULL);                                n += 1;
SetHorizontalAttachment(n, CATDlgRightOrBottomRelative,
   Spinner, Frame2, NULL);                       n += 1;
SetHorizontalAttachment(n, CATDlgTopOrLeft,
   TabContainer, PB, NULL);                      n += 1;
SetHorizontalAttachment(n, CATDlgRightOrBottomRelative,
   TabContainer, PB, NULL);
|
The resized windows is as follows:
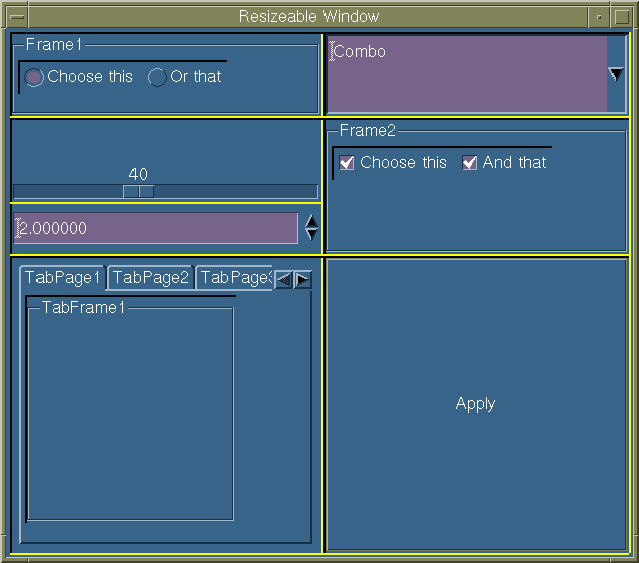
[Top]
Changing Attached Objects and Attachments
You can insert and remove objects into/from a tabulation line. Use the methods InsertAlongHorizontalTab
or InsertAlongVerticalTab to insert an object, and RemoveAlongHorizontalTab
or RemoveAlongVerticalTab to remove one. For example:
Window1->InsertAlongHorizontalTab(3, Editor, Combo, After); // Insert
|
This means that you insert the control Combo after the
control Editor along the horizontal tabulation number 3 in the
container Window1.
Container5->RemoveAlongVerticalTab(5, PushButton); // Remove
|
This means that you remove the control PushButton from the vertical
tabulation line 5.
You can also detach an object from all its attachments within a container by means of
the method ResetAttachment.
Window1->ResetAttachment(Combo); // Reset attachment
|
You thus reset all attachments of the control Combo in the container Window1.
You can also replace an object by another one by means of the method ReplaceKeepAttachment.
For example:
Window1->ReplaceKeepAttachment(Spinner, Slider); // Replace
|
replaces the control Spinner by the control Slider while
keeping the Spinner attachments for Slider.
[Top]
The Object Container Tabulation Layout Specific Programming Tasks
To manage the layout of a container using tabulations, you can use the following
methods. They apply to
Layout using tabulations is available by default, that is, if the CATDlgGridLayout
style is NOT used in the object constructor. With tabulations, you can:
- Manage the frame content default orientation
- Manage tabulation lines and attaching objects along them
- Attach a object using its four sides
The examples use a CATDlgFrame instance:
Managing the Frame Content Default Orientation
The default orientation is taken into account when no other layout information is
provided. This orientation is horizontal. The controls or containers contained in the
frame are placed horizontally one after the other in their instantiation order. This
corresponds to the following call to the SetDefaultOrientation method:
pFrame->SetDefaultOrientation(Horizontal);
|
You can ask for this orientation to be vertical.
pFrame->SetDefaultOrientation(Vertical);
|
Managing Tabulation Lines and Attaching Objects along Them
To manage the tabulation lines, you can:
- Create horizontal and vertical tabulations lines, and attach objects along them, using
the SetHorizontalAttachment and SetVerticalAttachment methods:
CATDlgTabIndex HorTabIndex = 2;
CATDlgAttachment AttachmentMode = CATDlgTopOrLeft;
pFrame->SetHorizontalAttachment(HorTabIndex
                                AttachmentMode,
                                pFirstControl,
                                ...,
                                NULL);
...
CATDlgTabIndex VerTabIndex = 2;
AttachmentMode = CATDlgRightOrBottom;
pFrame->SetVerticalAttachment  (VerTabIndex
                                AttachmentMode,
                                pFirstControl,
                                ...,
                                NULL);
|
The parameters of these methods are:
- The tabulation index. It must grow from left to right for horizontal tabulations, and
from top to bottom for vertical tabulations.
- The attachment mode. It can be set to:
CATDlgTopOrLeft |
The objects are attached using their top sides along an horizontal tabulation line, or
using their left sides along a vertical tabulation line |
CATDlgTopOrLeftRelative |
A CATDlgTopOrLeft tabulation line that enables resizing |
CATDlgRightOrBottom |
The object are attached using their bottom sides along an horizontal tabulation line,
or using their right sides along a vertical tabulation line |
CATDlgRightOrBottomRelative |
A CATDlgRightOrBottom tabulation line that enables resizing |
CATDlgCenter |
The object are attached using their center along both an horizontal or a vertical
tabulation line |
CATDlgCenterRelative |
A CATDlgCenter tabulation line that enables resizing |
- The objects to attach. The list must end up with
NULL
- Retrieve the horizontal and vertical tabulation line indices to which a given object is
attached:
int HorTabIndex;
HorTabIndex = pFrame->GetHorizontalTabIndex(pControl, AttachmentMode);
...
int VerTabIndex;
VerTabIndex = pFrame->GetVerticalTabIndex(pControl, AttachmentMode);
|
- Insert an object along an horizontal or vertical tabulation line with respect to an
already inserted object.:
InsertionMode WhereToInsert = After;
pFrame->InsertAlongHorizontalTab(HorTabIndex,
                                 pControlToInsert,
                                 pReferenceControl,
                                 WhereToInsert);
...
WhereToInsert = Before;
pFrame->InsertAlongVerticalTab  (VerTabIndex,
                                 pControlToInsert,
                                 pReferenceControl,
                                 WhereToInsert);
|
The parameters of these methods are:
- The index of the tabulation aong which the object is to be inserted
- The object to insert
- The object used as reference for the insertion mode
- The insertion mode. It can be set to After or Before
- Detach an object from an horizontal or a vertical tabulation line, or from both:
pFrame->RemoveAlongHorizontalTab(HorTabIndex, pControl);
...
pFrame->RemoveAlongVerticalTab(VerTabIndex, pControl);
...
pFrame->ResetAttachment(pControl);
|
ResetAttachment has the same effect than the two calls to RemoveAlongHorizontalTab and
to RemoveAlongVerticalTab.
- Replace an object by another using the same attachement parameters
pFrame->ReplaceKeepAttachment(pControlToInsert,
                              pControlToRemove);
|
- Attach an object using its four sides
CATDlgCombo * pCombo = new CATDlgCombo(pFrame, "pComboId");
...
pFrame->Attach4Sides(pCombo);
|
[Top]
In Short
The dialog object sizes are determined using their contents, and arranging the layout
of your objects in a container means either leaving the framework do it for you for
containers with few objects which are placed horizontally one after the other in the order
they are instantiated, or add code to attach objects to vertical tabulation lines using
their left or right side and/or horizontal tabulation lines using their top or bottom
side. The center of an object can be used in both cases.
Movable tabulation lines allow to make objects resize when the container is resized.
The keys to object layout are:
- tabulation lines are instantiated with a number and are placed from left to right and
from top to bottom with increasing number order
- objects are placed along the tabulation lines from left to right or from top to bottom
in the order they are referred to in the method
SetHorizontalAttachment and SetVerticalAttachment
respectively
- a single attachment mode can be used along a tabulation line, chosen among
CATDlgTopOrLeft,
CATDlgCenter or CATDlgRightOrBottom
- the suffix
Relative to an attachment mode means that the corresponding
tabulation line is movable with respect to the tabulation line located left or above and
that objects attached to it are resized when the container is resized
[Top]
References
History
| Version: 1 [Jan 2000] |
Document created |
| [Top] |
Copyright © 2000, Dassault Systèmes. All rights reserved.


