This task shows you how to create and edit reaction sensors.
You will also see how to upgrade former reaction
sensors (reaction sensors created before the Version 5 Release 16).
A reaction represents the resulting force and moment at restraint and connection specifications.
Reaction sensors are only available for static analysis solutions.
Open the sample08.CATAnalysis document from the samples directory for this task.
-
Set the Static Case as the current one.
To do this, refer to Changing a Current Analysis Case.
-
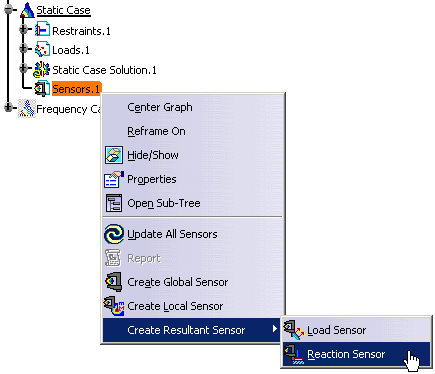
Right-click the Sensors.1 set in the specification tree and select Create Resultant Sensor > Reaction Sensor.
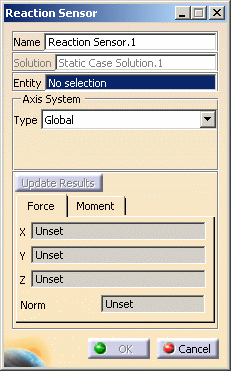
The Reaction Sensors dialog box appears.
-
Name: lets you modify the name of sensor you create.
-
Solution: gives you the name of the solution on which you are working.
-
Entity: lets you select a restraint, a face face connection property or a distant connection property (you can select neither a welding connection property nor a point based connection property).

Multi-selection is not available.
-
Axis System: lets you choose the type of axis in which the reaction sensor will be computed and displayed in the 3D view.
To know more about the axis system, refer to Axis System Type. -
Update Results: lets you launch the compute of the reaction sensor.
-
Force: lets you view the force output characteristics (the X, Y, Z components and the norm).
-
Moment: lets you view the force output characteristics (the X, Y, Z components and the norm).
-
-
Select the desired Entity.
In this particular case, select Clamp.1.
-
Select the desired Axis System.
In this particular case, select Global.
-
Click Update Results.
A warning message appears and informs you that this operation may be long.
-
Click OK in the warning message.
The Computation Status dialog box appears to show the update progress.
The output parameters are displayed in the Force and Moment tabs.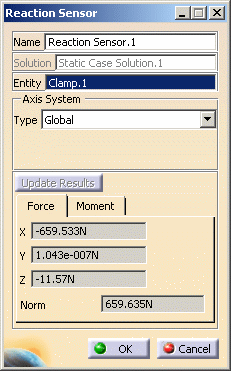
Reaction Sensor.1 appears in the specification tree.

The reaction sensor is already updated.
-
Click OK.
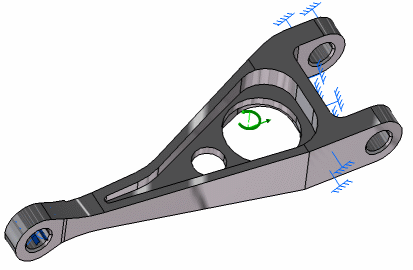
A symbol is displayed on the geometry.
-
You can update a sensor (you just have created or modified) or you can update all the sensors belonging to a sensor set.
-
You can display the value of knowledge parameters in the specification tree.
For more details, refer to Displaying Values of Sensors. -
If you selected a connection property in the Reaction Sensor dialog box, the direction of the reaction vector is given by the effects of the first component of the connection properties on the second component.
You can access the values of the reactions inside any connection using the image edition.
To do this:-
Right-click the Properties set
in the specification tree and select Generate Image.
The Image Generation dialog box appears. -
Select the Point Force Vector
image or the Point Moment Vector image and
click OK.

The Point Force Vector and the Point Moment Vector images are only available if you installed the ELFINI Structural Analysis (EST) product.
-
Double-click the image you just have
generated in the specification tree.
The Image Edition dialog box appears. -
Select:
- Text type in the Visu tab.
- Node of element as Position Value Control in the Filters tab.
- Connection Mesh object in the Selections tab.
- Click OK in the Image Edition dialog box.
For more details about image generation and image edition, refer to Generating Images and Editing Images in this guide.
-
Right-click the Properties set
in the specification tree and select Generate Image.
Upgrading Reaction Sensors
Reaction sensors created before the Version 5 Release 16 must be upgraded.
If you edit a reaction sensor (created before the Version 5 Release 16) before computing the solution, a warning message appears to inform you that the sensor and so the solution must be updated. Then, you can edit the reaction sensor or upgrade it using the Upgrade Sensors contextual menu.
Open the sample32.CATAnalysis document from the samples directory for this task.
-
Compute all the solutions.
To do this, click Compute and select All from the list.
-
Right-click Reaction > Clamp.1 and select Upgrade Sensors
 or
double-click Reaction > Clamp.1.
or
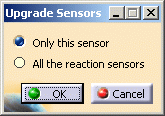
double-click Reaction > Clamp.1.The Upgrade Sensor dialog box appears.
-
Only this sensor: lets you upgrade only the selected sensor.
-
All the reaction sensors: lets you upgrade all the reaction sensors belonging to the current sensors set.
-
-
Select Only this sensor.
-
Click OK.
The reaction sensor values are now displayed in the specification tree.
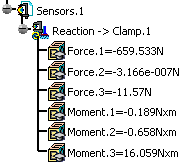
You can now edit the reaction sensor.
To do this: -
Double-click Reaction > Clamp.1 in the specification tree.
The Reaction Sensor dialog box appears.
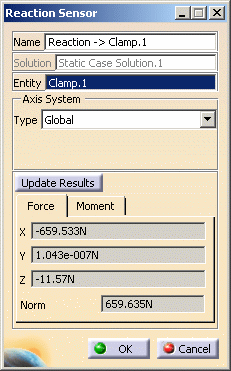
To know more, refer to the description of the dialog box.
-
Click OK.
-
Update the reaction sensor.
![]()
