 |
This procedure describes how to create a video
simulation with NC code. |
 |
Before you can run this procedure, take the following
steps:
-
On the Tools > Options > Machining > Output
tab,
select a Post Processor type for your NC code (e.g.,
ICAM®).
-
On the Tools > Options > Machining > Output
tab,
in the Default File Locations area, specify CATNCCode as the
file extension, and select output locations.
-
Assign an NC machine to the part operation.
-
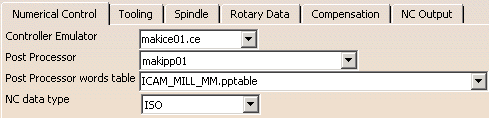
In the machine editor dialog box for the NC machine
(accessible in NC Machine Tool Simulation by right-clicking the machine
on the PPR tree, and selecting machine object > Edit), set
the Controller Emulator, Post Processor, and
Post Processor words table appropriate for your machine and the
Post Processor you selected in Step 1.
 |
 |
The contents of the lists available on the machine editor
dialog box depend on the options selected in Tools > Options >
Machining > Output. |
|
 |
Please see
Video Mode for Material Removal Simulation, from the NC
Manufacturing Infrastructure User's Guide, for information on the
video commands. |
 |
-
Double-click on the manufacturing program in the PPR
tree.
| The program dialog box appears (the name of the
dialog box is the name of the manufacturing program, e.g., 001). |
 |
 |
If your options are set as described above, you
can simply right-click on the manufacturing program, and select
Start Video Simulation using NC Code. |
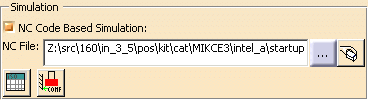
-
Select the NC Code Based Simulation check
box.
| The options in the Simulation
area become available. |
 |
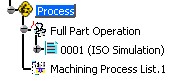
| The manufacturing program on the PPR
tree has ISO Simulation as part of its name. |
 |
|
|
If you alter these selections to return to tool
path-based simulation, ISO Simulation ceases to be part
of the program's name. |
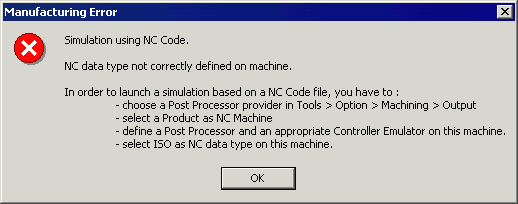
|
If you have failed to set up one of the parameters
correctly, either in Tools > Options > Machining > Output
or in the machine editor dialog box, you receive the
following message: |
|
 |
|
If you receive this error:
-
Click OK on the Manufacturing Error
message
-
Select the Tools > Options > Machining >
Output and machine editor dialog box as described
above
-
Try again.
|
-
(Optional) Click the Edit Program
 button to select an NC or ISO
code file to use as the simulation's source. button to select an NC or ISO
code file to use as the simulation's source.
The NC File field becomes blank when you
click the Edit Program button. Use the Select ISO
File  button
to browse among your directories and select the desired file. button
to browse among your directories and select the desired file. |
|
|
The NC File field is not available unless the
NC Code Based Simulation check box is selected. |
| |
By default, the NC File is interactively generated
from tool path when the NC Code Based Simulation check
box is selected. |
|
|
If you want to modify the workpiece origin or cutter
compensation data before creating the video replay, see
Managing Specific NC Codes. |
-
Click Start Video Simulation
 . .
| Depending on whether you have created any kind of
simulation with this process before, you may see the following
warning: |
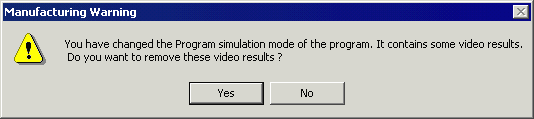 |
| If you receive the above warning, click the
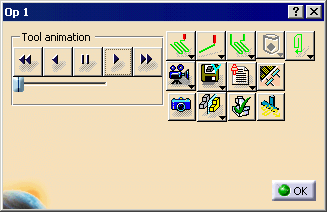
Yes button. |
| The product geometry data appears in a video window
and the video dialog box appears. |
 |
|
|
Instead of selecting Start Video Simulation (which
creates a video from the machining data in the manufacturing
program as it exists at the moment you select the command), you can
select Video from last saved result
 (if you have
previously saved a video result). In that case, you do not
see the progress bar. (if you have
previously saved a video result). In that case, you do not
see the progress bar. |
-
In the Tool animation area, click the
Forward Replay  button.
| The geometric data begins showing the replay; the
NC Code dialog box appears. |
 |
|
|
For more information on the features of the NC Code
dialog box, such as
collision checking and analysis, see
About the NC Code Dialog Box. |
-
Click Associate Video Result with the Entire
Machining Operation  . .
|