RADE Web Application Composer |
Web Application Builder |
Creating an Application to be Integrated to Modular 3DcomCreating a Picture Browser Application Using the Web Application Builder |
| Use Case | ||
AbstractThis article describes the use of the input parameters in the Web Application Editor. In this use case, the user creates a 2 page-application that interacts with the Modular 3d com application and is designed to select pictures in the Modular 3d com interface and to call a Picture Browser application. This application lists the selected files on the first page, and displays a selected picture from the list on the second page.
|
What You Will Learn With This Use Case
This use case is intended to show you how to:
- Create an application that can interact with Modular 3d com and to manage input parameters.
- Set up a CAA V5 build time environment required when using the Web Application Builder product.
It will also teach you how to design the layout of your application, and how to graphically build the associated logic using input parameters. Finally, it will help you through the testing phase of the generated web application on the Websphere Application Server (WAS) Test Environment embedded in IRAD.
| [Top] |
|
|
|
Setting up Your Workspace in IRAD
Before Starting
After installing IRAD, launch launchpad.exe and select
Install Websphere® test environment V6.x.
|
|
Note that this installation only needs to be performed once. If Websphere® test environment V6.x is already installed, skip this step. |
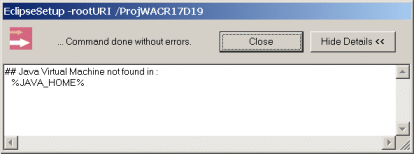
Before launching WAC, you need to set the JAVA_HOME
variable. Otherwise, the following message will be displayed when running the
Get prerequisites or the
Create/Update RuntimeView commands.
 |
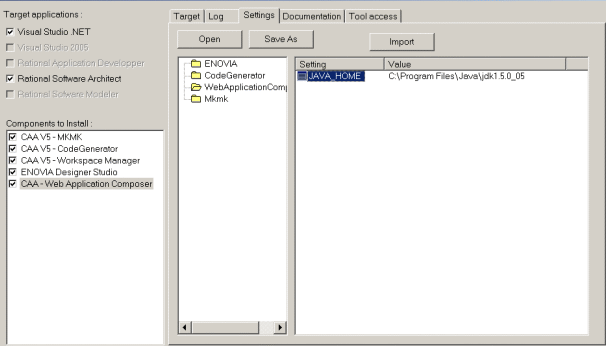
You can set this variable:
- In the system variables.
- In the CAA V5 Development Environment Setup V5R17 window. In this window, select WebApplicationcomposer, double-click JAVA_HOME and enter the desired value (.jdk or jre).
 |
| [Top] |
Creating a Web Project
- From the
Start->Programsmenu, access theIBM Rational->IBM Rational Application Developer v7.0->Rational Application Developerapplication. - In the
Workspace Launcherwindow, clickBrowse...to select the directory that will contain the data. ClickOK. The application opens. - From the
Filemenu, selectNew, thenDynamic Web Project. - In the
New Dynamic Web Projectwindow, enter the name of your project in theNamefield, PictureBrowserApp in this use case, and click theShow Advanced>>button. - In the
Servlet versioncombo box, select2.4. - In the
Target servercombo box, selectWebsphere Application Server v6.0and clickFinish. - Click
Yeswhen asked if you want to switch to the web perspective.
Working With a CAA V5 Workspace
Using Web Application Builder requires to work in a CAA V5 workspace. A CAA V5 file tree is mandatory because many files are created in specific directories from this file tree. Therefore you will need at least a workspace, containing a framework and a module. It is recommended to create a Java package in your module that will be used as a location where the generated classes will be stored.
There are 2 ways to set up such a workspace in IRAD:
- If you work with Java Interactive Dashboard (JID): You can create the required CAA framework/module architecture through the dedicated custom menus. For more information about the way to manage your CAA V5 workspace in IRAD, see the Java Interactive Dashboard article. To know how to create a workspace and a module, see Generating a V5 Directory Structure. To know how to set up prerequisites, see Setting up Prerequisites.
- If the Java Interactive Dashboard (JID) product is not installed:
IRAD provides you with a custom menu allowing you to create your CAA V5
workspace architecture. To access it:
- Display the
Navigatorview in IRAD selecting theWindowmenu, and selectShow View->Navigator. - Right-click your project name and select
Convert to WAC projectin theNavigatorview. This opens a wizard where you will need to provide some information as explained below.
- Display the
- In the
Convert to WAC Projectwindow, selectMkmk(if need be), theTool leveland clickNext>. The levels available in the list depend on your install. The tools are initialized. ClickClosein theInitializing tools...window. A new window opens. - Click
Add...in theConvert to WAC Projectwindow to define the prerequisites of the CAA V5 workspace you are creating. ASelect Directorydialog box is displayed. - Browse to the directory containing the runtime view and click
OK. - Click
Next>once your prerequisites are defined. The Installing Prereqs dialog box is displayed. ClickClosewhen the installation is done. - Click
Closein theEclipse Setupwindow. - In the
Framework namefield, enter the framework name:SampleFwand clickNext>. - In the
Module namefield, enter the module name:SampleMdand clickFinish.
The final step consists in creating a new Java package for the generated classes that will contain the generated logic driving the behavior of your web application.
- Expand the PictureBrowserApp folder in the
Navigatorview. - Right-click the SampleFw/SampleMd.mj/src folder and select
New->Other->Java->Packageand clickNext>to display the window below. - In the
Name field, entercom.dassault_systemes.picturebrowser. - Click
Finishwhen done.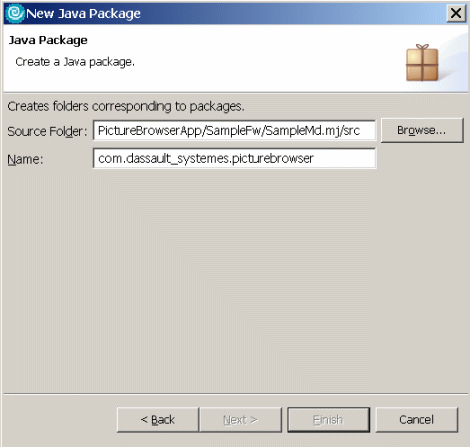
| [Top] |
Creating the Picture Browser Web Application
In this step you are going to create an e-wizard controller file (.XMLCtrl
file) and its dedicated resources (the generated files will be further
described).
- In the
Navigatorview, right-click PictureBrowserApp and selectNew->Other.... The New dialog box is displayed. - Select
CAA e-applicationthenWeb Application Builder Fileas shown below. ClickNext>.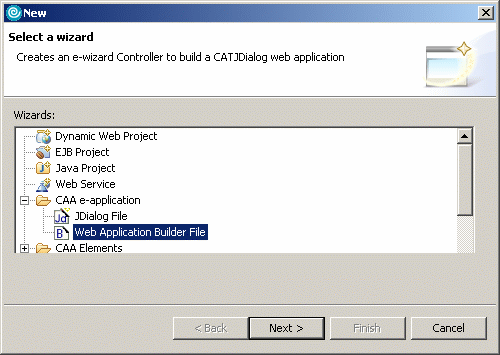
In the Create XML Ctrl window, provide information such as the name of the generated e-wizard controller file, and the location that will be used when generating resources.
- In the Create XML Ctrl window, expand the PictureBrowserApp \SampleFw folder and click the CNext folder.
- In the
XMLCtrl new Filefield, enterPictureBrowserApp.XMLCtrl. - In the Module field of the Generated code information field, click the
Browsebutton and select theSampleMd.mjmodule in the dialog box. ClickOK. - In the Package field, click the
Browsebutton, and select thecom.dassault_systemesJava package that you previously created. - Click the
Next>button to access the next window. - In the
Integration with ENOVIA 3dcom Modularframe, click theavailablecheck box so that the application that you are creating can interact with Modular 3d com. - In the
Icon name (normal)field, click theBrowsebutton. TheOpendialog box is displayed. - Select an icon, the CAAIcon.gif in this use case, and click
Open.
The CAAIcon.gif is the icon that will be displayed in the contextual menu of your Picture Browser. This icon is located in the intel_a\resources\graphic\icons\normaldirectory. - In the
Object typefield, clickAdd. A dialog box is displayed. - Enter
jpgin theEnter type:field and clickOK.
jpg corresponds to the type of file to which the application that you are building will apply. The type indicated here can be any type. You can also add more than one type by clicking Addin theObject typeframe. - Click
Finish.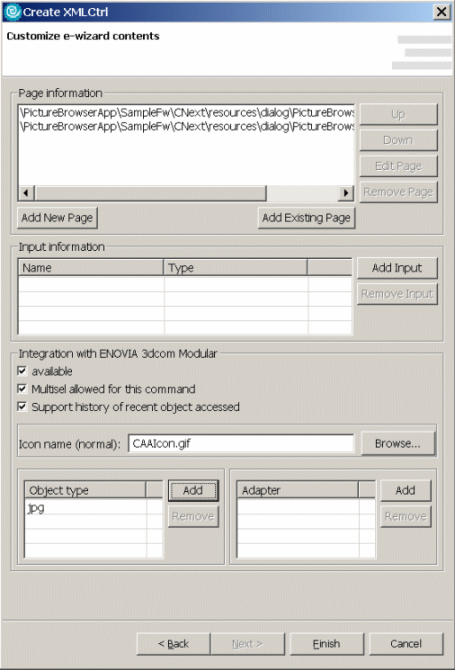
The Web Application Builder editor should now be displayed. If not,
check the Open file for editing when done
checkbox in the creation window. To open it, double-click the
PictureBrowserApp.XMLCtrl file in the
Navigator view. The Web Application Builder editor
contains three tabs referred to in the documentation as the
Layout Editor,
Mappings Editor and the Behavior
Editor.
Building the Generated Code
In the Navigator View, red crosses are displayed in front of the generated
java controller indicating compilation errors. Although the
IdentityCard.h file of the SampleFw and the
Imakefile.mk file of the SampleMd.mj module have been
updated automatically, you cannot directly build your project without errors.
The class path needs to contain the required Jar files.
There are 2 ways to solve these errors:
- If Java Interactive Dashboard (JID) is installed: From the
CAA Projectmenu, selectUpdate libpath based on makefile. This will automatically update your class path. - Without the JID product installed:
- Right-click the
PictureBrowserAppweb project name in theNavigatorview, and selectProperties. - In the Properties for PictureBrowserApp dialog box, select
Java Build Pathand select theLibrariestab. - Click
Add External JARs...and browse to the installation folder (the one of your prerequisites where the runtime view can be found). - Add the 4 following jar files located in the
\intel_a\docs\javaserverfolder and clickOpenandOK.CATJDialog.jarCATJsystem.jarCATJSyODT.jarCATJWACRuntime.jarPPRNBbase.jar
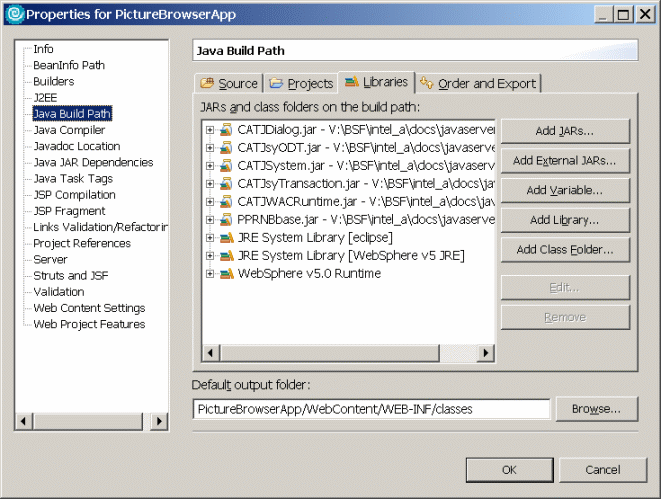
- Right-click the
All compilation errors are now solved.
| [Top] |
Defining the Layout of Your Application
The next step consists in defining the user interface of the web application. By default, it contains 2 main pages.
- The first page will allow you to select the image.
- The second page will display the selected images.
The layout of both pages will be defined through the
Layout Editor. It is an embedded version of
Dialog Builder, another WAC RADE product. For more details about the
layout design, refer to the following technical article :
Working with Dialog Builder.
Creating the First Page Layout
You are going to create the page that will enable you to select the images you want to display. The page must contain 2 widgets:
 |
- 1 top label showing the title of the combo box.
- 1 bottom combo box allowing you to display the list of the selected files in 3d com and to select the images you want to display.
- In the
Layouteditor, double-click the banner. TheProperties for PictureBrowserAppdialog box is displayed. - In the
Titlefield, enterPicture Browserand clickOK. - In the Jdialog Builder toolbar, click the
 widget then the
 widget to add widgets to the first page, and position the widget as shown
above.
|
|
JDialog Builder works with a type of layout called a Grid Layout. This layout manager is widely used among UI builders tools, and will offer much flexibility when designing your pages layout. If you experience issues when dealing with the layout, refer to Working with Dialog Builder. |
Once the layout is defined, you can edit the properties of the widgets. To do so, proceed as follows:
- Right-click Label1 (or double-click it) and select
Properties. - In the
Titlefield, enterSelect a file. ClickOKwhen done. - Click the red line border to move up the combo box and double-click it to
open the
Properties for ComboBox1dialog box. - In the Variable name, enter
_comboand clickOK. This widget is published.
| [Top] |
Creating the Second Page Layout
You are going to create the page that will display the images selected in the first page.
- Access the second page of the application. To do so, you can:
- Click
Next>directly in theLayoutEditor. - Use the
Outlineview and selectPictureBrowserAppPage2.
- Click
- Click the
 widget. The Label1 widget is displayed. Expand the widget so that it fits the
page. To do so, double-click it to open the
 Propertieswindow, and checkfillin thehorizontal alignmentand thevertical alignmentfields. - In the
variable namefield, enter_imageand clickOKto validate. This widget is published.
Defining the Behavior of Your Application
Defining the Behaviors of the First Page
Defining the Behavior to Initialize the First Page
- In the
Outlineview, double-click the first page (PictureBrowserAppPage1) to open thePropertiesdialog box. If this view is not available, selectWindow->Show View->Outline.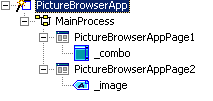
- In the
Onshowfield, entershowPage1and clickOKto validate. - In the
Outlineview, click onShow.showPage1(). The Behavior editor is displayed. - You are going to design the behavior of the Picture browser
initialization. From the
Add widgetmenu, select_comboand click the drawing area. _combo is displayed in the Behavior Editor. The combo box needs to be filled with the .jpg file names selected in the 3d com interface.
Since this application is created for a 3dcom integration, the type of the input parameter [3] that you are going to create is set to PortalUID[] (a PortalUID is an object allowing you to identify any object in the portal interface). Since multi-selection is available for this command, InputParameter is a table of PortalUID.
- From the
Create Componentmenu, selectInput Parameterand click the drawing area.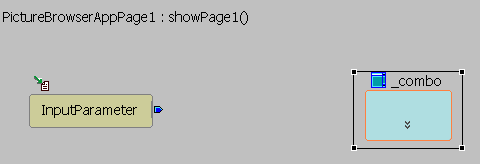
- From the
Create Componentmenu, selectUser Actionand click the drawing area. A dialog box is displayed. - Enter getFileList in the
Method Namefield, and clickAdd Input. - Enter InputParameter in the
Namefield and selectPortalUID[]in the type list. ClickOK. - In the
Return Typelist, selectString[]and clickOK.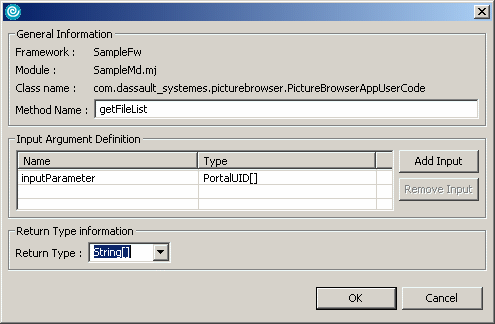
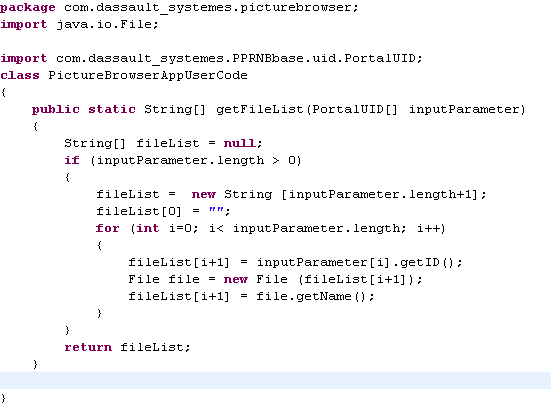
- Enter the code below in the page that opens:
- Click the PictureBrowserApp.XMLCtrl tab page and from the
Toolsmenu, clickCreate Linkto create a link between theInputParameterwidget and the User Action. - Expand the
_combowidget properties list by clicking its double down arrows icon. - Click
CreateLinkfrom theToolsmenu, and create a link between the User Action and theItemListproperty of the_combowidget.
Defining a Behavior For Selection in the Combo Box
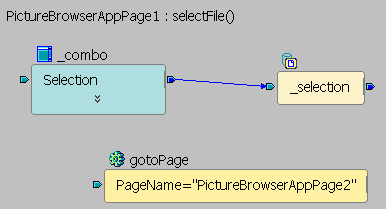
- In the
Outlineview, double-click _combo. ThePropertiesfor_combowindow is displayed. - In the
onComboActivatedfield, enterselectFileand clickOK. - In the
Outlineview, click onComboActivated.selectFile(). TheBehavioreditor is displayed. - From the
AddWidgetmenu, select the _combo widget and click the drawing area. - From the
CreateComponentmenu, selectSession Dataand click the drawing area. TheCreate a new SessionDatadialog box is displayed. - In the
Namefield, enter_selectionand selectStringin theTypescrolling list. ClickOKwhen done. - Expand the
_combowidget properties list by clicking its double down arrows icon. - Click the
Create Linksub-menu in theToolsmenu, and create a link between theSelectionwidget and the_selectionwidget. - From the
Create Componentmenu, selectHelperand click the drawing area. TheAdd Helperdialog box is displayed. - Expand the
Miscellaneousnode, and checkgotoPage. ClickOKwhen done. This way, in your Picture Browser, pages will change automatically after selecting a jpg file.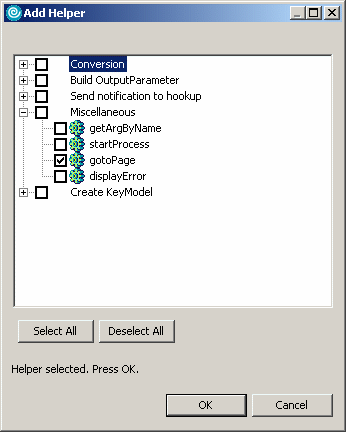
- In the
Propertiesview, select thePage Nameline and enter PictureBrowserAppPage2.
The helper is created.
 |
Creating the Behaviors of the Second Page
- In the Outline view, double-click the PictureBrowserAppPage2. The
Properties for PictureBrowserAppPage2dialog box is displayed. - In the onShow field, enter showPage2 and click
OK. - In the
Outlineview, click onShow.showPage2(). TheBehavioreditor is displayed. - From the
AddSessionDatamenu, select the_selectionsession data and click the drawing area. - From the
Addwidgetmenu, select_imageand click the drawing area. - Expand the
_imagewidget properties list by clicking its double down arrows icon. - Click
CreateLinkin theToolsmenu, and create a link between the_selectionsession data and theImageproperty of the_imagewidget so that the title and the image of the _image label can be initialized with the _selection value. - Click
Create Linkin theToolsmenu, and create a link between the_selectionsession data and theTitleproperty of the_selectionwidget.
- Save your work.
Creating the Runtime View
If you work with Java Interactive Dashboard (JID), create the runtime
view of your project in IRAD. To do so, from the
CAA Project menu, select
Create/Update Runtime View.
If you do not work with Java Interactive Dashboard (JID): Open a Command window and enter:
$INSTALL-RADE intel_a\code\command\tck_init.bat |
|
|
For JNI Licensing reasons at runtime, IRAD needs to be launched in a particular environment to execute 3dcom
applications in a Websphere Test Server.
|
Launching the Application on a Test Server
|
|
If you have already gone through the
Creating Your First Web
Application use case, we recommend you to work with the same server. If
not, create a new server and set it up (see below.)
Prior to launching the application on a test server, you must have installed 3d com and DB2. |
This paragraph provides you with the required configuration steps before running your web application in a web browser.
- From the
Windowmenu, accessShow View->Servers. TheServerstab is displayed. - Right-click the server field, and select
New->Server. TheNew Serverwindow is displayed. - Select
Websphere v6.0
   Server
and clickFinish.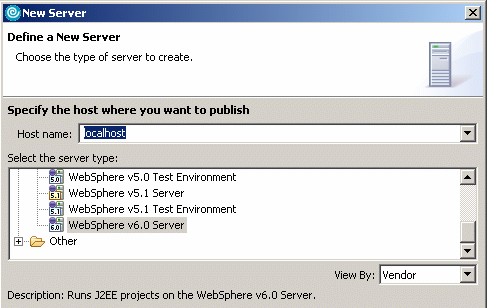
- In the
Serverstab, right-clickWebSphere v6.0 Server@localhost, and selectStart. - Right-click and select
Run Administration Console. - Enter your identifier in the
User IDfield. The Administration Console opens. - Expand the
Serversnode and clickApplication servers. - In the
Applications
   servers
frame, clickserver1.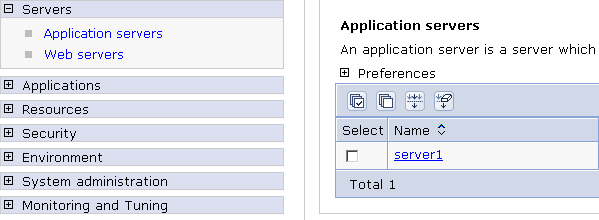
- Expand the
Securitynode, clickGlobal security. SelectJAAS Configuration Authentication>J2C Authentication Data.Click New. Enter the db2 administrator Alias(db2adminin this use case) in theAliasfield and the administrator password. Here, copy/paste this string into theUser IDand thePasswordfields.
Enter the description admin user for DB2 in theDescriptionfield.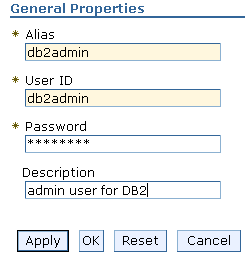
Click OK, andSave. - Expand the
Environmentnode. SelectWebSphere Variables.- In the
WebSphere Variablespage, clickDB2UNIVERSAL_JDBC_DRIVER_PATH.
- In the
Role
           from
value field, enter the name of the directory containing thedb2jcc.jarfile.
- Click
OK,Save. Click theSavebutton.
- In the
- Expand the
Resourcesnode and clickJDBC Providers.- In the WebSphere Variables page, select
Node.
- Under
Preferences, clickNew.
- In
Step 1, selectDB2as database type.
- In
Step 2, selectDB2 Universal JDBC Driver Provideras provider type.
- In
Step
           3
, selectConnection pool data sourceas implementation type. ClickNext.
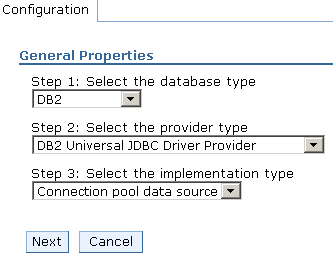
- Click
OKandSave. Click theSavebutton. the provider is created.
- In the WebSphere Variables page, select
- Select the provider you created. In the
JDBC Providerswindow, clickData Sourcesand clickNew.- In the
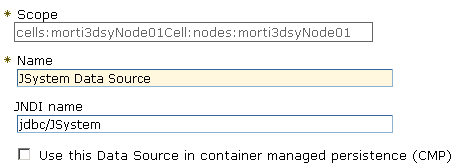
Namefield, enterJSystem Data Source.
- In the
JNDI
           name
field, enterjdbc/JSystem.
- Uncheck
Use
           this Data Source in container managed persistence (CMP)
.
- In the
Component-managed authentication aliaslist, select the alias you have created.

- In the
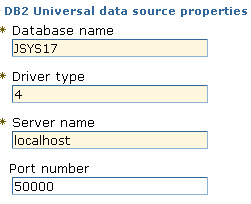
DB2
           Universal data source properties
frame, enterJSYS17in theDatabase namefield. Enter4in theDriver typefield. Enterlocalhostin the Server name field. Enter 50000 in thePort numberfield.
- Click
OKandSave. Click theSavebutton.
- In the
- Test the connection. To do so, click
Test Connection. - Add some jpg files in the
intel_a\resources\graphicdirectory of your workspace so that you can view these images in the picture browser application (PictureBrowserApp.) - Right-click the
PictureBrowserAppweb project name in theNavigatorview, and selectRun->Run on Server. - Make sure the server previously created is selected and click
Finish. Wait for the server process completion. - Open Internet Explorer, and enter
http://localhost:9080/PictureBrowserApp/html/enovia3dcomand hit theEnterkey. Your application opens.
|
|
If you encounter licenses problems:
|
You are now going to make sure that the favorites are correctly set.
- Select
Favorites->Favorite Configurationand clickRemove data sourcesthenUpdate data sources.
 |
- Click the
Navigatornode and select theCAA Locale Filetab. - Check
Enabledand make sure that theWeb Servicefield is blank and thatStartis set to auto. - Click
Checkto make sure that everything is OK. ClickOKwhen done.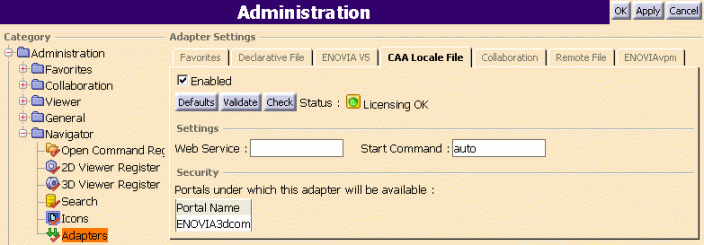
- Close Internet Explorer and open a new one using the same URL (http://localhost:9080/PictureBrowserApp/html/enovia3dcom).
- Right-click
CAA Locale Fileand selectAdd to Navigator. Navigate to theintel_a\resources\graphicdirectory located in your workspace. - Right-click the .jpg files that you want to display. Since .jpg files are
selected, the Picture Browser is available in the contextual menu as one of
the actions available for .jpg files. Select
PictureBrowserAppfrom the contextual menu.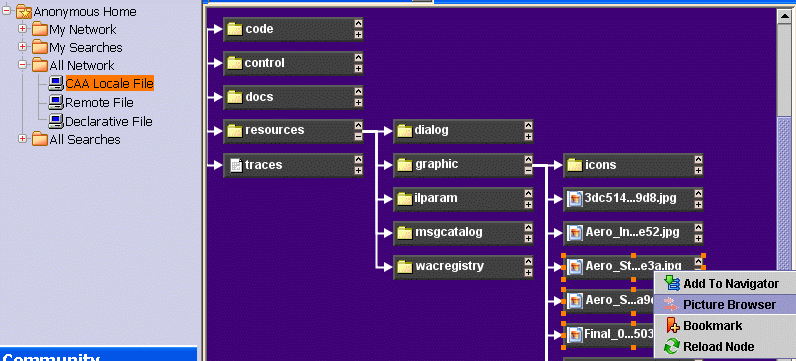
The application is initialized with the list of selected .jpg files displayed in the combo box.
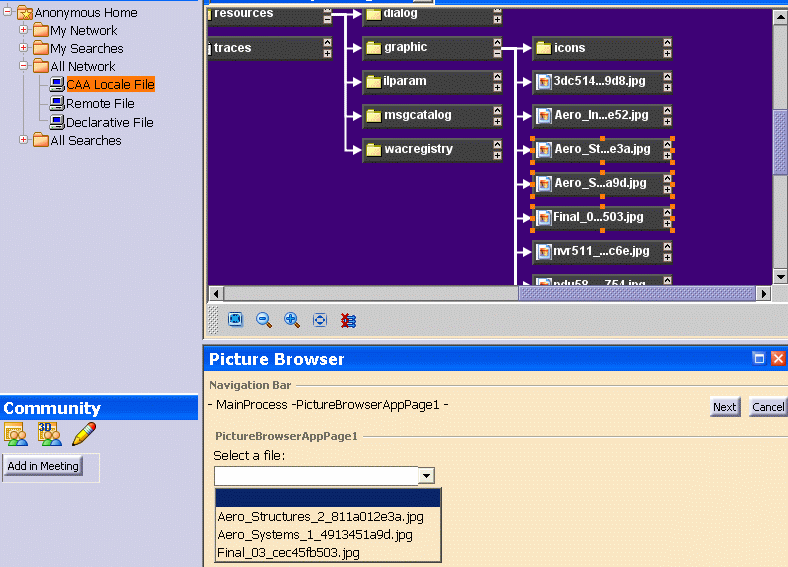 |
- Select a picture to display it in the viewer.
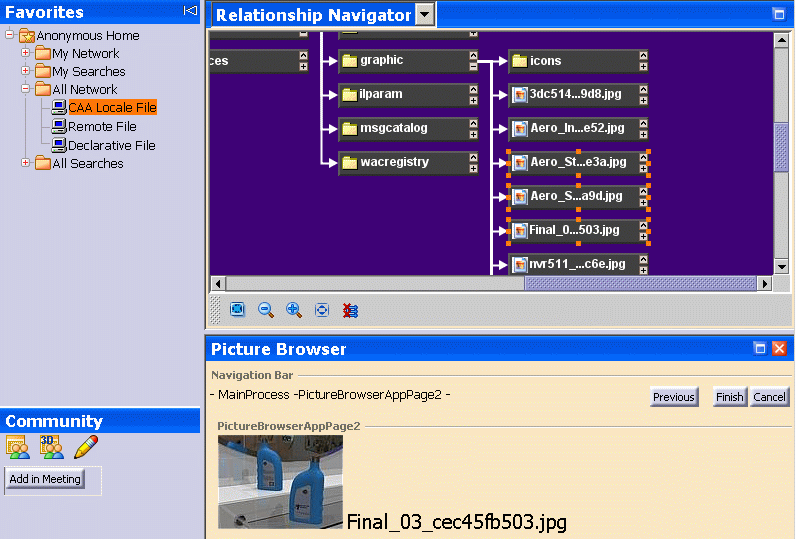 |
- Click
Previousto select another graphic.
| [Top] |
In Short
This use case has demonstrated the way to develop an application and to integrate it into 3Dcom. It illustrates how to:
- Define the layout of an application
- Define behaviors of the application
- Create a predefine Helper
- Use InputParameters to work on the files selected in the 3dcom interface
- Create a UserAction to define user source code
- Manipulate a PortalUID object in user source code.
| [Top] |
References
| [1] | CATJDialog Overview |
| [2] | Java Interactive Dashboard |
| [3] | Working with the Web Application Builder |
| [4] | Working with Dialog Builder |
| [5] | WAC Troubleshooting |
| [Top] | |
History
| Version: 1.01 [December 2005] | Update |
| Version: 1.00 [July 2005] | Creation |
Copyright © 1994-2006, Dassault Systèmes. All rights reserved.