RADE Web Application Composer
|
Web Application Editor
|
Working with the Web Application Builder
Building a Web Application with JDialog |
| Technical Article |
Abstract
This article describes the use of the Web Application Editor embedded in
IRAD 6.0.
|
|
Before You Start
Make sure you have:
- Checked ENOVIA Designer Studio and CAA - Web Application Composer
in the CAA V5 Development Environment Setup window. To find out more, see customizing the RADE Interactive Tools.
- Run the process described in
Installing RSx.
Creating a Web Application
Before starting
First of all, a Dynamic Web Project must be created by using the standard
wizards of IRAD 6.0.
A Web Application can only be created in a CAAV5 workspace. There are 2
ways to create it:
- If you work with Java Interactive Dashboard, use
Open CAA V5 Workspace available from
the contextual menu of the Navigator
view.
- If you only have the Web Application Composer product, use
Convert to WAC available from the
Navigator view contextual menu.
The workspace must contain a framework containing your Web Application, a
module for its associated java controller files and a package. They can be
created using Java Interactive Dashboard tools (wizards in IRAD 6.0 are also
provided by the JID RADE product for CAAV5 framework and module creation)
Using the IRAD 6.0 Wizard
The Web Application builder provides a wizard to create easily a new Web
Application. To access this wizard, from the File
menu, select New->Other...->CAA e-application/Web
Application Builder file.
This wizard creates the following files:
- One .XMLCtrl file describing the data flow and behavior to be started
on GUI events. This file is created in the Framework\CNext\resources\dialog
directory.
- One .XMLMap file for data mapping definition between widgets and
Actions. This file is created in the Framework\CNext\resources\dialog
directory.
- As many .XMLDlg files as you have created pages in your wizard. These
files are created in Framework\CNext\resources\dialog
directory.
- One CATNls file for each XMLDlg created and one for the XMLCtrl
itself. These files are created in the Framework\CNext\resources\msgcatalog
directory.
- One .java file for the controller associated to the GUI. This file is
created in the Framework\module.mj\src\package directory.
The IdentityCard.h of your framework and the Imakefile.mk of your module
are automatically modified to include your build dependencies.
At the end of the wizard process, all essential resources ( files )
required by a web application are available, and the user can now proceed
with designing his application and thereby populating the files.
[Top]
Creating the Graphic User Interface
Web Application Builder provides you with a toolbox that enables you to
create a web application. The tools contained in this toolbox are the
following:
- Processes and sub-processes
- Pages
- Widgets
- Behaviors
- Session Data
- Actions
- Links
- Action Clicks
Processes and sub-processes
A Web Application is composed of a main process (necessarily a Wizard
process) and can contain many sub-processes. You can call a sub-process from
the main process but you cannot call a sub-process from another one. A sub
process can be started from any page of the main process. When the
sub-process has unrolled its execution, it returns to the page where it was
called from. When the main process ends, you return where you started the Web
Application.
There are 2 types of processes:
- Dialog process: composed of one single page with a set of
OK / Apply / Cancel buttons.
- Wizard process: composed of a set of ordered pages with a set of
Next / Previous buttons.
Creating a process
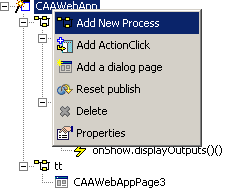 |
To create a process, proceed as follows:
- Right-click the main process in the
Outline view.
- Select
Add New Process.
Enter the process name and select its type in the dialog box that
is displayed.
- Click
OK when done.
It automatically creates a page under the new created process. The
sub process is created in the application, along with a new page.
|
Deleting a process
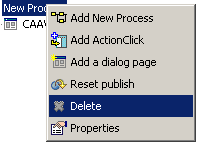 |
To delete a process, proceed as follows:
- Right-click the process that you want to delete in the
Outline view.
- Select
Delete. You
are asked to confirm the deletion. Deleting a process causes all
embedded pages and all behaviors under those pages to be deleted
too. So be very careful when deleting a process.
 |
Note that the main process cannot
be deleted. |
|
[Top]
Pages
When called, a process displays its starting page, and then follows
sequentially through all the pages until the last page is reached, then the
application returns to the calling process. When the last page of the main
process is reached, the application finishes.
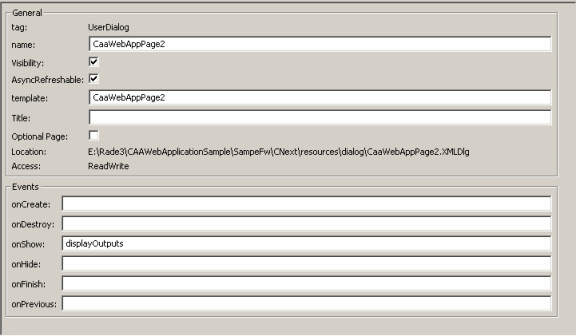
A page is characterized by its properties and events (You can perform
actions on each of those events). To access this information, right-click the
page in the Outline view, and
select Properties.
|
Properties |
Events on pages |
- Name : internal Jdialog name of the page
|
onCreate |
dispatched at the
initialization of the application for each page composing your Web
Application |
- Visibility : if checked the page will be shown at the execution
|
onDestroy |
When your Web Application
finishes an 'onDestroy' event is dispatched for each page too. |
- Template : the name of the XMLDlg files where the UI of the page
is stored
|
onShow |
dispatched from a page when
the page appears on screen. It's a common way to initialize your page |
- Title : the NLS name of the page
|
onHide |
dispatched from a page when
the page is replaced by another one. It is always dispatched before
events such as : onNext, onPrevious, onOk,
onApply, onCancel, onFinish. |
|
onNext |
Those events are
enabled depending of the position of the page and on the kind of the
parent process. They are dispatched when the click of the corresponding
button occurs. |
|
onPrevious |
|
onOk |
|
onApply |
|
onCancel |
|
onFinish |
Adding a page
To add a new page, proceed as follows:
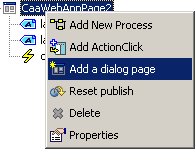 |
- Right-click a page or a process in the
Outline view.
- Select
Add a dialog page
from the contextual menu.
- Check the
Insert before selected
             page
or the Insert after
selected page option according to your needs.
 |
When your Web application is
started, all the pages are created at the beginning. |
|
Deleting a page
To delete a page, proceed as follows:
- Right-click the page that you want to delete in the
Outline view.
- Select
Delete from the
contextual menu. A dialog box appears asking you to confirm the
delete operation.
 |
Be careful when deleting a page: all
widgets and all actions triggered on the page or on the widgets
events of this page will be deleted too. |
|
Widgets
The DialogBuilder lets you manipulate JDialog basic widgets, as well as
your own custom widgets.
Setting widgets
The properties of the widgets are available in Read/Write mode. To set a
property with a constant value, you can either right-click the widget and
select Properties from the
Layout tab or from the
Behavior tab, and set the property. If
you want to read or write a property with a value computed at runtime, set
it by creating data links in the Behavior
tab.
Inserting widgets
 |
Standard
You can insert any widgets into the current page. To do so,
proceed as follows:
- click this widget in the toolbar or
- select it from the
Insert
Menu.
 |
The layout manager is a "Grid
layout" implementation. Grid Layout is a very common layout
manager for many UI Builders. Grid layout is very powerful
and should allow you to create almost any layout.
The position of the widget is given by a grid layout. For
more information about widgets and grid layout please refer
to
JDialog Documentation. |
Custom
You can also insert your own custom widgets in your layout. A
custom widget is a widget defined by the user in terms of render
and behavior.
To do so, proceed as follows:
- Declare your own custom widgets so that they are available in
the DialogBuilder
- Create a new XMLWidget file and store it in the
resources\widget directory of the runtimeview. This XMLWidget
file must be stored in the runtimeview of the current workspace,
or in the concatenation of its prerequisites workspaces.
When creating this file, use the following syntax: <?xml
version="1.0"?> <Widget Description="a comment to describe the
widget" class="Complete name of the widget implementation class"
/>.
For this new widget to be taken into account by the
DialogBuilder, 2 images must be declared, one for the icon
symbolizing the custom widget, the other for the layout in the
DialogBuilder.
- Add the following tags to the XMLWidget file:
Icon="name of the icon located in resource\graphic so that the
widget is displayed in the Insert menu in DialogBuilder"
Preview="Name of an image located in the resource\graphic
directory used by the DialogBuilder when the widget is inserted
into the JDialog page"
- From the
Insert
menu, select the Others
sub-menu.
- Select the widget you want to insert. All custom widgets
found in the runtime view concatenation of your workspace are
displayed and can be used from here. For more information about
custom widgets refer to
JDialog Documentation.
For each XMLWidget file found in the runtime view of your
workspace or in the runtime view of your prerequisite workspaces,
the corresponding icon is added in the DialogBuilder Toolbar,
allowing you to manipulate a custom widget the same way as any
basic JDialog widget. When a custom widget is inserted in a window,
the preview image declared in the XMLWidget file is used for the
layout in DialogBuilder.
Remember that: XMLWidget files must be located in
the resources\widget directory, and the 2 images for the Icon and
the Layout must be located in the resources\graphic directory of
the runtime view. Don't forget to update your workspace's runtime
view after creating your custom widget, by running
mkCreateRuntimeView or
mkrtv, in order to see it from
within the DialogBuilder.
By default, the widget is inserted into the first empty cell
found in the layout. If there are no empty cells, a new row is
created at the bottom of the layout. |
Publishing widgets
Publishing a widget enables you to use this widget in a behavior. It
means that you will be able to assign a role to this widget event and to
access and modify its properties in a behavior.
To publish a widget, proceed as follows:
- Double-click the widget to access the Properties window
.
- Assign it a variable name (use the Properties view or the Properties
dialog box.) The variable name given to the widget appears in the
Outline View along with the icon
corresponding to its type.
 |
Behaviors can only modify the properties
of published widgets. Widgets that are not published or simply not
visible. The scope of a widget is the page of the wizard that contains
it. |
Resetting a published widget
You can reset published widgets. This deletes the variable name. In
other words, the widget cannot be used in behaviors any longer but it still
appears in the layout.
Deleting a widget
If you delete a widget from a behavior, you simply remove it from the
graph. But it will not be deleted from the page layout. If you want to
remove it permanently from the layout, select it and delete it from
the Layout tab. You will be asked to confirm the delete operation. A widget
can potentially be used by all the behaviors of your application. Make sure
before deleting a widget that no behavior is using it.
To delete a widget, proceed as follows:
- Right-click the widget that you want to delete in the
Outline view.
- Select
Delete. A dialog box
is displayed asking you to confirm the delete operation.
 |
Be careful when deleting a widget.
Triggered behaviors on this widget will be deleted too if those
behaviors are no more triggered by other widgets. |
Grid Layout
The layout manager provided by JDialog is a "Grid Layout" implementation. Grid
Layout is a very common layout manager for many UI builders. Grid layout is
very powerful and should allow you to create almost any layout. For more
information on how JDialog manages the Grid Layout, see
Defining the command
layout
[Top]
Defining Behaviors and Logic
We have seen previously how to create a Graphic User Interface. Now you are
going to learn how to define 'behaviors' triggered by the user interface events
and to define the logic of your application.
Behaviors
A behavior defines a sequence of actions to be performed on events.
You can trigger behaviors on:
- Page events and/or on
- Published widget's events
Inside a behavior you can:
- retrieve data stored in SessionData (accessible from every
behavior)
- retrieve data from every published widget in the current page
- modify data in every published widget in the current page
- invoke code written in java.
A java class called a Java Controller is associated to your Web
Application. When you save your work: a java method is generated in the
controller for each defined behavior. Since the behaviors are associated
to GUI events, the appropriate java method is automatically called when
the event occurs in your Application.
Defining a new behavior
You can define a new behavior by editing the properties of the trigger
object. To do so, proceed as follows:
- From the Layout tab page of the editor, select the current page, or
a published widget.
- Display its properties by double clicking on the selected component
- Enter the name of the behavior associated to the requested event of
the selected component. The behavior is created and the corresponding
tab page appears in the editor.
Re-using an existing behavior
You can trigger the same behavior from many events inside the same
page. For example, you may want to trigger a behavior to reset published
widgets of the page on the 'onShow' event of the page and on the 'onButtonActivated
' event of a published button of the same page. You don't need
to define the same behavior twice.
To do it, simply give a name to the first trigger event to create the
behavior. Now give the same name to the second trigger event. Each time
one of those events will occur, the same behavior will be started.
 |
The scope of a behavior is the current
page. Therefore that you cannot refer to a behavior defined inside a
different page. |
Deleting a behavior
There are 2 ways to delete a behavior:
- Delete the name of the behavior from the Event field of the
Properties window of the triggered
object.
- Select
Delete from the
contextual menu on the selected behavior in the
Outline view.
 |
A behavior is deleted only when no more
event is associated to it and is triggered by the second event. If
you want to delete it permanently, delete it from each trigger event. |
[Top]
SessionData
SessionData are data storage entities available through your Web
Application. With a SessionData, you can store the execution result of an
Action (User Action or Helper) and re-use it later in another behavior of
another page. It is the only way to transfer data from one page to
another. The type of a SessionData may be one:
 |
As a general guideline, try to keep the
amount of data stored in your SessionData as small as possible. |
Creating a SessionData
To create a SessionData, that can be shared by all applications,
proceed as follows:
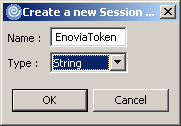
- In the Behavior view, select
Create
         Component->SessionData
, and click the Behaviors view. A
new SessionData is created.
- Enter its name and select its type in the Type scrolling list.
 |
Blanks are not authorized. You have to
give a different name to each SessionData. |
Storing data in a
SessionData
You can store data in a Session Data by creating a DataLink between a
widget property or the output of an Action and your SessionData.
Alternatively, you can also store constant values in SessionData by
editing the Session Data properties. At runtime this constant value is
set at the initialization of your Web Application. Remember that a
constant value can be overwritten at any time should a behavior be
invoked that changes the SessionData value.
Deleting a Session Data
You can delete a SessionData by selecting it from a behavior and by
selecting Delete.
 |
A Session Data can potentially be used
by all of the behaviors of your Application. Make sure before
deleting a Session Data that no behavior is using it. |
[Top]
Actions
Actions are components performing operations on data. There are 2
types of Actions.
Actions have arguments, defined as Input, Output or Input/Output.
Using helpers
Helpers are pre-defined command actions designed to help you when
creating your Web Application. Helpers are executed locally on the server
when the Web Application is running.
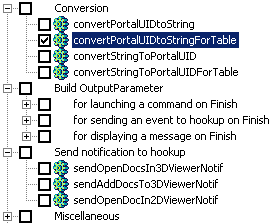 |
To create a helper, proceed as
follows:
- Select
Create Component->Helper.
- Click in the Editor. The Add Helper dialog box is displayed.
- Select the helpers you want to use.
- Click
OK when done.
|
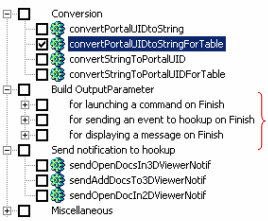
Helpers are broken down into 5 categories:
| Conversion |
convertPortalUIDtoString |
Helper enabling to convert a PortalUID
object to a string. |
| convertPortalUIDtoStringForTable |
Helper enabling to convert a PortalUID
object to a string to be used in a table. |
| convertStringToPortalUID |
Helper enabling to convert a string
into a PortalUID object. |
| convertStringToPortalUIDForTable |
Helper enabling to convert a string
into a PortalUID object to be used in a table. |
| Build Output Parameter |
For launching a command
on Finish |
Helper enabling to build the output
parameter to launch a command when the current action is done. |
|
For sending an
event to hook up on Finish |
Helper enabling to build the output
parameter to send an event to the hook up when the current action
is done. |
|
For displaying a
message on Finish |
Helper enabling to build the output
parameter to display a message when the current action is done.
|
| Send notification to
hook up |
sendOpenDocsIn3DViewerNotif |
Helper enabling to send a notification
asking to open a document in a 3D viewer. |
| sendAddDocsTo3DViewerNotif |
Helper enabling to send a notification
asking to add a document in a 3D viewer. |
| sendOpenDocsIn2DViewerNotif |
Helper enabling to send a notification
asking to open a document in a 2D viewer. |
| Miscellaneous |
getArgByName |
Helps the developer retrieve one
argument in the InputParameter String[]. Note that this helper can
only be used if the InputParameter has the following format:
- InputParameter[0]="arg Name 0 = arg value 0"
- InputParameter[n]="arg Name = arg value n"
It has input arguments:
- String InputArguments which is the full InputParameter
- String argName which is the name of the argument to retrieve.

Note that the return value of this helper is a string containing
the argument value. |
| startProcess |
Helper enabling to jump to a given
page and to come back to the first page when the sub-process is
finished. |
| gotoPage |
Helper enabling to jump to a given
page. |
| |
displayError |
Helper enabling to display an error.
|
| Create Key Model |
for CATTable |
Helper enabling to fill in a JDialog
table with a single column.
|
Using user java code
The Application Builder provides you with a way to write your own java
methods. The method will be defined as public static. It can take in
input as many arguments as you want, and return one argument. Handled
arguments types are:
Creating a user java code
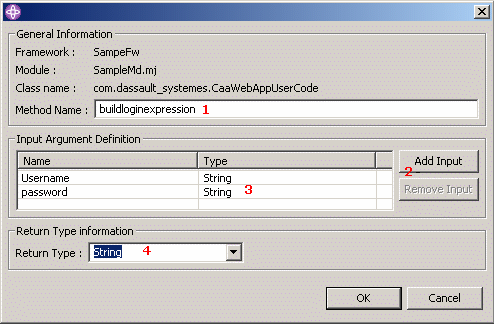
To create a new Java Method, proceed as follows:
- Select
Create Component->User Action.
A dialog box is displayed.
- In the
Method Name field
(1), enter the name of the method.
- Click the
Add Input button
(2) to enter the name of the
argument (3) and select its type in
the scrolling list. Click OK
when done.
- In the
Return Type information
(4) scrolling list, select the type
of the return argument.
- Click
OK to validate. A
public static method is created.
The Class name which contains the method is
WebApplicationNameUserCode where WebApplicationName is the name you
have given when you created your Web Application with the dedicated
wizard. If this class does not exist, the tool generates it.
[Top]
Datalinks
Datalinks are links that define the data flow between widgets,
sessionData ,and actions. A Datalink enables you, for example, to set the
arguments of a User Action with values extracted from a widget or
SessionData, to store the output of the User Action execution in a widget
property or a SessionData.
Creating Datalink
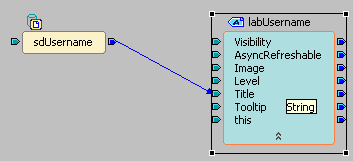 |
A Datalink can be created between only
two 'plugs'. Plugs can be widget properties, Action arguments or
sessionData. You can create as many links as you want in a
behavior. |
To create a link, proceed as follows:
- Select
Tools->Create Link.
- Click the body of a component (Widget, Action, SessionData) and
choose the data source of the link in the pop-up list displayed.
- Click the target component and choose the target argument in the
new pop-up list.
Performing a mapping
When creating a datalink, you set the value of a variable at the
extremity of the datalink from the value of the variable at the origin of
the datalink. in many cases, the type of these variables is different and
you need to specify how to convert the transmitted value from one type to
another. This is called mapping. Depending on the variables, the datalink
can be:
- A Datalink which does not need mapping (displayed in green)
- A Datalink which needs mapping (displayed in dashed blue)
- A Datalink mapped (displayed in blue)
To define the mapping, proceed as follows:
- Select the link that you want to define in the
Behavior tab page.
- Select the
Mappings tab
page.
- From the left tree, select the property that you want to map.
- Drag and drop it on the desired property on the right tree.
- Repeat step 4 as many times as you need to complete the mapping.
 |
If there are two independent paths in
the same behavior defined by datalinks, you can not presume which way
will be resolved first. |
[Top]
Input and Output parameters
Web Applications support input and output arguments, which enables them
to communicate with other applications.
| |
Input Parameter |
Output Parameter |
| What is it? |
An input argument is an argument
enabling users to use other parameters in inputs of their
applications. WAC applications support only a single argument which
can be of 2 types:
- String and String[]: Available only for Web applications not
integrated into 3d com.
- PortalUID and PortalUID[]: Available only for Web applications
integrated into 3d com. a PortalUID is a universal identifier
allowing you to identify any object in the portal interface
PortalUID is automatically selected if the multi selection is not
available for the Web application integrated in 3d com.
PortalUID[] is automatically selected if the multiselection is
available for the Web application integrated in 3d com.
|
An output argument is an argument
enabling you to execute the following pre-defined actions:
WAC applications
support only a unique argument. This argument is a String which
values are identified, and limited to a set of possible values. They
correspond to of pre-defined actions requests, such as displaying a
message box or an error message, stacking another command, …
Three different
helpers are available to create the 3 types of output in the
Build OutputParameter category.
|
| Creating Input/Output parameters |
To create an input parameter, proceed as
follows:
- If not already done, click the Behavior tab.
- In the
Create Component
menu, click Input
Parameter ( )
and click anywhere in the editor (grey area.) )
and click anywhere in the editor (grey area.)
- Select its type in the scrolling list and click
OK. The input parameter is
created.
|
To create an output parameter, proceed
as follows:
- If not already done, click the Behavior tab.
- In the
Create Component
menu, click Output
Parameter ( )
and click anywhere in the editor (grey area.) )
and click anywhere in the editor (grey area.)
- Select its type in the scrolling list and click
OK. The output parameter is
created.
|
Action click
An action click is a static way to provide a contextual menu in a Web
context. It is represented in the User Interface by a clickable link
which trig a behavior. The behavior can be an existing one or a new one.
Creating an Action click
To create an Action click, proceed as follows:
- Select a page in the
Outline
view and right click it.
- Select
Add ActionClick
in the contextual menu.
- Enter its name in the
Name
field and select a behavior in the
Behavior Name scrolling list. Note that if you
select the Behavior
option, you will be requested to enter the name of the new
behavior.
|
Ensuring the integration of your application into 3dcom
 |
This step can only be performed at creation! |
You can now integrate your web applications into 3d com. To do so, use the
Integration with portal field in the Create XMLCtrl
dialog box.
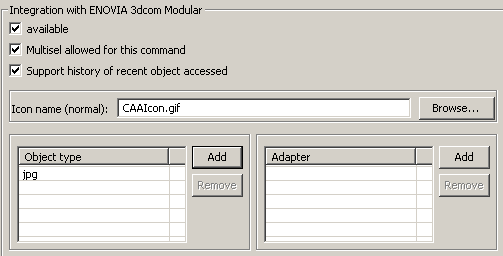 |
- Check the
available check
box. Multisel allowed for this
and the Support history of recent
object accessed options are enabled.
 |
Multisel allowed for this
                 command
, if checked, enables you to select
several files in 3dcom Modular. Support history of recent
object accessed: if the application was launched
using a particular file, this file is logged in the list.
|
- Select the icon that will be associated to the application in
portal.
- Click
Add in the
Object type field and enter the
type of files that will be supported.
|
Running the Web Application using
a standard browser
- Use the
CAA Project -> Create->Update
       Runtime view...
|
- Deploy your application on your Websphere Application Server. To do
so, use
Run on server to deploy
on a Test Server inside IRAD 6.0, or use the standard deployment
procedure described in 3dcom Installation guide /
Installing Version 5 / Integrating Modular 3d com into IBM Websphere
Application Server to deploy on a production WAS.
|
- Run your server, and enter following URL in Internet Explorer:
http://hostname:portnumber/RootURI/portal
|
- You can run your Web Application in a "standalone" mode on a (Test)
Websphere Application Server 5.0 using the following URL:
http://localhost:9080/RootURI_ForYourProject/html/EApp/webappname
where webappname is the name of the XMLCtrl generated file.
See
Creating Your First Web Application for more details on this subject.
- You can also run your Web Application directly integrated into a portal (Websphere
portal, or Dassault Systemes Web Application Frame).
If your application is ended and ready to be inserted in your runtime view:
In the starter area (the banner on the left side of the screen), you can
access a container named "WebApp Starter". This container displays the list
of all Web Applications created with Web Application Builder tool,
found in the runtime view. So you should see your particular Web Application
in the list. Just double-click its name to run it in the portal.
[Top]
References
History
| Version: 1.00 [July 2003] |
Document created |
|
Version: 1.10 [August 2003]
|
Document updated
|
|
Version: 1.20 [May 2004]
|
Document updated
|
|
Version: 1.30 [July 2005]
|
Document updated
|
| |
|
Copyright © 1994-2005, Dassault Systèmes. All rights reserved.


