| In a DOS/shell Window | With NT platform: Execute following commands to access mkmk:
With Unix platform:
|
|
| From Interactive Dashboard
|
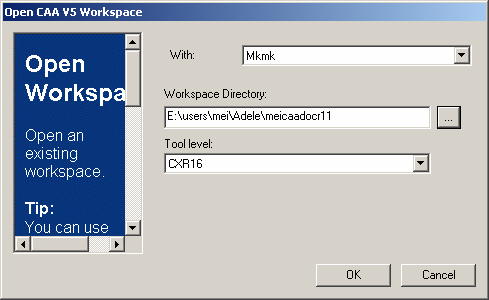
From the File
menu, select the Open CAA V5 Workspace
command.
|
RADE |
C++/JAVA Interactive Dashboard |
Workbench Commands MappingCorrespondence between Workbench commands and RADE Dashboard or Visual Studio.NET and Visual Studio 2005 menus |
| Quick Reference | ||
AbstractThis article has been written for people getting skills using Workbench commands [1], either with Windows or Unix platforms. They will find here what are the menus corresponding to these commands and how command options have been mapped to graphic items such like check or combo boxes. This article can also be read by people willing to work on Unix platform where only shell commands are available, it is a way for them to find the commands hidden behind Visual Studio.NET and Visual Studio 2005 windows. Some conventions are used in this article:
This article is divided into the following sections: |
| In a DOS/shell Window | With NT platform: Execute following commands to access mkmk:
With Unix platform:
|
|
| From Interactive Dashboard
|
From the File
menu, select the Open CAA V5 Workspace
command.
|
[Top]
| In a DOS/shell Window
|
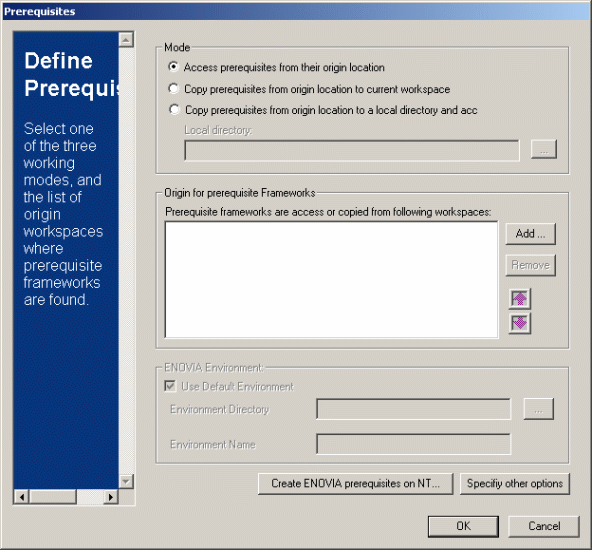
There are two ways of setting prerequisites:
you can copy them into your workspace with mkCopyPreq or register the
workspace containing them:
In the window displayed in the right side, the " mkGetPreq -p H:\BSF;E:\Program Files\Dassault Systemes\B17D04
|
|
| From Interactive Dashboard | From the CAAV5
Workspace menu, select Locate
Prerequisite Workspaces....
Note that the first directory you set in the list will be the first browsed when searching for prerequisites afterwards. You can change directory order by selecting a directory in the list and click on the arrow Up and Down buttons. You can specify additional options by clicking the The first mode gives you dynamic access (
|
[Top]
| In a DOS/shell Window
|
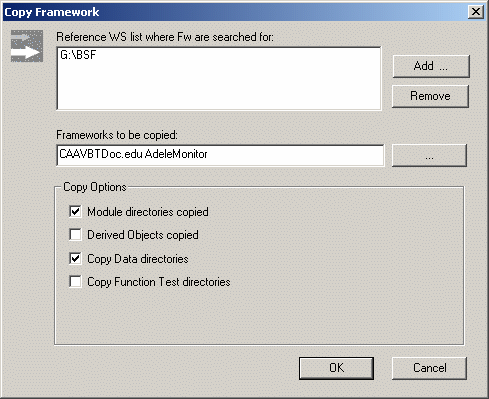
The command to copy framework(s) from a
workspace to another is mkCopyFw. Our sample dialog box
corresponds to this command:
mkCopyFw -update VisualStudio -d Using the dialog box, you enter the path to the origin workspace(s) in the top list, then type the name of the framework(s) you want to copy (use <space> between two framework names), you can filter the modules to copy by clicking on the "Add..." button associated with the middle list (at least one framework name must have been typed in before).
|
|
| From Interactive Dashboard
|
From the Open menu select the
CAAV5 Workspace and
Copy Framework... commands.
The check boxes in the " |
[Top]
[Top]
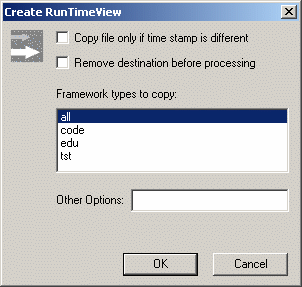
| In a DOS/shell Window | The command to build a Runtime View from a
workspace is mkrtv
The items of the Dialog boxes correspond respectively to
|
|
| From Interactive Dashboard | From the CAAV5
Workspace menu, select
Create/Update Runtime View....
|
[Top]
Considering the Runtime View has been created...
| In a DOS/shell Window
|
If you have built an executable, you can run
it directly. If you have built a library, you run V5 by executing the
following command: mkrun
The Like
|
|
| From Interactive Dashboard
|
From the Debug
menu, select Start Without Debugging
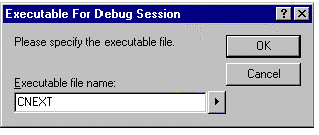
or use the shortcut Ctrl+F5.if you're not building an executable, you'll be prompted to enter the name of the executable to run, then type CNEXT, or select the CNEXT.exe module with the browse button from your Runtime View.
|
[Top]
| In a DOS/shell Window
|
Online documentation is generated by two
different commands depending on the type of data you want to document:
|
| From Interactive Dashboard
|
From the CAAV5
Workspace menu, select
Generate/Update Documentation..There is nothing more to do, a log window is displayed while the documentation is being generated. |
[Top]
| In a DOS/shell Window
|
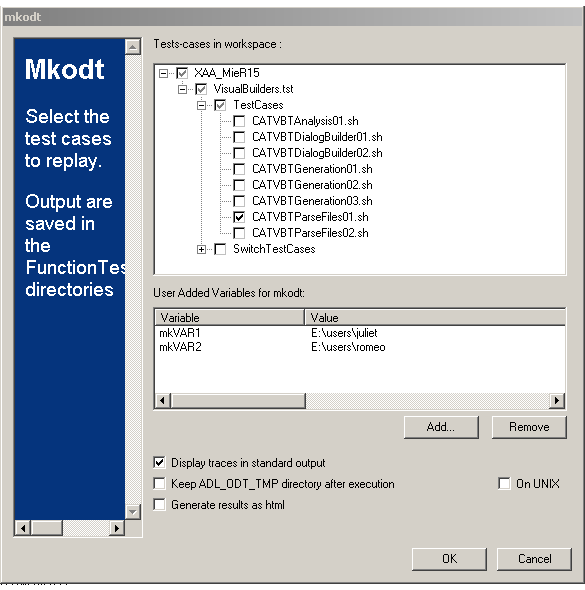
Test objects that are delivered in a
test framework of CAAV5 workspace can be run using mkodt
command.
The test objects which are selected in the right side of the dialog
box are specified using |
|
| From Interactive Dashboard
|
From the "Tools",
select "Replay test-cases...".
The following window appears displaying the test objects found in test
frameworks of your workspace. Select which ones you want to run and click
on " You can also define additional variables, to take them into account only during the replay.
|
[Top]
| In a DOS/shell Window
|
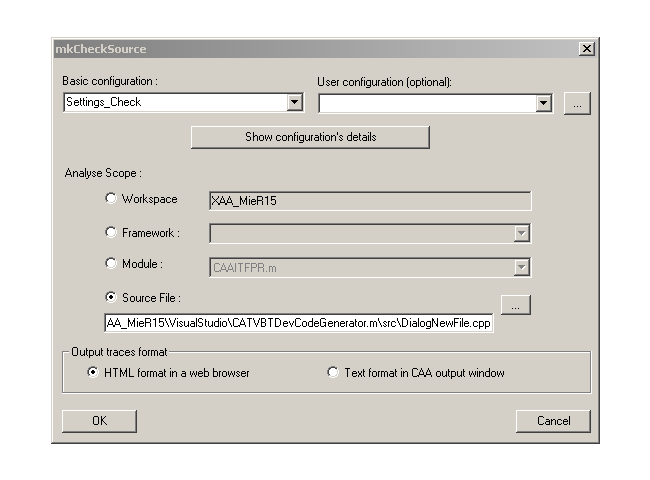
mkCheckSource reads C++ source
files to detect potential bugs like missing Release() on
interfaces pointers. Sources to check are selected with the -s
option on the command line. |
|
| From Interactive Dashboard
|
From the CAAV5
Workspace menu, select Check
Source Files....Select all files in the workspace, all
files from a specified framework, all files for a specified module or a
single source file. You can enable or disable warning messages and
specify an optional file containing an alternate list of methods
returning a pointer and needing a Release().
|
[Top]
Once a workspace has been opened (for mkmk and/or for Workspace Manager usage) any command launched from Visual Studio.NET inherits environment variables and paths and can thus access mkmk or Workspace Manager commands. One command that can be run is the DOS interpreter, to do this:
- From the
Windowmenu, selectOpen Command Window.
In this window, you can access Workspace Manager or mkmk commands and therefore any command for which no interface is provided in VisualStudio.NET.
[Top]
| [1] | Summary of Commands around mkmk |
| [2] | Customizing Visual Studio.NET and Customizing Microsoft Visual Studio 2005 |
| [3] | Working with the RADE Dashboard |
| [Top] | |
| Version: 1 [Jan 2000] | Document created |
| Version: 2 [May 2003] | Document updated |
| Version: 3 [July 2005] | Document updated |
| Version: 4 [January 2006] | Document updated |
| [Top] | |
Copyright © 2006, Dassault Systèmes. All rights reserved.