Catalog Modeler |
Creating a Catalog with Part DocumentsHow to link a Part document into a catalog document |
|
| Use Case | ||
AbstractThis use case illustrates how to create a catalog which contains links towards Part documents. |
In reading the "What You Will learn With this Use case" section of the use case "Creating a Catalog" [1], you learn that a catalog is in the form of a tree structure made up of chapters, families (end chapter), components, descriptions and keywords. The goal of this article is to describe a simple catalog which contains descriptions referencing only Part documents. In addition, it explains how to set a previous image for a chapter.
Before getting to the use case itself, it is important to already be familiar with the basic notions of Catalog. See the referenced article [2] for a detailed overview.
[Top]
CAACciScrewCatalogCreation is a use case of the CAAComponentsCatalogs.edu framework that illustrates ComponentsCatalogsInterfaces framework capabilities.
[Top]
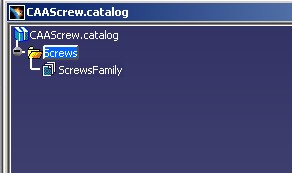
This use case creates the CAAScrew.catalog document [Fig.1].
The scenario of its creation is explained through images created in editing the
catalog thanks to the Catalog Editor workbench. At last, the interactive scenario to obtain the same result, is
given.

|
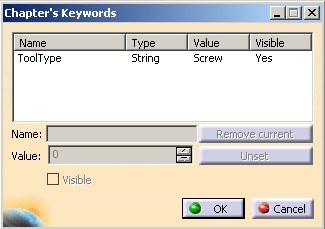
The Screws chapter is the root chapter. It contains the
visible "ToolType"
keyword. This keyword is a string whose the default value is
"Screw".
|
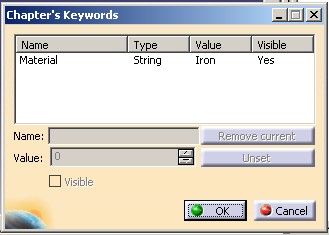
The Screws chapter contains the ScrewsFamily sub
chapter. This chapter is an end chapter, so it is a family. It contains the
visible "Material"
keyword. This keyword is a string whose the default value is
"Iron".
|
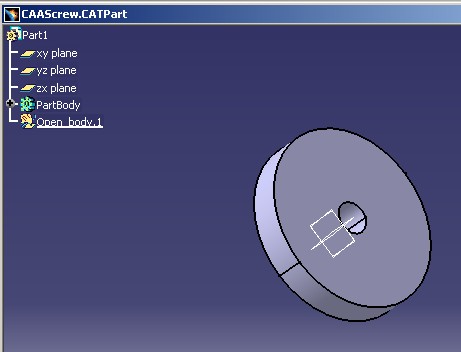
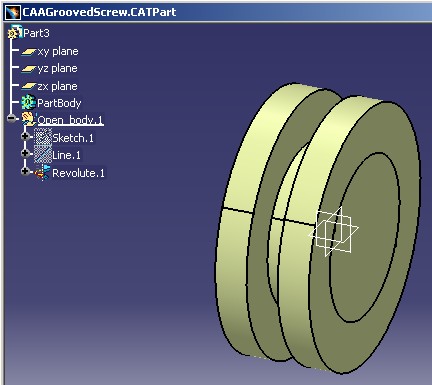
Two documents are added to this ScrewsFamily family [Fig.4]: the CAAScrew.CATPart
and the CAAGroovedScrew.CATPart documents.

|
In the right part of its window, the Catalog Editor workbench lists the descriptions
associated with the current chapter. You can notice the type of the
descriptions (Document) in the "Type" column and the name of the
Part document in the "Object Name" column.
|
|
For the ScrewsFamily, a preview image (130x110 pixels) is given:
|
The display's image size is always 130x110 pixels. if the size of the image is smaller or larger, a ratio is applied to increase or decrease the image's size.
The interactive scenario to obtain the same CAAScrew.catalog document is the following:
Launch CATIA. When the application is ready:
(*) The files are located in the directory CAAComponentsCatalogs.edu/InputData
InstallRootDirectory/CAAComponentsCatalogs.edu/InputData
InstallRootDirectory\CAAComponentsCatalogs.edu\InputDatawhere InstallRootDirectory is the directory where the CAA CD-ROM
is installed.
[Top]
To launch CAACciScrewCatalogCreation , you will need to set up the build time environment, then compile the CAACciCatalogCreate module along with its prerequisites, set up the run time environment, and then execute the use case [3].
mkrun -c CAACciCatalogCreate InputPath [OutputPath]
Where:
CAAComponentsCatalogs.edu/InputData
InstallRootDirectory/CAAComponentsCatalogs.edu/InputData
InstallRootDirectory\CAAComponentsCatalogs.edu\InputData where InstallRootDirectory is the directory where the CAA
CD-ROM is installed.
The use case creates three documents:
CAAScrew.catalog, explained in the current articleCAANuts6Sides.catalog, explained in the "Creating a Catalog With Part Family"
article [4]CAATools.catalog, explained in the "Creating a
Catalog" article [1]After its execution, you can launch CATIA and open the created catalogs or execute the CAACciCatalogNavigation use case [5] for each. This use case displays the contents of a catalog.
[Top]
The CAACciScrewCatalogCreation use case is made of several source files located in the CAACciCatalogCreate.m module of the CAAComponentsCatalogs.edu framework:
| Name of the source file | Function |
| CAACciCatalogCreateMain | Main source file |
| CAACciScrewCatalogCreation | Global function to create the CAAScrew.catalog document |
| CAACciCatalogDocumentServices | Global functions to factorize the code |
depending on operating system you find them :
Windows |
InstallRootDirectory\CAAComponentsCatalogs.edu\CAACciCatalogCreate.m\ |
| Unix | InstallRootDirectory/CAAComponentsCatalogs.edu/CAACciCatalogCreate.m/ |
where InstallRootDirectory is the directory where the CAA CD-ROM
is installed.
[Top]
There are nine logical steps in the CAACciScrewCatalogCreation use case:
Some operations like create or save a document have been factorized in global functions. These functions are defined in the CAACciCatalogServices.cpp file. You retrieve theirs explanations in the "Creating a Catalog" article [1] .
[Top]
 ...
    CATDocument * pDocument = NULL ;
    CATICatalogChapterFactory * pICatalogChapterFactory = NULL ;

    rc = ::CAACreateCatalogDocument(&pDocument,&pICatalogChapterFactory);
 ...
|
The CAACreateCatalogDocument
global
function creates a "catalog" document and returns pICatalogChapterFactory,
a CATICatalogChapterFactory
interface pointer on its root container. This interface pointer is necessary to create
chapters.
 ...
    if ( SUCCEEDED(rc) && ( NULL != pICatalogChapterFactory) )
    {
       CATICatalogChapter * piScrewsChapter = NULL ;

       CATUnicodeString ChapterName = "Screws" ;
       CATBoolean IsEndChapter = FALSE ;
       rc = pICatalogChapterFactory->CreateChapter(ChapterName,IsEndChapter,piScrewsChapter);

 ...
|
The Screws chapter is created thanks to the CreateChapter
method of the CATICatalogChapterFactory interface. The second parameter, IsEndChapter,
specifies that the chapter is a not a end chapter, so not a family. The returned pointer, piScrewsChapter,
must be released as soon as it will be useless.
The Screws chapter is the first chapter created in the new
document, so it is the root chapter. It means that you can retrieve it thanks to
the GetRootChapter method of the same interface CATICatalogChapterFactory. Refer to the use case "Browsing a Catalog" [5]
for an example about this method.
 ...
       if ( SUCCEEDED(rc) && (NULL != piScrewsChapter))
       {
          CATICatalogKeyword * piKeyword = NULL ;
          rc = piScrewsChapter->AddKeyword("ToolType","String",piKeyword);
          if ( SUCCEEDED(rc) )
          {
             piKeyword->Release();
             piKeyword = NULL ;
          }
       }
       if ( SUCCEEDED(rc) && (NULL != piScrewsChapter))
       {
          CATUnicodeString Value = "Screw" ;
          rc = piScrewsChapter->SetDefaultValue("ToolType",Value);
       }
 ...
|
The string keyword "ToolType" is created thanks to the AddKeyword
method of the CATICatalogChapter interface pointer on the Screws
chapter, piScrewsChapter.
The default value for the keyword is set thanks to the SetDefaultValue
method of the CATICatalogChapter interface pointer on the Screws
chapter, piScrewsChapter.
 ...
       CATICatalogChapter * piScrewsFamily = NULL ;

       if ( SUCCEEDED(rc) )
       {
          CATUnicodeString     ChapterName = "ScrewsFamily" ;
          CATBoolean           IsEndChapter = TRUE ;
          rc = pICatalogChapterFactory->CreateChapter(ChapterName,IsEndChapter,piScrewsFamily);

 ...
|
As the Screws chapter, the ScrewsFamily chapter is
created thanks to the CATICatalogChapterFactory interface. But contrary to
the Screws chapter the second argument of this method is TRUE: It means
that the ScrewsFamily chapter is a end chapter, in other words, it could
contains only data and none sub-chapter.
Screws
Chapter.
 ...
       if (SUCCEEDED(rc) && (NULL != piScrewsFamily) && (NULL != piScrewsChapter) )
       {
          CATILinkableObject * pLinkOnScrewsFamily = NULL ;
          rc = piScrewsFamily->QueryInterface(IID_CATILinkableObject,
                                              (void **) &pLinkOnScrewsFamily);
          if ( SUCCEEDED(rc) )
          {
             CATICatalogDescription * piDescription = NULL ;
             rc = piScrewsChapter->AddDescription(piDescription,pLinkOnScrewsFamily);
...
|
Like any kind object to set in a description, the CATILinkableObject
interface on the ScrewsFamily chapter, pLinkOnScrewsFamily,
is necessary. The AddDescription method applied to the Screws
chapter, the parent chapter pointed by piScrewsChapter, creates a new
description with the pLinkOnScrewsFamily interface pointer on the ScrewsFamily
chapter.
 ...
             if ( SUCCEEDED(rc) && (NULL != piDescription) )
             {
                CATUnicodeString PreviewFileName="CAAScrewFamilyPreview.jpg" ;
                PreviewFileName = iInputPath + Slash + PreviewFileName ;

                rc = piDescription->SetPreviewName(PreviewFileName);
                ...
                piDescription->Release();
                piDescription = NULL ;
             }

             pLinkOnScrewsFamily->Release();
             pLinkOnScrewsFamily = NULL ;
          }
       }
...
|
The previous image for the ScrewsFamily chapter, comes from the
external file PreviewFileName. Notice that the image's name is a complete path. The file is associated with the
description which pointes towards the ScrewsFamily chapter thanks
to the SetPreviewName method of the CATICatalogDescription
interface. piDescription is the CATICatalogDescription
interface pointer on the ScrewsFamily chapter previously created.
 ...
       if ( SUCCEEDED(rc) && (NULL != piScrewsFamily) )
       {
          CATICatalogKeyword * piKeyword = NULL ;
          rc = piScrewsFamily->AddKeyword("Material","String",piKeyword);
          if ( SUCCEEDED(rc) )
          {
             piKeyword->Release();
             piKeyword = NULL ;
          }
       }
       if ( SUCCEEDED(rc) && (NULL != piScrewsFamily) )
       {
          CATUnicodeString Value = "Iron" ;
          rc = piScrewsFamily->SetDefaultValue("Material",Value);
       }
...
|
The string keyword "Material" is created thanks to the AddKeyword
method of the CATICatalogChapter interface pointer on the ScrewsFamily
chapter, piScrewsFamily.
The default value for the keyword is set thanks to the SetDefaultValue
method of the CATICatalogChapter interface pointer on the ScrewsFamily
chapter, piScrewsFamily.
The first way to add a Part document in a catalog is the following:
 ...
       CATDocument * pScrewDocument = NULL ;
       if ( SUCCEEDED(rc) )
       {

          CATUnicodeString ModelDocName = "CAAScrew.CATPart" ;
          ModelDocName = iInputPath + Slash + "CAAScrew.CATPart" ;

          rc = CATDocumentServices::Open(ModelDocName.CastToCharPtr(), pScrewDocument);
       }
...
|
The Open static function of the CATDocumentServices
class opens the CAAScrew.CATPart document.
 ...
       if ( SUCCEEDED(rc) && (NULL != pScrewDocument) && (NULL != piScrewsFamily) )
       {
          CATILinkableObject * pLinkOnScrewPart = NULL ;
          rc = pScrewDocument->QueryInterface(IID_CATILinkableObject,
                                              (void **) &pLinkOnScrewPart);
          if ( SUCCEEDED(rc ) )
          {
             CATICatalogDescription * piDescription = NULL ;
             rc = piScrewsFamily->AddDescription(piDescription,pLinkOnScrewPart);
             ...
             pLinkOnScrewPart->Release();
             pLinkOnScrewPart = NULL ;
          }
       }
...
|
The AddDescription method applied to piScrewsFamily, the CATICatalogChapter
interface pointer on the ScrewsFamily, creates a new
description for this chapter. The second argument is the object pointed by the description.
In this case it is pLinkOnScrewPart, the CATILinkableObject
interface pointer on the CAAScrew Part document.
This mechanism is available for any kind component types: Here it is a Part document, but you add a Product or a feature integratable in a catalog (See the "Integrating a New Type of Component" use case) in retrieving their CATILinkableObject interface pointer.
Notice that once the Part document is referencing by the catalog document, it
will be "released" when the catalog will be closed. To keep a link on
the Part document, use the CATLockDocument global function (ObjectModelerBase
framework).
The second way to add a Part document in a catalog is the following:
 ...
       if ( SUCCEEDED(rc) && (NULL != piScrewsFamily) )
       {
          CATICatalogDescription * piDescription = NULL ;
          rc = piScrewsFamily->AddDescription(piDescription);
          if ( SUCCEEDED(rc) && (NULL != piDescription) )
          {
             CATUnicodeString ModelDocName ;
             ModelDocName = iInputPath + Slash + "CAAGroovedScrew.CATPart" ;

             rc = piDescription->SetDocumentName(ModelDocName);
             ...
       }
...
|
In this case, the description is created "empty", in other words
without a CATILinkableObject interface pointer. The document is given by
the SetDocumentName method on the new CATICatalogDescription
interface pointer. The argument of this method is the complete path of the
document.
In this case, the pointed document is not opened.
 ...
    if ( SUCCEEDED(rc) && (NULL != pDocument) )
    {
        CATUnicodeString DocumentName = "CAAScrew" ;
        rc = ::CAACloseCatalogDocument(DocumentName,*pDocument,iOutputPath);
        pDocument = NULL ;
    }
...
|
The CAACloseCatalogDocument global
function saves the new catalog under the name CAAScrew.
[Top]
This use case illustrates how to create a description which references a Part document: (or any kind component types)
AddDescription method
as following:
CATICatalogDescription * pICatalogDesc = NULL ; p2->AddDescription(pICatalogDesc,p1 ); |
[Top]
| [1] | Creating a Catalog |
| [2] | Catalog Overview |
| [3] | Building and Launching a CAA V5 Use Case |
| [4] | Creating a Catalog With Part Family |
| [5] | Browsing a Catalog |
| [Top] | |
| Version: 1 [Jul 2002] | Document created |
| [Top] | |
Copyright © 2002, Dassault Systèmes. All rights reserved.