This
task shows how to show and update computed data.
This lets you visualize how the solver interprets the pre-processing
specifications (loads, multi loads or masses) before launching a
computation.
You will see how to:
Only available with the ELFINI Structural Analysis (EST) product.
In general the structural analysis pre-processing specifications are applied to the centers of gravity of mesh entities (where entities can be elements, edges, faces, ...). The solver needs to evaluate these pre-processing specifications at the degrees of freedom of mesh nodes.
The recommended methodology to use computed data is:
-
Set your preprocessing specifications (restraints, loads, multi loads, masses).
-
Show computed data.
-
Update computed data.
-
Generate images on computed data.
-
Generate a report on computed data.
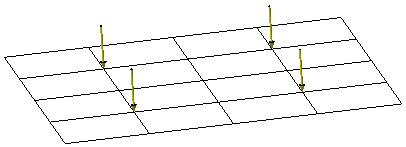
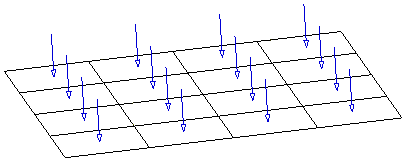
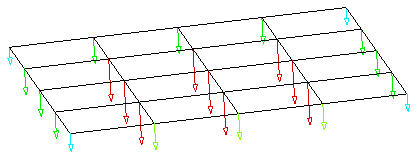
This is an example of a pressure applied to a face:
|
Preprocessing Representation |
|
|
Finite Element Model View |
|
|
Solver View |
|
Showing and Hiding Computed Data
You can show (and then hide) computed data only on static solutions and frequency solutions.
You can show the computed data, where data contain:
-
Loads or multi loads
-
Masses.
Open the sample46.CATAnalysis document from the samples directory.
In this particular example, the preprocessing specifications are not updated.
-
Right-click Static Case Solution.3 in the specification tree and select Show/Hide Computed Data
 .
.Computed Data.1 appears in the specification tree.
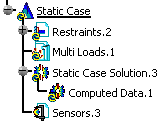
Computed Data.1 groups all the computed data of Static Case Solution.3.

In this particular example, Computed Data.1 object is empty because computed data have never been updated.
To know more, refer to More About Computed Data.

To hide the computed data, right-click Static Case Solution.3 in the specification tree and select Show/Hide Computed Data.
You can now update the computed data you generated and then
generate images.
To do this, refer to Updating Computed Data.
Updating Computed Data
-
Right-click Computed Data.1 and select Update Computed Data
 .
.Computed Loads.1 (Multi Loads.1) appears in the specification tree under Computed Data.1.
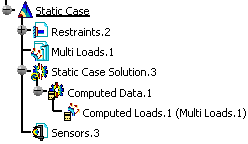
Note that both Computed Data.1 and Computed Loads.1 (Multi Loads.1) are updated.
Computed Loads.1 (Multi Loads.1) lets you access to the solver view of the Loads.1 set within the context of Static Case Solution.3.
You can now generate image on computed loads.
To do this, refer to Generating Images on Computed Data.
Generating Images on Computed Data
The list of available images depends on the type of
computed data (computed loads or computed masses).
To know more about the list of available images, refer to
Available Images.
-
Right-click Computed Loads.1 (Multi Loads.1) and select Generate Image.
The Image Generation dialog box appears.
To know more about this dialog box, refer to Generating Images.In this particular example the only available images are Point force vector and Point moment vector.
-
Select Point force vector.
-
Click OK.
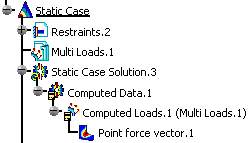
The Point force vector image is automatically generated in the 3D visualization and Point force vector.1 appears in the specification tree under Computed Loads.1 (Multi Loads.1).
More About Computed Data
The Computed Data content depends on:
-
The update status of computed data
-
The content of the analysis case (load set, multi loads set, mass set).
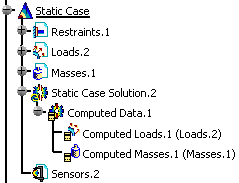
In the following example, the static case contains a loads
set and a masses set.
So Computed Data.1 contains both computed loads and computed
masses:
To summarize:
|
Content of analysis case |
Content of computed data |
Naming Rules |
|
Loads set called Loads.1 |
Computed loads |
Computed Loads (Loads.1) |
|
Multi Loads set called Multi Loads.1 |
Computed loads |
Computed Loads (Multi Loads.1) |
|
Masses set called Masses.1 |
Computed masses |
Computed Masses (Masses.1) |
|
|
Only additional masses are taken into account. Additional masses are masses that belong to a mass set. This means that if no mass set is created in the
analysis case, no computed masses will be generated. |
![]()
