3D PLM PPR Hub Open Gateway |
Feature Modeler |
Creating StartUps in CatalogsThe first step in working with features |
| Use Case | ||
AbstractThis article accompanies the CAAOsmCatalogSU use case. It explains how to create and save a catalog, how to create StartUps within the catalog and how to define a StartUp structure by adding simple and feature attributes to it. |
This use case is intended to help you make your first steps in programming the ObjectSpecsModeler (also called the "feature" modeler). Its main intent is to explain how to define and create StartUps within Catalogs. Through this use case, you will also learn some important concepts about the underlying data structure of a feature in general and about the recommended ways of programming with features. More specifically, you will learn how to:
Before getting to the use case itself, it is important to get an understanding of what StartUps are and how they are used in modeling features. See the referenced article [1].
[Top]
When accessing a catalog of StartUps, it must be found under the run-time directory:
| Windows | InstallRootDirectory\OS\resources\graphic\ |
where InstallRootDirectory is the directory where the CAA CD-ROM
is installed, and OS is a directory the name of which depends on the operating
system. Refer to [2] to get the list of the currently
supported operating systems and their associated directory names.
In order for the catalog to be accessible from the run-time directory, it should be stored in the following directory:
| Windows | InstallRootDirectory\FW\CNext\resources\graphic\ |
| UNIX | InstallRootDirectory/FW/CNext/resources/graphic/ |
where FW is the framework containing the catalog creation code.
When updating the run-time view (mkCreateRuntimeView), the catalog will be automatically transferred to the run-time directory.
[Top]
CAAOsmCatalogSU is a use case of the CAAObjectSpecsModeler.edu framework that illustrates CATIA ObjectSpecsModeler framework capabilities.
[Top]
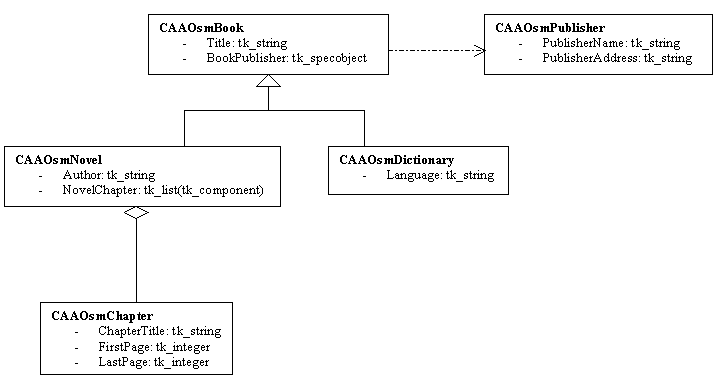
The goal of CAAOsmCatalogSU is to create a catalog and to define StartUps within it. The notion of "books" is used as an example. The StartUps describe different kinds of books such as novels or dictionaries. First, several StartUps are created that will be used as feature attributes later on. They are "CAAOsmPublisher" and "CAAOsmChapter". Next, the actual "Book" StartUps are created: "CAAOsmBook", "CAAOsmNovel" (which is a kind of "CAAOsmBook") and "CAAOsmDictionary" (which is also a kind of "CAAOsmBook"). Here is a schematic relational view of these StartUps and their attributes:
 |
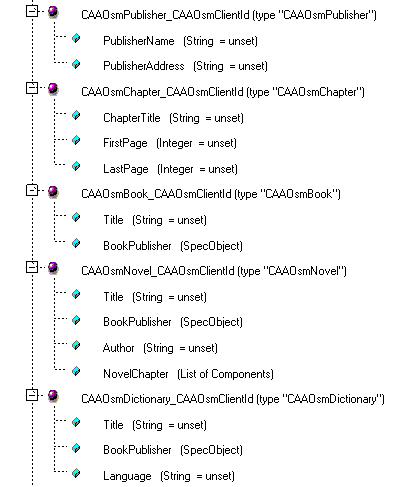
Note that since "CAAOsmNovel" is a kind of "CAAOsmBook" (i.e., its supertype is "CAAOsmBook's" type), it also has the attributes "Title" and "BookPublisher" that it has inherited from "CAAOsmBook". The same is true for "CAAOsmDictionary".
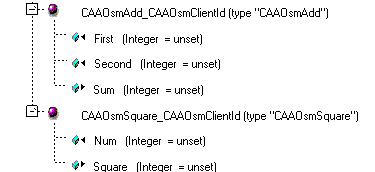
Note also that this use case creates two other StartUps called "CAAOsmAdd" and "CAAOsmSquare" which are used in the CAAOsmBuildUpdate use case.
Here is a complete image of the contents of the catalog:
 |
 |
[Top]
To launch CAAOsmCatalogSU, you will need to set up the build time environment, then compile CAAOsmCatalogSU along with its prerequisites, set up the run time environment, and then execute the sample. This is fully described in the referenced article [2].
mkrun -c "CAAOsmCatalogSU CatalogStorageName"
Note: It is not necessary to locate the newly catalog in the CNext/resources/graphic directory of the CAAObjectSpecsModeler.edu framework, since one has been already provided.
[Top]
CAAOsmCatalogSU code is located in the CAAOsmCatatalogSU.m use case module of the CAAObjectSpecsModeler.edu framework:
| Windows | InstallRootDirectory\CAAObjectSpecsModeler.edu\CAAOsmCatalogSU.m |
| Unix | InstallRootDirectory/CAAObjectSpecsModeler.edu/CAAOsmCatalogSU.m |
where InstallRootDirectory is the root directory of your CAA V5
installation. It is made of a unique source file named CAAOsmCatalogSU.cpp.
[Top]
There are eight logical steps in CAAOsmCatalogSU:
We will now comment each of those sections by looking at the code.
[Top]
To create a catalog, use the CreateCatalog global function which
returns a pointer to CATICatalog:
...
CATICatalog *piCatalog = NULL;
CATUnicodeString storageName = argv[1];
HRESULT rc = ::CreateCatalog(&storageName,
                             &piCatalog);
if (NULL == piCatalog)
{
   cout << "ERROR in creating Catalog" << endl << flush;
   return 2;
}
else cout << "Catalog created OK" << endl << flush;
...
|
Catalogs have the suffix .CATfct by default. In other words,
when creating a catalog, you need not specify this suffix in the catalog name,
but if you do, another one will not be added. The name of the catalog is taken
from the first argument passed to this program. For now, a new catalog should be
created in the resources/graphic directory of your workspace in order for the OpenCatalog
method to be able to find it.
A client identification must also be added to the catalog using the SetClientId
method found in the CATICatalog interface:
CATUnicodeString clientId("CAAOsmClientId");
rc = piCatalog -> SetClientId(&clientId);
if (NULL == rc) cout << "ClientID setOK" << endl << flush;
else cout << "ERROR in setting ClientID" << endl << flush;
|
This identification is necessary in order to open the catalog later on. The
string defined by SetClientId is added on as a suffix to the name
of each StartUp added to the catalog. This identifier should remain unique to
this particular catalog in order to insure the uniqueness of the StartUp name in
the case where more than one catalog were used at the same time. So, choose your
identifier carefully, such that you will be able to distinguish your features
from others.
[Top]
To create a StartUp , use the CreateSUInCatalog method found in
the CATICatalog interface. For example, here is how the StartUp
"Novel" is created:
CATBaseUnknown *pNovelSU = NULL;
CATUnicodeString novelSUName("CAAOsmNovel");
CATUnicodeString novelSUType("CAAOsmNovel");
rc = piCatalog -> CreateSUInCatalog (&pNovelSU,          // Pointer to the StartUp in the catalog
                                     &novelSUName,       // StartUp name
                                     &novelSUType,       // StartUp type
                                     "CATISpecObject",   // Interface
                                     &bookSUType);       // StartUp supertype
if (NULL == pNovelSU)
{
    cout << "ERROR in creating CAAOsmNovel StartUp" << endl << flush;
    piCatalog -> Release();
    return 3;
}
else cout << "CAAOsmNovel StartUp created OK" << endl << flush;
// Get a CATISpecObject handle on the CAAOsmNovel StartUp
CATISpecObject *piNovelSU = (CATISpecObject*) pNovelSU;
|
Creating a StartUp means simply reserving a non-structured data slot in the catalog. The actual data structure is created when adding attributes to the StartUp.
Note that this specific StartUp has a supertype, referenced by the variable bookSUType
which references the StartUp called "CAAOsmBook" defined previously in
the program. The StartUp "CAAOsmNovel" will, therefore, inherit all of
the attributes of the StartUp "CAAOsmBook".
The CATBaseUnknown pNovelSU pointer acquired through CreateSUInCatalog
is directly cast to a CATISpecObject handle and must be released at the
end of its use.
Note also that, in general, when exiting the program on error, current
pointers must be released (for example in this case: piCatalog).
[Top]
CATUnicodeString novelAuthor("Author");
CATISpecAttribute *piNovelAuthor = piNovelSU ->
		AddAttribute(novelAuthor,
		             tk_string);
if (NULL == piNovelAuthor) cout << "ERROR in adding CAAOsmNovel Author attribute" << endl << flush;
else cout << "Novel Author attribute added OK" << endl << flush;

piNovelAuthor -> Release();

CATUnicodeString novelChapter("NovelChapter");
CATISpecAttribute *piNovelChapt = piNovelSU ->
		AddAttribute(novelChapter,
		             tk_list,
	   		     tk_component);
if (NULL == piNovelChapt) cout << "ERROR in adding CAAOsmNovel Chapter attribute" << endl << flush;
else cout << "CAAOsmNovel Chapter attribute added OK" << endl << flush;

piNovelChapt -> Release();
pNovelSU -> Release();
|
Once the StartUp has been created, attributes are added to it in order to
define its data structure. Use the AddAttribute method using the CATISpecObject
handle acquired on the StartUp.
Do not forget that all pointers acquired AddAttribute must also
be released when they are no longer used.
Note that the "NovelChapter" attribute is added as type tk_list
and tk_component. This will allow a number of unique
"Chapter" features to be attached to a "CAAOsmNovel"
feature.
[Top]
// Save catalog

rc = ::SaveCatalog(&piCatalog,
	           &storageName);
piCatalog -> Release();
piCatalog = NULL;
if (FAILED(rc))
{
   cout << "ERROR in saving catalog document" << endl << flush;
   return 5;
}
|
When all StartUps and their attributes have been created, the catalog can be
saved. We use here the same name as for the creation of the catalog. Because the
AccessCatalog method systematically looks for the catalog in the
"resources/graphic" directory under the current workspace, it is
simpler to save it there directly. In order to save the catalog, use the SaveCatalog
global function. Note that a Remove operation need not be performed
on a catalog.[Top]
// Open the Catalog in Edit mode
rc = ::UpgradeCatalog (&storageName,
                       &piCatalog,
	              &clientId);
if (SUCCEEDED(rc) && NULL != piCatalog) cout << "Catalog accessed for Upgrade OK" << endl << flush;
else
{
    cout << "ERROR on UpgradeCatalog" << endl << flush;
    return 6;
}
|
Use the UpgradeCatalog global function to open a catalog for
editing (in other words, in read/write mode). This function requires the entire
pathname, name and .CATfct extension to be passed as input. It also
requires the client id. It returns a CATICatalog pointer to the opened
catalog. This pointer can then be used to add new StartUps and/or attributes to
the catalog.
[Top]
If your StartUps are "public", this means that they will be
registered as such in a declarative file. This declarative file's name is the
same as that of the catalog but it has a .CATSpecs suffix. For each
"public" StartUp, you can also list the attributes that are also
"public". These attributes will be available for consultation, all
other attributes of the "public" StartUp will not be available at all.
The declarative file also registers information concerning the authorization you
may give for your StartUp to be derived by others in order to create a new
StartUp. The declarative file for each catalog containing information on the
publication of your StartUps can be created through a specific batch program as
seen in the use case "Managing Public Features and Attributes" [3].
However, it is also possible for you to register this information automatically
at the time you create your StartUp in the first place. This is done by
valuating two optional arguments of the CreateSUInCatalog method of
CATICatalog:
CATBaseUnknown *pAddSU = NULL;
CATUnicodeString addSUName = "CAAOsmAdd";
CATUnicodeString addSUType = "CAAOsmAdd";
CATBoolean publicSU = TRUE;
CATBoolean derivableSU = TRUE;
rc = piCatalog -> CreateSUInCatalog(&pAddSU,
                                    &addSUName,
 			         &addSUType,
			         "CATISpecObject",
				NULL,
		    	         publicSU,
			         derivableSU);
if (NULL != pAddSU) cout << "CAAOsmAdd StartUp created OK" << endl << flush;
else
{
    cout << "ERROR in creating CAAOsmAdd StartUp" << endl << flush;
    piCatalog -> Release();
    return 1;
}
|
As you can see above, the CATBoolean publicSU argument is valuated to TRUE: this means that the StartUp will be registered in the corresponding .CATSpecs file. By also setting the CATBoolean derivableSU argument to TRUE, the StartUp is marked as "derivable" by others, i.e., others are authorized to create their own new StartUps deriving from this one.
[Top]
// Delete session
rc = ::Delete_Session(sessionName);
if (FAILED(rc))
{
   cout << "ERROR in deleting session" << endl << flush;
   return 6;
}
|
The Session must also be deleted. If you do not yourself create the session,
it is done by default in the CreateCatalog method. In any case, it
is your responsibility to delete the session at the end of your batch program.
Use the Delete_Session global function:
[Top]
In order to have NLS on the feature names that may appear in the
specifications tree during an interactive session, it is necessary to create a .CATNls
file corresponding to each .CATfct catalog. The .CATNls file is a normal
text file. Its name must be the same as the catalog name + "NLS"
and the .CATNls suffix. For example, the catalog CAAOsmCatalogSU.CATfct
would have a corresponding NLS file called CAAOsmCatalogSUNLS.CATNls. The
file is delivered in the CNext + resources + msgcatalog directory of your
framework. The contents of the file must follow a precise format: for each
feature name that is displayed to the user, a text line must be created
containing the correspondence FeatureName = "Feature Name Value". For
example, in the case of a StartUp whose name is CAAOsmNovel, you would enter the
following text line: CAAOsmNovel = "Novel". Then, in the
specifications tree, "Novel" would appear as the feature name. Here is
an example of the NLS file created for the CAAOsmCatalog.CATfct feature catalog
file:
CAAOsmPublisher="Publisher";
|
Top]
This use case has demonstrated how to create and define StartUps in Catalogs. It has also exposed a number of concepts on the feature modeler, such as types and supertypes, simple and feature attributes. Specifically, this use case has illustrated:
CreateCatalog global
functionSetClientId method of CATICatalogCreateSUInCatalog
method of CATICatalogAddAttribute method
of CATISpecObjectSaveCatalog global
function.UpgradeCatalog global function.CATSpecs declarative file.Other use cases will demonstrate how to use features based on these StartUps.
[Top]
| [1] | Feature Modeler Overview |
| [2] | Building and Launching a CAA V5 Use Case |
| [3] | Managing Public Features and Attributes |
| [Top] | |
| Version: 1 [Feb 2000] | Document created |
| Version: 2 [Nov 2000] | Document modified |
| Version: 3 [Feb 2002] | Document modified |
| [Top] | |
Copyright © 2000, Dassault Systèmes. All rights reserved.