RADE
|
Data Model Customizer for ENOVIA
|
DMC for ENOVIA LCA
Customizing the ENOVIA Database |
| Technical Article |
Abstract
This article describes how to customize the ENOVIA
LCA database using the Data Model Customizer in Rational
Software Architect.
|
Before You Start
Make sure you have:
- Checked ENOVIA Designer
Studio and CAA - Web Application Composer
in the CAA V5 Development Environment Setup window. To find out more, see customizing the RADE Interactive Tools.
- Run the process described in
Installing RSx.
Overview
Using
Rational Software Architect and Modeler (RSx) as an Interactive
Design Tool
The Data Modeler Customizer is an interactive tool integrated
to Rational Software Architect and Rational Software
Modeler (Rsx). You can design new customizations in UML
(Unified Modeling Language) using Rational Software Architect
Integrated Design
Environment. Use a dedicated wizard to create a brand new LCA customization and
manage it through the DMC specific menus embedded within
Rational Software Architect interface. With these new menus, it becomes very easy to define new modeler
objects and their attributes, or to modify them. You will see at all time
the logical and graphical view of your customization content. When your design
is correct, you can launch the metadata generation from
RSx.
Then, the ".metadata" file is generated in the
CNext/code/dictionary
directory
of your current active framework and the model is stored in a UML file suffixed
".mdl".
[Top]
Before You
Start
You are going to work in 2 different views, the
Perspective
Modeling View and the
Navigator View. To access both views:
- From the
Window
menu, select Open perspective->Other.
In the Select
Perspective dialog box, select
Modeling (default). Click
OK when done.
- From the
Window
menu, select Window->Show View->Other.
In the Show View dialog box, select
Navigator. Click
OK when done.
Before customizing any model, you
must
know the names and composition of your model.
On the one hand, some cases are simple because
your customization will be accepted, and names have no consequence on its further use.
The only restriction is the name length which is limited to 12 characters. But
this limitation is applied to all model customizations.
For ECO/ECR,
you can either create a model which inherits from
ECO or ECR, or from both, and all names are allowed to customize your
model. Actions and Config follow the same principle.
On the other hand, the customization of some models requires
rigor and knowledge of the composition of the model.
Two examples are presented to attest this fact.
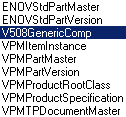
-
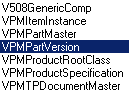
To customize a Product, you MUST create 3 objects which
respectively inherit from VPMPartMaster,
VPMPartVersion and
VPMItemInstance.
In this case, names have a great importance. Indeed, each name of customized
object must comply with the name of the inherited object:
The suffix name
must be the same as the one of the inherited parent. Moreover, each prefix
name must be identical for the 3 objects.

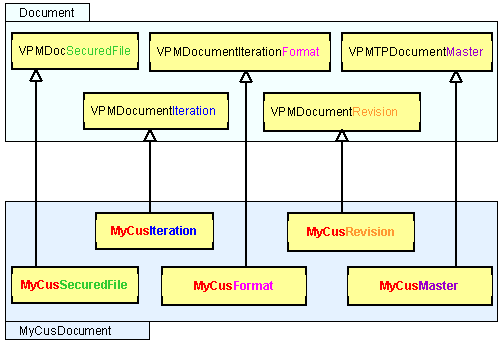
In the same way, to customize a Document, you MUST create 5
objects which inherit from VPMSecuredFile,
VPMDocumentIteration,
VPMdocumentIterationFormat,
VPMDocumentRevision,
VPMTPdocumentMaster, with
the same specifications as for Product.
What Do You Want to Do?
There are multiple ways to customize the data model:
- By creating new sets of objects
- By adding new objects to an existing set of objects
- By adding attributes to an existing object
Whichever way is chosen, all these cases are handled in the same
way: Creating a new modeler object. For example, if you add attributes
to an existing LCA object, create a new modeler object that "extends"
the LCA object using inheritance and let LCA use this extended object rather
than the original one.
Note that whenever you customize an LCA application, you create a new UML
model, as well as a new ".metadata" file. All modeler objects you create
are stored in this new model, and are kept separate from the LCA original
models (or somebody else's customization). It is always very important to keep
your customized data schemas separate from the original LCA data schema, to
allow you to upgrade the LCA release without destroying or losing your work.
As far as the CAA file tree is concerned, an Enovia Application corresponds
to a framework. This framework contains:
- The UML model (under the directory ProtectedInterfaces/FrameworkName.mdl).
- A dictionary file. This dictionary contains the objects
that will be used in the Enovia runtime (under the directory CNext/code/dictionary/FrameworkName.metada)
[Top]
Creating a UML Project
- From the
File
menu, select New->Project.
- In the
New Project
window, select UML Project
and click Next>.
- Enter the name of the project in the
Project name field click
Next> and
Finish.
- In the
Navigator view, right-click your project and
select Open as a DMC project...
 |
- If a workspace has already been opened, this
step is not required. If you want to create a customization in
another workspace, you need to close RSA and reopen it.
- To access the
Navigator view, select
Window->Show
         View->Other->Navigator
.
|
-
In the
Open a DMC Project window, select the
tool level, CXR17 in this example and click
Next>. Click
Close in the
Initializing window.
-
Click
Add to select the prerequisites
frameworks, select your prerequisites and click Finish.
If you have already defined your prerequisites, click
Cancel.
-
Click
Close in the
Installing prereqs window.
[Top]
Defining Prerequisites for
DMC
You certainly defined your prerequisites (Unix or NT) when
using the
Open as a
DMC
command but you can modify them any time using the
DMC Project->Define
Prerequisites for DMC
command.
[Top]
Creating a
New ENOVIA LCA Customization
- From the
File
menu, select New->Other.
- Expand the
DMC elements
node, select New LCA Customization
and click
Next>. The
Create New ENOVIA PLM Customization
window opens.
- Enter the name of the application in the
Application name field.
- Click
...
to select the Super Class, click
Next> and
Finish.
|
|
If you want to derive a customization from another
customization, do not forget to set the CAA derivable option to Yes
when creating a new modeler object. This way, the customization will be
available in the Super class list of the New Modeler Object window. |
|
|
When creating a new modeler, the super
classes available in the Create a Modeler
window depend on the
Super
       Class
you have chosen in the
New LCA Customization window (see graphic
above). The table below details the modeler classes available for each
customization class.
Actions
|
ADMPSM
|
Config
|
Document
|
ECOECR
|
People
|
Product Structure
|
Standard Part
|
 |
 |
 |
 |
 |
 |
 |
 |
|
[Top]
Creating an
Object Modeler
- From the
File
menu, select Other->DMC elements->New
Modeler Object. Click
Next>. The
New Modeler Object window opens.
- Enter the class name in the
Class name field,
CustoDesignAction in this example.
Carefully choose the class name, it will be forbidden to modify it after creating the customization.
- Select the
Super
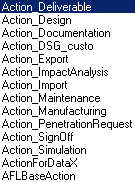
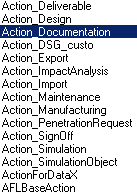
Class in the list (Action_Design
in this example). Click Next>.

- Click
Insert
in the Attributes
field to add attributes.
- Click
Insert
in the Index field to add
attributes. The object will be created in a package corresponding to his access.
- Click
OK to confirm
the object modeler creation.
The wizard generates a new framework containing a new UML model importing
the modeler objects defined in the original parent application.
The wizard generates also a file .ENOVApp which contains the application
name, the application which is customized (as the parent application) and the
list of the prerequisite frameworks and their dictionary file names.
[Top]
Adding Attributes to Objects
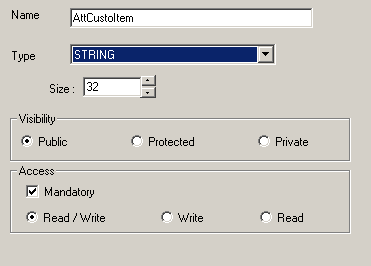
Adding Attributes to a New Object
- In the
New Modeler
   Object
window, click
Insert in the
Attributes field.
- Enter the name of the attribute in
the
Name
field.
Carefully choose the name, it will be forbidden to modify it after creating the customization.
- Select its type in the list.
- Select the size of this attribute and specify if need be
its visibility and Access.
- Click
OK
when done.
- Repeat the above steps for each attribute your want to create.
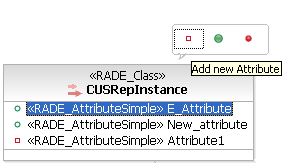
Adding Attributes to an Existing Object
- In the diagram, select an attribute and click the red square
(see picture below). Enter the name of the new attribute and edit
it in the Properties view.
|
- In the diagram,
right-click the class, and select
Add
               UML->Attribute
.
Enter the name of the new attribute and edit it in the Properties
view.
|
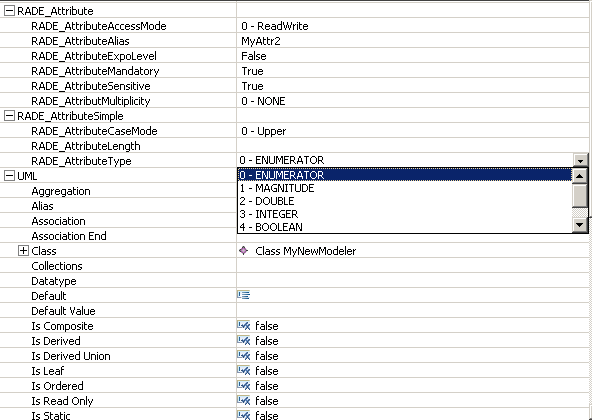
Adding a Relationship Type Attribute to a New Object
When you select a type in Type list when creating a new
attribute, the basic types are available. If you have already created classes,
their names are displayed in this list. To create an attribute based on such a
class, select the class in the Type list.
Adding a Relationship Type Attribute to an Existing Object
You can add a Relationship type attribute to an existing object:
- In the diagram,
right-click the class, and select
   Add
               UML->Attribute
.
- Enter the name of the new attribute and edit it in the
Properties
view.
- In the
General tab,
modify the
Visibility,
Mandatory,
... properties.
- In the
Stereotypes
tab, click
Add Stereotypes
and check
RADE_AttributeRelation.
[Top]
Editing an Attribute
- In the
Main view of the class diagram, click the
attribute that you want to edit.
- Click the
Properties
tab
- Click
General
if you want to modify its visibility, its qualifiers, its type, its
value or its multiplicity.
- Click
Advanced
if you want to modify its type for example or other parameters.
|
[Top]
Overloading an Attribute
Only relationship type attributes
can be overloaded.
The attribute to overload must:
- Keep exactly the same naming as defined in the
Super
Class.
- Point to a Class inheriting from the
Super Class.
[Top]
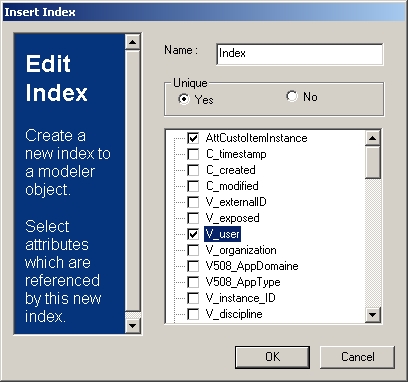
Adding an Index to an Object
- In the
New Modeler
   Object
window, click
Insert in the
Index field.
- Enter the name of the index in the
Name field.
- Specify if this index will be unique or not.
- Select the attributes which are referenced by the
index.
- Click
OK
when done.
[Top]
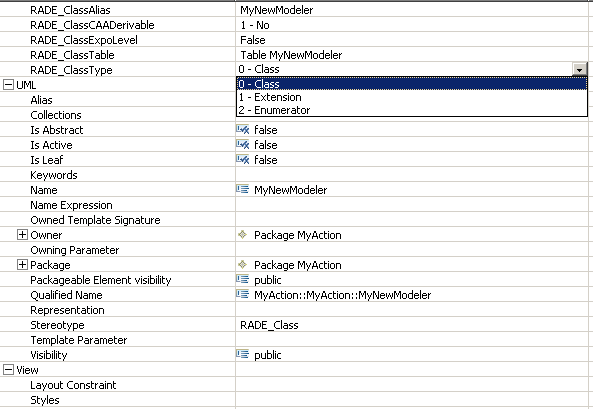
Editing a Modeler Object
- In the
Main view of the class diagram, click the
class that you want to edit.
- Click the
Properties
tab.
- Click
General
if you want to modify its visibility, and to indicate if it is
abstract or leaf.
- Click
Advanced
if you want to modify its type for example or other parameters.
|
You cannot modify the name or the
Super Class of the modeler object.
[Top]
Modifying the Attributes of a
Modeler
You can modify the attributes of a modeler on condition that
this attribute is of String type and you want to increase its size.
-
Create a workspace migrating an existing workspace to a
subsequent version. The generated data is located in the following directory:
Workspace_name/framework_name/CNext/code/dictionary/module.DMCRules.
-
Open the generate file in a text editor and perform the
modification.
 |
- Edit the
MaxLength field and enter the desired
string length.
- Change the
Modified status to "Y".
|
-
Publish the changes.
[Top]
Modifying an Existing Customization
Adding a new Object Modeler to an Existing Customization
- In the Navigator view, right-click your project and
select
Open as a DMC project...
-
If your prerequisites have already been defined click Cancel in the opening
window. If not, select the tool level and click
Next>. Click
Close in the
Initializing window.
Click Add to select the prerequisites
frameworks, select your prerequisites and click Finish.
-
Create an Object Modeler.
Adding an Attribute to an Existing Object
- To add an attribute to an existing object:
- In the diagram, select an attribute and click the red square
(see picture below). Enter the name of the new attribute and edit
it in the Properties view.
|
- In the diagram,
right-click the class, and select
Add
               UML->Attribute
.
Enter the name of the new attribute and edit it in the Properties
view.
|
If you do not have access to the Properties view, select
Window->Show View->Other,
then select
Basic section->Properties.
Then in this properties view you can set the visibility in the General
section, and all other RADE_Attributes values in the Advanced section.
- If you want to derive an other class for your customization, select
File->Other->DMC
   elements->New Modeler Object
.
[Top]
Generating the
Dictionary File
- From the
DMC Project menu, select Generate
VPM Dictionary file. The following window is displayed.
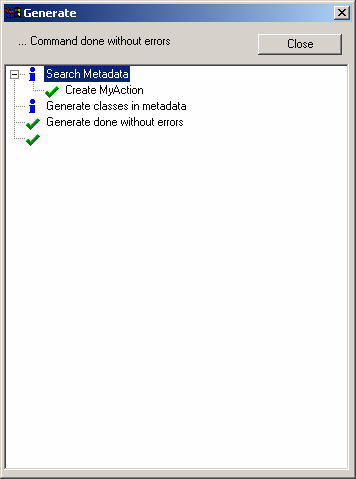
The wizard creates MyAction.metadata under the directory MyAction/CNext/code/dictionary.
[Top]
Importing Metadata
- From the
DMC Project menu, select
Import
VPM Dictionary file. The following window is displayed. This
command is designed to ensure coherence between the UML
model and the
dictionary file.
[Top]
Publishing Your
Customization
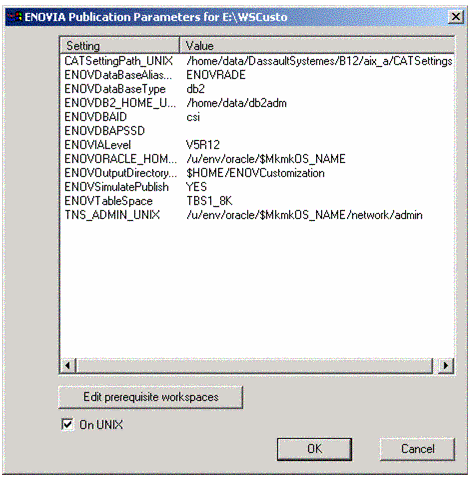
- Select
DMC Project->Publish
   VPM Dictionary file in Database
. Click
OK. The data are published. Check if the settings are correctly valuated and click
OK to launch the Publish command to finish
the scenario.
Setting
|
Explanation
|
CATSettingPath |
The path of the CATSettings directory of your ENOVIA LCA installation |
ENOVDataBaseAliasName |
The name of your database |
ENOVDataBaseType |
The type of your database: db2 and oracle is supported |
ENOVDB2_HOME |
If you have a db2 database type: the HOME directory of the db2 user |
ENOVDBAID |
The ENOVIA LCA administrator |
ENOVDBAPSSD |
The password of the ENOVIA LCA administrator |
ENOVIALevel |
The release level of ENOVIA LCA: must be V5Rn, where n is
the release number |
ENOVORACLE_HOME |
If you have a oracle database type: the oracle installation |
ENOVOutputDirectory |
At the end of the publish, RADE copy some required files in this
directory. This directory can be use to deploy the customization on a
another database. |
ENOVSimulate |
If you inform YES: RADE build the library and generate the database
script but don't update the database. If you inform NO: the database is
updated. |
ENOVTableSpace |
The name of your tablespace |
TNS_ADMIN |
If you have a oracle database type, it's the name of you TNSADMIN. |
The publish update your test or production server runtime with your
customization.
 |
When publishing your customization, *.metadata.off files
are generated. Do not delete them, they will be used at the next
publication. |
[Top]
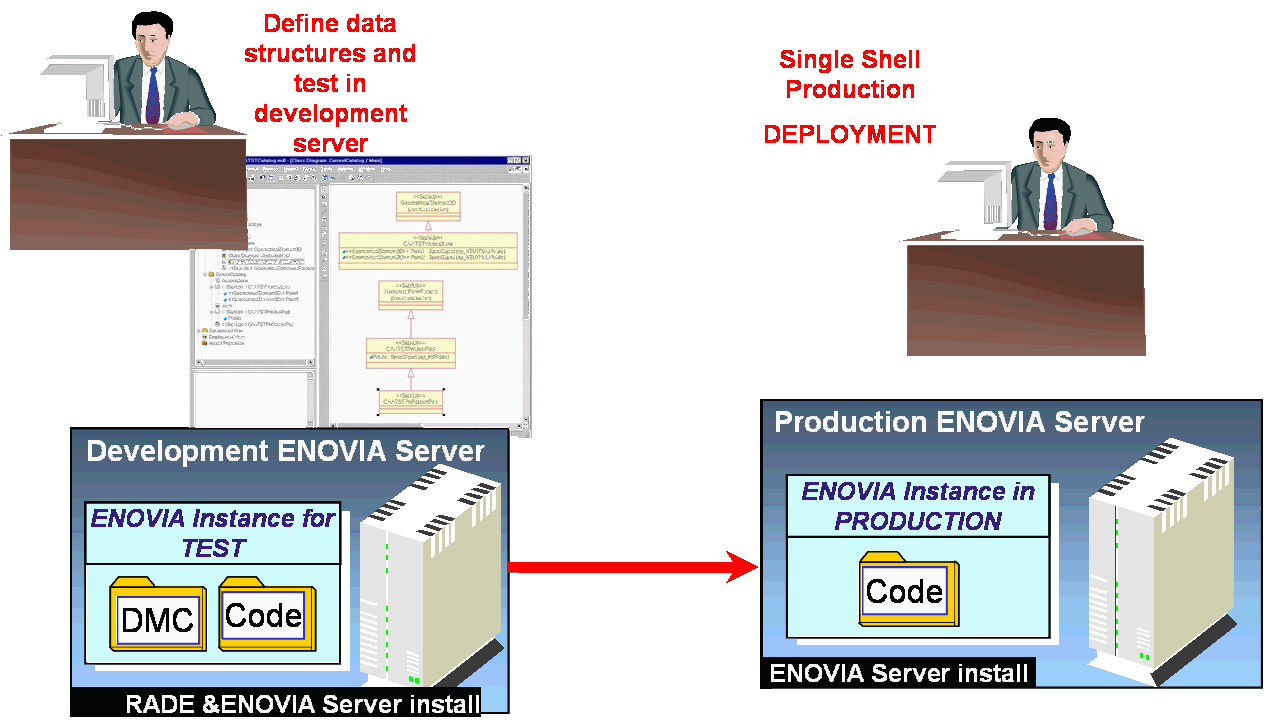
Deploying your Customization
Why use the deployment
mechanism?
- You can test the customization on a Development ENOVIA
server before making it available in Production environment
- There is no need to install RADE on the production
ENOVIA server machine
- There is a separation of responsibilities between LCA
Data structure analyst and LCA Server administrator.
- There is a single documented procedure ( in the next
article ) to:
- Update data structures
- Update database tables
- Modify administration settings
- Update customized object masks
[Top]
How to deploy a customization?
The deployment process will
- Create a new RADE directory to store customized files
- Create a new environment file
- Generate SQL order
- Update database
- Add customized modelers in ADMIN database
- Import Default Mask generated by RADE
STEP 1: Make a customization with RADE tools. Publish
the customization and check in ENOVIA LCA that the customization is available.
STEP 2: Check prerequisites for deployment
- The Development Server and the Production Server
should be installed on the same operating system
- In the $ENOVOutput directory ( generated during publishing process ), you
should have
- *.custo files , *.metadata files, VPMSearchEntityDefinition.xml,
VPMLightNode.xml, ActionRules.xml under $OS/code/dictionary
- *.param files under $OS/reffiles/DBMS/Generator
- *.CustomEnv.sh under $ENOVOutput
|
|
- You can make your customization on DB2 and deploy it on ORACLE ( or the
other way around )
- You can deploy your customization on a customize database
|
STEP 3:
- cd to the "code/command" directory under your ENOVIA
LCA product install path. This path appears like one of the following :
- ~/aix_a/code/command
- ~/solaris_a/code/command
- ~/hpux_b/code/commandf
under the directory where you installed the product.
- Create a command file containing all the parameters you will need to run
the deployment script. The parameters should all wrap continuously as one line.
WARNING: Because the command line contains the user/password of the LCA admin,
maintain the confidentiality of this command file.
The command line is as follows:
./DeployRadeCusto.sh
...
-DBVendor |
ORACLE or DB2 |
-DBName |
The name of your database |
-DBAdmHome |
The home directory of Oracle Id or the DB2 instance ID |
-TbsName |
The tablespace name used by ENOVIA LCA for its database
tables |
-IdxTbsName |
The tablespace name used by ENOVIA LCA for its indexes |
-TableOwner |
The ID that is creator/owner of database tables |
-AdmUsr |
The ENOVIA LCA administrative user ID ( often the same as
TableOwner ) |
-AdmPwd |
The AdmUser password |
-DBAID |
The database administrator ID |
-DBAPwd |
The database administrator password |
-EnvDir |
The full directory path to the CATEnv directory |
-EnvName |
The name of the "ENOVIA_LCA~" file in CATEnv directory
without the ".sh" |
-InitRADECustoDir |
The ENOVOutput directory of the publish |
-RADECustoDir |
The directory where you want to deploy the customization |
For command line help with this script, simple type:
DeployRadeCusto.sh <return>
from the UNIX command line and it will return some help text.
Here are two sample executable files, one for Oracle and one for DB2
DB2:
./DeployRadeCusto.sh -DBVendor DB2 -DBName ENOVRADE -DBAID db2adm7 -DBAPwd
db2adm7 -DBAdmHome /home/data/db2adm7 -TbsName TBS1_8K -IdxTbsName TBS1_8K -TableOwner
EV5ADM -AdmUsr ev5adm -AdmPwd EV5ADM -EnvDir /CATEnv -EnvName
ENOVIA_LCA.V5R11.B11 -InitRADECustoDir /home/data/ev5adm/MSDEV/CustoOutput -RADECustoDir
/home/data/vpm5adm/RADECusto
ORACLE:
./DeployRadeCusto.sh -DBVendor ORACLE -DBName ORARADE -DBAID ora7
-DBAPwd ora7 -DBAdmHome /home/oracle/8.1.7 -TbsName TBS1_8K -IdxTbsName TBS1_8K
-TableOwner EV5ADM -AdmUsr ev5adm -AdmPwd EV5ADM -EnvDir /CATEnv -EnvName
ENOVIA_LCA.V5R11.B11 -InitRADECustoDir /home/data/ev5adm/MSDEV/CustoOutput -RADECustoDir
/home/data/vpm5adm/RADECusto
4 - Run the file script from the Unix command line. Information status
messages appears. Some steps will take several minutes, during which no
additional messages will appear.
5 - Run ./enoviastart -env ENOVIA_LCA.V5R11.B11 -direnv /CATEnv
-object "-senv WorkspaceEnv -sdirenv /home/data/vpm5adm/RADECusto/CATEnv"
to test your deployment.
[Top]
References
History
| Version: 1 [May 2001] |
Document created |
| Version: 2 [January 2007] |
Document updated |
| [Top] |
Copyright © 2007, Dassault Systèmes. All rights
reserved.