3D PLM Enterprise Architecture |
User Interface - Dialogs |
The Burger Order Dialog BoxA comprehensive dialog box sample |
| Use Case | ||
AbstractThis article discusses the CAADlgBurger.m module of the CAADialog.edu framework. It shows how to create a dialog box, and the interactive application needed to display and run it. It includes and explains most of the Dialog framework mechanisms. |
This integration example is intended to cover the scope of programming tasks to create a dialog box. These tasks are:
[Top]
CAADlgBurger is a use case of the CAADialog.edu framework that illustrates Dialog framework capabilities.
[Top]
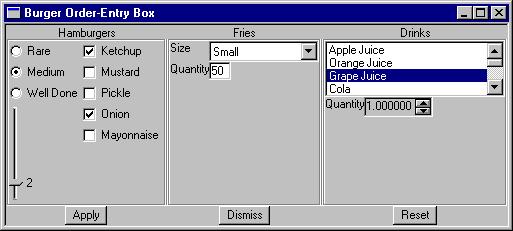
This example introduces some objects of the Dialog framework, how to arrange them in a dialog box, and a key mechanism of the interactive application architecture as well: the callback mechanism. The window is a fast-food order dialog box. It allows you to select what you want to eat and drink, and generates the order in a message window if you click the Apply push button.
Below is the how the dialog box looks like.

The Dialog framework objects that you can use for selecting a value or an attribute and that react to your selection are controls (like radio buttons, combos or spinners). The different controls are gathered in frames. For example, the Hamburgers frame includes a slider to select the number of hamburgers you want, radio buttons to choose the cooking, and click buttons to add condiments. Separators help to distinguish the three frames, and above, labels help to understand what their contents refer to. Labels can also be used for other Dialog framework objects such as the combo to choose the fries size, or the editor to choose the number of fries. A selector list with a scrollbar allows you to select a drink within the list and a spinner lets you order the number of drinks you want. These objects are shown below.
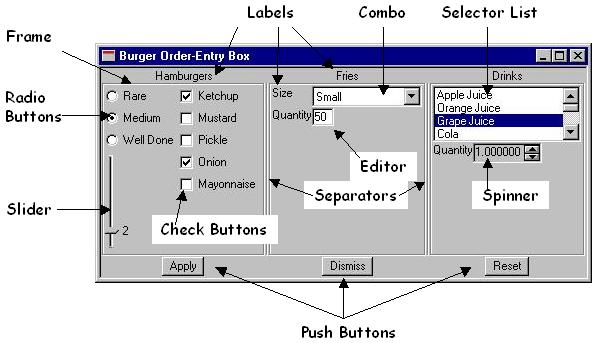
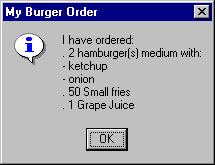
Checking, selecting, or entering values display traces in the command prompt window. When you have chosen, the Apply push button builds the order and displays it in another window. You can reset the different objects to their default value using the Reset push button, and exit the window using the Dismiss push button. If you press Apply, you order is generated in the following window:
[Top]
To launch CAADlgBurger, you will need to set up the build time environment, then compile CAADlgBurger along with its prerequisites, set up the run time environment, and then execute the use case [1].
[Top]
The CAADlgBurger use case is made of a several classes located in the CAADlgBurger.m module of the CAADialog.edu framework:
| Windows | InstallRootDirectory\CAADialog.edu\CAADlgBurger.m\ |
| Unix | InstallRootDirectory/CAADialog.edu/CAADlgBurger.m/ |
where InstallRootDirectory is the directory where the CAA CD-ROM
is installed.
The CATDlgBurger.m module includes four files:
| CAABurgerApplication.h | The interactive application header file |
| CAABurgerApplication.cpp | The interactive application source file |
| CAABurgerDialogBox.h | The dialog box header file |
| CAABurgerDialogBox.cpp | The dialog box source file |
The resource file CAABurgerDialogBox.CATNls is located in the CNext\resources\msgcatalog directory.
[Top]
[Top]
Thanks to an interactive application, the Burger dialog box can be displayed and run as a standalone application. This interactive application is made of the class CAABurgerApplication that derives from CATInteractiveApplication. Its header file is as follows.
#ifndef CAABurgerApplication_h
#define CAABurgerApplication_h  // To prevent from multiple inclusion
#include "CATInteractiveApplication.h"

class CAABurgerDialogBox;  // Forward declaration to the burger dialog box class

class CAABurgerApplication : public CATInteractiveApplication
{
  public:
                 CAABurgerApplication(const CATString & iApplicationId);
    virtual     ~CAABurgerApplication();
    virtual void BeginApplication();
    virtual int  EndApplication();
  private:
    CAABurgerDialogBox * _pBurgerDialogBox; // The dialog box
};
#endif
|
In addition to the constructor and destructor, this interactive application class redefines two methods of CATInteractiveApplication:
BeginApplication, called by CATIA just after the application
constructor. This method is dedicated to create the different objects
managed by the application, namely here the dialog boxEndApplication, called by CATIA when the application
destruction is requested. This method is dedicated to deallocate objects or
close files. Note that the application dialog windows and boxes declared as
the application class data members are automatically deleted.The dialog box is created in the BeginApplication method, and
the EndApplication has nothing to deallocate since the only data
member is this dialog box.
...
void CAABurgerApplication::BeginApplication()
{
  _pBurgerDialogBox = new CAABurgerDialogBox(this,              // Parent
                                             "BurgerId",        // Identifier
                                             CATDlgGridLayout); // Style
  _pBurgerDialogBox->Build();
  _pBurgerDialogBox->SetVisibility(CATDlgShow);
}

int CAABurgerApplication::EndApplication()
{
  return 0;
}
...
|
Note that the dialog box class is first instantiated, then initialized using
its Build method, and finally set as visible. The constructor
parameters are:
The application is simply instantiated as follows. CATIA creates the main program from this instance.
...
CAABurgerApplication ApplicationInstance("Burger");
|
[Top]
The file CAABurgerDialogBox.h contains the following:
#ifndef CAABurgerDialogBox_h
#define CAABurgerDialogBox_h   // To prevent from multiple inclusion

#include "CATDlgDocument.h"

class CATDlgFrame;
...                               // Data member class forward declaration
class CATInteractiveApplication;

class CAABurgerDialogBox : public CATDlgDocument
{
  DeclareResource(CAABurgerDialogBox, CATDlgDocument)
  public:
    CAABurgerDialogBox(CATInteractiveApplication * iParentCommand,
                       const CATString           & iDialogBoxId,
                       CATDlgStyle                 iDialogBoxStyle);
    virtual ~CAABurgerDialogBox();
    void     Build();

  private:
    CATDlgFrame           * _pHamburgerFrame, * _pFriesFrame, * _pDrinkFrame;
    CATDlgLabel           * _pHamburgerLabel, * _pFriesLabel, * _pDrinkLabel,
                          * _pSizeOfFriesLabel, * _pQuantityOfFriesLabel,
                          * _pQuantityOfDrinksLabel;
    CATDlgRadioButton     * _pRare, * _pMedium, * _pWellDone;
    CATDlgCheckButton     * _pKetchup, * _pMustard, * _pPickle,
                          * _pOnion, * _pMayonnaise;
    CATDlgSlider          * _pHamburgerQuantity;
    CATDlgCombo           * _pFriesSize;
    CATDlgEditor          * _pFriesQuantity;
    CATDlgSelectorList    * _pDrinkList;
    CATDlgSpinner         * _pDrinkQuantity;
    CATDlgSeparator       * _pSeparator1, * _pSeparator2;
    CATDlgPushButton      * _pApply, * _pDismiss, * _pReset;
...
};
#endif
|
The DeclareResource macro enables the class and all its dialog
objects to use the automatic resource assignment. The first parameter is the
class name, and the resource files must use this class name as file name, such
as CAADlgBurger.CATNls for the file containing the texts and messages.
The class has a constructor, a destructor, and a Build method.
Pointers to the different dialog objects and controls are then declared as data
members.
The remaining part of this file deals with the callback method declaration, the message window, the message catalog, and a pointer to the interactive application stored as a data member:
...
// Methods to execute when a control is activated
    void Rare               (CATCommand           * iSendingCommand,
                             CATNotification      * iSentNotification,
                             CATCommandClientData   iUsefulData);
    void Medium             (CATCommand           * iSendingCommand,
                             CATNotification      * iSentNotification,
                             CATCommandClientData   iUsefulData);
    void WellDone           (CATCommand           * iSendingCommand,
                             CATNotification      * iSentNotification,
                             CATCommandClientData   iUsefulData);
...
// The order message window
    CATDlgNotify * _pNotifyWindow;
    void NotifyOK           (CATCommand           * iSendingCommand,
                             CATNotification      * iSentNotification
                             CATCommandClientData   iUsefulData);
...
// The message catalog
    CATMsgCatalog * _pMsgCat;
// The dialog box parent
    CATInteractiveApplication * _pCAABurgerApplication;
};
|
All the methods are not listed here. The method to execute when a given control is activated has the following arguments:
Such a method is automatically called because we'll set callbacks that refer to these methods. See Setting Callbacks onto Controls.
Some variables are declared to manage the different things you can order, and one method is dedicated to each action associated with a given control.
[Top]
Let's have a look at the beginning of CAABurgerDialogBox.cpp:
...
CAABurgerDialogBox::CAABurgerDialogBox(CATInteractiveApplication * iParentCommand,
                                       const CATString           & iDialogboxId,
                                       CATDlgStyle                 iDialogBoxStyle)
       : CATDlgDocument(iParentCommand, iDialogboxId, iDialogBoxStyle),
	 _pCAABurgerApplication(iParentCommand)
{
  cout << "------- Burger constructor -------" << endl;
  cout << "-------  to allocate only  -------" << endl;
}

void CAPBurger::Build()
{
  CATString BurgerMsgCatalogName("CAABurgerDialogBox");
  _pMsgCat = new CATMsgCatalog();
  int rc = _pMsgCat->LoadMsgCatalog(BurgerMsgCatalogName);
  if(!rc) cout << "The message catalog is not found" << endl;
  ...
  _pHamburgerLabel = new CATDlgLabel(this, "HamburgerLabelId");
  CATDlgGridConstraints GC1;
  GC1.Row = 0; GC1.Column = 0; GC1.H_Span = 1; GC1.V_Span = 1; GC1.Justification = CATGRID_CENTER;
  _pHamburgerLabel->SetGridConstraints(GC1);

  _pFriesLabel = new CATDlgLabel(this, "FriesLabelId");
  GC1.Row = 0; GC1.Column = 2; GC1.H_Span = 1; GC1.V_Span = 1; GC1.Justification = CATGRID_CENTER;
  _pFriesLabel->SetGridConstraints(GC1);

  _pDrinkLabel = new CATDlgLabel(this, "DrinkLabelId");
  GC1.Row = 0; GC1.Column = 4; GC1.H_Span = 1; GC1.V_Span = 1; GC1.Justification = CATGRID_CENTER;
  _pDrinkLabel->SetGridConstraints(GC1);
...
|
The constructor is empty, but calls the base class CATDlgDocument
constructor,and sets the parent command of the window as the interactive
appliction itself. The Build method begins with the message catalog
creation from the file designated using the DeclareResource macro
in the header file. This message catalog creation is required because some
controls cannot have their resources automatically assigned. This is the case
for the combo and editor lines. The labels, frames, and push buttons are then
instantiated. Now we shall arrange these objets in the window in a grid as
follows:
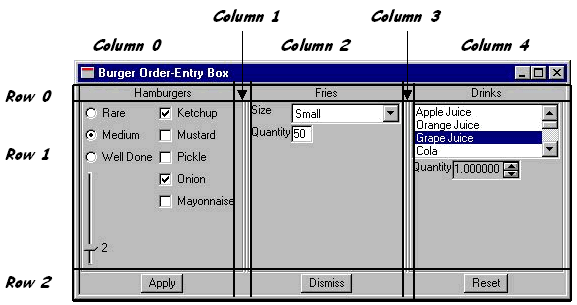
Three rows and five columns are necessary to accommodate the labels for the titles, the frames and separators, and the three push buttons. This is coded using instances of the CATDlgGridConstraints class for the three frames and the two separators as follows:
... _pHamburgerFrame = new CATDlgFrame(this, "HamburgerFrameId", CATDlgFraNoTitle | CATDlgGridLayout); CATDlgGridConstraints GCFH(1,0,1,1, CATGRID_TOP | CATGRID_BOTTOM); _pHamburgerFrame->SetGridConstraints(GCFH); _pSeparator1 = new CATDlgSeparator(this, "Separator1Id", CATDlgCtrVertical); CATDlgGridConstraints GCsep1(1,1,1,1,CATGRID_TOP | CATGRID_BOTTOM); _pSeparator1->SetGridConstraints(GCsep1); _pFriesFrame = new CATDlgFrame(this, "FriesFrameId", CATDlgFraNoTitle | CATDlgGridLayout); CATDlgGridConstraints GCFF(1,2,1,1, CATGRID_TOP | CATGRID_BOTTOM); _pFriesFrame->SetGridConstraints(GCFF); _pSeparator2 = new CATDlgSeparator(this, "Separator2Id", CATDlgCtrVertical); CATDlgGridConstraints GCsep2(1,3,1,1,CATGRID_TOP | CATGRID_BOTTOM); _pSeparator2->SetGridConstraints(GCsep2); _pDrinkFrame = new CATDlgFrame(this, "DrinkFrameId", CATDlgFraNoTitle | CATDlgGridLayout); CATDlgGridConstraints GCFD(1,4,1,1, CATGRID_TOP | CATGRID_BOTTOM); _pDrinkFrame->SetGridConstraints(GCFD); ... |
As an example, the first SetGridConstraints method call applies
the GCFH CATDlgConstraints instance that puts the Hamburger
frame left corner in the cell located at the intersection of row 1 and column 0,
and states that this frame extends on one cell in the row direction, and also on
one cell in the colum direction. The CATGRID_TOP and CATGRID_BOTTOM
attributes are concatenated and indicate that the Hamburger frame is attached to
the top and bottom border of the cell [2].
Let's go on with the Hamburger frame controls instantiation and arrangement:
...
// Instantiate and arrange the cooking radio buttons
//                                     dialog parent     Id for resources
  _pRare       = new CATDlgRadioButton(_pHamburgerFrame, "RareId");
// Arrange in container parent
  _pRare->SetGridConstraints(0,             // Top left corner row
                             0,             // Top left corner column
                             1,             // Spans on 1 row
                             1,             // Spans on 1 column
                             CATGRID_LEFT); // Attached to container by left side

  _pMedium     = new CATDlgRadioButton(_pHamburgerFrame, "MediumId");
  _pMedium->SetGridConstraints(1,0,1,1,CATGRID_LEFT);

  _pWellDone   = new CATDlgRadioButton(_pHamburgerFrame, "WellDoneId");
  _pWellDone->SetGridConstraints(2,0,1,1,CATGRID_LEFT);

// Instantiate and arrange the condiment check buttons
  _pKetchup    = new CATDlgCheckButton(_pHamburgerFrame, "KetchupId");
  _pKetchup->SetGridConstraints(0,1,1,1,CATGRID_LEFT);

  _pMustard    = new CATDlgCheckButton(_pHamburgerFrame, "MustardId");
  _pMustard->SetGridConstraints(1,1,1,1,CATGRID_LEFT);

  _pPickle     = new CATDlgCheckButton(_pHamburgerFrame, "PickleId");
  _pPickle->SetGridConstraints(2,1,1,1,CATGRID_LEFT);

  _pOnion      = new CATDlgCheckButton(_pHamburgerFrame, "OnionId");
  _pOnion->SetGridConstraints(3,1,1,1,CATGRID_LEFT);

  _pMayonnaise = new CATDlgCheckButton(_pHamburgerFrame, "MayonnaiseId");
  _pMayonnaise->SetGridConstraints(4,1,1,1,CATGRID_LEFT);

// Instantiate and arrange the hamburger count slider
  _pHamburgerQuantity = new CATDlgSlider(_pHamburgerFrame,
                                         "HamburgerQuantityId",
                                         CATDlgCtrVertical);
  _pHamburgerQuantity->SetRange(0.f,10.f,10); // Ranges from 0 to 10 with 10 steps
  _pHamburgerQuantity->SetDecimalPoint(0);    // No decimal point
  _pHamburgerQuantity->SetGridConstraints(3,0,1,3,CATGRID_LEFT);
...
|
The labels, frames, and push buttons are then instantiated and arranged using a grid. This is described with the hamburger frame taken as an example:
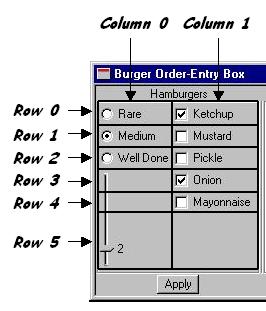
The controls of the Hamburger frame are instantiated by passing their father
in the command tree structure, here the frame itself, and their identifier. They
are arranged in the grid as they are created. For example, the Rare radio button
is instantiated, and it location is declared using the SetGridConstraints
method that creates a grid constraint object with the control with the following
parameters
SetGridConstraintsSetGridConstraintsThe other controls are instantiated and placed in the frame in the same way. The slider is set vertical and ranges from 0 to 10 with 10 steps and no decimal point. It thus takes the values 0, 1, 2, 3, 4, 5, 6, 7, 8, 9, and 10.
[Top]
We will now set the callbacks to trigger the appropriate method when a specific control is activated. Have a look at what happens with the hamburger frame for the hamburger cooking radio buttons:
...
  AddAnalyseNotificationCB(_pRare, _pRare->GetRadBModifyNotification(),
                           (CATCommandMethod)&CAABurgerDialogBox::WellDone, NULL);
  AddAnalyseNotificationCB(_pMedium, _pMedium->GetRadBModifyNotification(),
                           (CATCommandMethod)&CAABurgerDialogBox::Medium, NULL);
  AddAnalyseNotificationCB(_pRare, _pRare->GetRadBModifyNotification(),
                           (CATCommandMethod)&CAABurgerDialogBox::WellDone, NULL);
...
|
For example, if the Rare radio button is clicked, or if another radio button
is clicked while Rare was checked, Rare creates and sends a radio button
modification notification that is an instance of the class
CATDlgRadBModifyNotification. The AddAnalyseNotificationCB method
sets a callback to enable a parent class of the radio button, that is in this
case the dialog box itself, to be called to execute a method whenever the radio
button is checked or unchecked. This callback associates the method Rare
of the dialog box class with the Rare button sending a
CATDlgRadBModifyNotification. Rare is triggered when the Rare
button is clicked, that is when the GetRadBModifyNotification
method returns a radio button modification notification. We now need to code Rare:
void CAABurgerDialogBox::Rare(CATCommand           * pSendingCommand,
                              CATNotification      * pSentNotification,
                              CATCommandClientData   UsefulData)
{
  CATUnicodeString usParam[2];
  usParam[0] = ((CATDlgRadioButton *)pSendingCommand)->GetTitle();
  if (((CATDlgRadioButton *)pSendingCommand)->GetState()==CATDlgCheck)
    usParam[1] = "checked";
  else
    usParam[1] = "unchecked";
  CATUnicodeString usMessage((*_pMsgCat).GetCatalogMsg("RadioButtonNotification").BuildMessage(usParam));
  cout << usMessage << endl;
}
|
This method simply writes a trace in the command window. It retrieves from the object that sends the notification, that is the rare radio button, its title and whether it is checked, and make two CATUnicodeString instances from this information, creates the output message by retrieving a standard message from the resource file and customizign it with the two parameters.
[Top]
The file that contains texts and messages is named CAADlgBurger.CATNls and is stored in CNext\resources\msgcatalog directory.
Title = "Burger Order-Entry Box"; ... HamburgerLabelId.Title = "Hamburgers"; FriesLabelId.Title = "Fries"; DrinkLabelId.Title = "Drinks"; ... HamburgerFrameId.RareId.Title = "Rare"; HamburgerFrameId.MediumId.Title = "Medium"; HamburgerFrameId.WellDoneId.Title = "Well Done"; ... RadioButtonNotification = "/p1 button sends a CATDlgRadBModifyNotification to state it is /p2"; ... |
Each resource that is automatically extracted and assigned is referred to using a key built thanks a concatenation of the identifiers set when instantiating the dialog objects, starting with the dialog box and covering the parent/child tree up to the involved control. For example, HamburgerFrameId.RareId.Title is the key to retrieved the title assigned to the Rare rodio button. It is located in the dialog box resource file, and is made of the hamburger frame identifier, concatenated to the radio button identifier using a dot as separator, itself concatenated to the Title keyword. The mechanism that automatically retrieves the resource value is implemented by the Dialog framework and you don't need to instantiate by yourself the message catalog to do this.
The standard message for radio buttons is referred to using the RadioButtonNotification
key. As with combo or editor lines, there is no automatic message retrieval, and
you should for them instantiate the message catalog, and build a
CATUnicodeString instance from the key and the possible parameters that
customize the standard message.
[Top]
[Top]
| [1] | Building and Launching a CAA V5 Use Case |
| [2] | Arranging Dialog Objects Using Grid |
| [Top] | |
| Version: 1 [Jan 2000] | Document created |
| [Top] | |
Copyright © 2000, Dassault Systèmes. All rights reserved.