

![]()
3D PLM Enterprise Architecture |
User Interface - Frame |
Making Your Commands AvailableHow to integrate your commands into the application frame |
| Technical Article | ||
AbstractOnce you have completed your command development, or even during its development stage, your may want to test them in the application frame, and then make them available to your customers. To do this, you need to decide where to integrate them, and then proceed to the integration. This article gives you tips and explains how to carry out the integration depending on your location decision. Integrating a script as a command is also described. |
To make your brand new commands available to your customers, you need to integrate them into one of the following objects:
[Top]
You can either create a new workbench or modify a existing one.
CreateCommands method of the workbench class
to add your command header instantiationsCreateWorkbench method to create the command
starters and put them in the menus, submenus, toolbars, and icon boxes
you choose[Top]
Because you are not their provider, or because you don't want to modify them, you may prefer to remain independent from the workshop or from the workbench into which you intend to integrate your commands. In this case, the add-in is the solution. You can either create a new add-in, or modify a existing one.
CreateCommands method of the add-in class to
add your command header instantiationsCreateToolbars method to create the command
starters and put them in the toolbars you choose[Top]
If your command modifies the contents of a V5 document, you should ensure its warm start integration. Refer to the technical article entitled "Warm Start Incremental Backup" [3].
[Top]
You can easily customize your toolbars by adding icons to trigger your favorite macros. This reduces the macro access time for the macros you often run.
| This task explains how to add a macro as a command in a toolbar. | |||
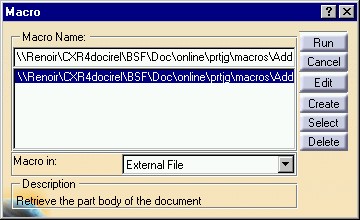
| 1. On the Tools menu, point to Macro, and then click Macros. Click Select to select the macro you want to add to make sure that the directory path of the file containing the requested macro is concatenated with those recognized by the application. Then click Cancel. |  |
||
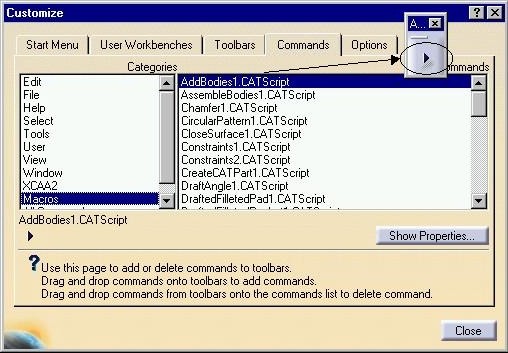
| 2. On the Tools menu, click Customize, and
then click the Commands tab. In the Categories list, click
Macros. Drag the macro name and drop it onto the toolbar you
wish. The default icon |
 |
||
| 3. To select another icon than the default one, click Show
Properties, and click |
 |
||
| 4. Click the appropriate icon. The default icon changes to the one clicked. |  |
||
|
|
|||
The macro is now ready to use from the toolbar.
[Top]
To make your command available to your customers, you need to integrate it into a workbench, or an add-in. You can also add scripts as commands in toolbars.
[Top]
| [1] | Creating a Workbench |
| [2] | Creating an Add-in |
| [3] | Warm Start Incremental Backup |
| [Top] | |
| Version: 1 [Jan 2000] | Document created |
| Version: 2 [Sep 2003] | Warm Start Integration |
| [Top] | |
Copyright © 2000, Dassault Systèmes. All rights reserved.