

3D PLM Enterprise Architecture |
User Interface - Frame |
Creating a WorkbenchExposing and organizing commands dedicated to a given task |
| Use Case | ||
AbstractThis article shows how to create a workbench. |
This use case is intended to show how to create a workbench to be added to a given workshop. Like the workshop, the workbench is an object that gathers the commands to work on the document and arrange them in toolbars and menus. Command headers are used to make the link between the workbench and the commands.
[Top]
CAAAfrGeoCreationWbench is a use case of the CAAApplicationFrame.edu framework that illustrates the ApplicationFrame framework capabilities.
[Top]
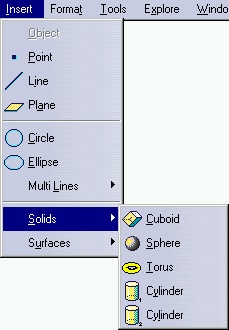
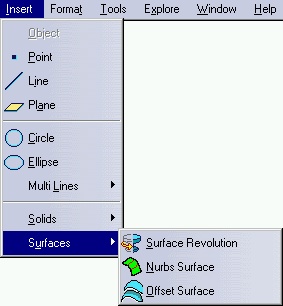
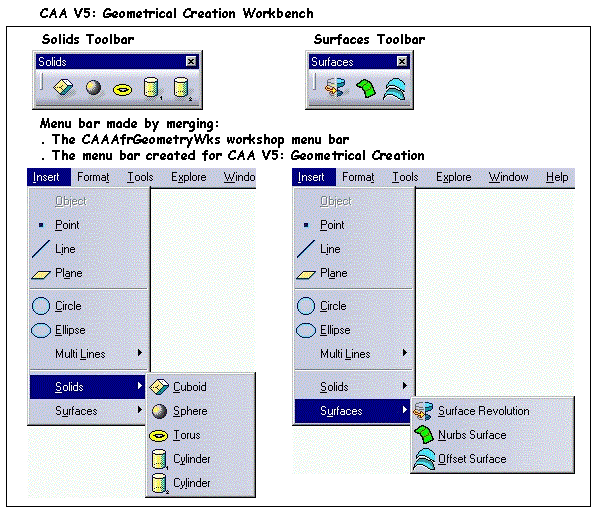
The CAAAfrGeoCreationWbench use case creates a workbench named CAA Geometrical Creation for the CAAGeometry document. Its specifications cover most of the cases you will meet. Two toolbars are provided:
 |
The Solids toolbar. It includes five new commands: Cuboid, Sphere, Torus, and Cylinder 1 and 2. |
 |
The Surfaces toolbar. It includes three new commands: Revolution Surface, Nurbs Surface, and Offset Surface. |
The only change in the menu bar is the addition of these commands in the Insert menu using two submenus below the existing ones.
 |
 |
[Top]
See the section entitled "How to Launch the CAAGeometry Use Case" in the "The CAAGeometry Sample" use case for a detailed description of how this use case should be launched. For the specific scenario :
Do not type the module name on the command line, but type CNEXT instead. When the application is ready, do the following:
This creates a new CAAGeometry document with the CAA V5: Geometrical Creation workbench active.
[Top]
The CAAAfrGeoCreationWbench use case is made of classes and interfaces located in the CAAAfrGeoCreationWbench.m module and in the ProtectedInterfaces directory of the CAAApplicationFrame.edu framework:
| Windows |
InstallRootDirectory\CAAApplicationFrame.edu\CAAAfrGeoCreationWbench.m\ |
| Unix |
InstallRootDirectory/CAAApplicationFrame.edu/CAAAfrGeoCreationWbench.m/ |
where InstallRootDirectory is the directory where the CAA
CD-ROM is installed.
These classes and interfaces are:
| CAAAfrGeoCreationWkb | Workbench description class |
| CAAAfrGeoCreationWkbFactory | Factory class for the workbench class |
| CAAIAfrGeoCreationWkbFactory | Factory interface implemented by CAAAfrGeoCreationWkbFactory |
| TIE_CAAIAfrGeoCreationWkbFactory | TIE class for the factory interface |
| CAAIAfrGeoCreationWkbAddin | Add-in interface exposed by the workbench and that all its add-ins must implement |
| TIE_CAAIAfrGeoCreationWkbAddin | TIE class for the add-in interface |
[Top]
But before creating the workbench, you should:
| In the framework's ProtectedInterfaces directory | ||
| CAAIAfrGeoCreationWkbAddin.h | The header file of the workbench exposed interface to enable clients to create add-ins | |
| In the CAAAfrGeoCreationWbench.m\LocalInterfaces directory | ||
| CAAIAfrGeoCreationWkbFactory.h | The header file of the workbench factory interface | |
| CAAAfrGeoCreationWkbFactory.h | The header file of the workbench factory class | |
| CAAAfrGeoCreationWkb.h | The header file of the workbench description class | |
| In the CAAAfrGeoCreationWbench.m\src directory | ||
| CAAIAfrGeoCreationWkbAddin.cpp | The source file of the workbench exposed interface to enable clients to create add-ins | |
| CAAIAfrGeoCreationWkbFactory.cpp | The source file of the workbench factory interface | |
| CAAAfrGeoCreationWkbFactory.cpp | The source file of the workbench factory class | |
| CAAAfrGeoCreationWkb.cpp | The source file of the workbench description class | |
| TIE_CAAIAfrGeoCreationWkbAddin.tsrc | The file to create the TIE for CAAIAfrGeometryWksAddin | |
| TIE_CAAIAfrGeoCreationWkbFactory.tsrc | The file to create the TIE for CAAIAfrGeometryWksFactory | |
| In the dictionary, that is the CNext\code\dictionary directory, referenced at run time using the CATDictionaryPath environment variable, create or update | ||
| CAAApplicationFrame.edu.dico | The interface dictionary | |
| CAAApplicationFrame.edu.fact | The factory dictionary | |
| In the CNext\resources\msgcatalog directory, referenced at run time using the CATMsgCatalogPath environment variable | ||
| CAAAfrGeoCreationWkb.CATNls | The workbench message file | |
| CAAAfrGeoCreationWkbHeader.CATNls and CAAAfrGeoCreationWkbHeader.CATRsc |
The command header resource files | |
To create the CAA Geometrical Creation workbench, there are seven steps:
| # | Step | Where |
|---|---|---|
| 1 | Create the workbench factory interface | LocalInterfaces and src |
| 2 | Create the workbench factory | LocalInterfaces and src |
| 3 | Create the workbench description class | LocalInterfaces and src |
| 4 | Create the command headers | CreateCommands method |
| 5 | Create the workbench and arrange the commands | CreateWorkbench method |
| 6 | Provide the resources and insert the workbench into the Start menu | Resource files |
| 7 | Create the workbench exposed interface | ProtectedInterfaces and src |
[Top]
This factory interface is named CAAIAfrGeoCreationWkbFactory. To create this interface, create:
This is shown below.
#include <CATIGenericFactory.h>

extern IID IID_CAAIAfrGeoCreationWkbFactory;

class CAAIAfrGeoCreationWkbFactory : public CATIGenericFactory
{
  CATDeclareInterface;
  public :
};
|
A factory interface is a CAA interface, that is, an abstract class that
derives from CATIGenericFactory. As any interface, it has an IID
declared as IID_ followed by the interface name, and includes the
CATDeclareInterface macro that declares that this abstract class is an
interface. No additional method than those of CATIGenericFactory is
necessary. Don't forget the public keyword required by the TIE compiler.
#include <CAAIAfrGeoCreationWkbFactory.h>

IID IID_CAAIAfrGeoCreationWkbFactory = {
    0xb32eed10,
    0xd4c1,
    0x11d3,
    {0xb7, 0xf5, 0x00, 0x08, 0xc7, 0x4f, 0xe8, 0xdd}
  };

CATImplementInterface(CAAIAfrGeoCreationWkbFactory, CATIGenericFactory);
|
This file includes a GUID [1], shown in bold
typeface. The CATImplementInterface macro is used in conjunction
with CATDeclareInterface in the header file to make an interface
from this abstract class and to declare that it OM-derives from
CATIGenericfactory.
#include "CAAIAfrGeoCreationWkbFactory.h" |
The Multi-Workspace Application Builder (mkmk) will generate the TIE for this interface for you, that is, the TIE_CAAIAfrGeoCreationWkbFactory.h file in the ProtectedGenerated directory.
[Top]
![]() The
factory class that creates workbench instances must concatenate the name of the
class to instantiate, that is, the workbench description class
CAAAfrGeoCreationWkb, with the string Factory. This
gives CAAAfrGeoCreationWkbFactory.
The
factory class that creates workbench instances must concatenate the name of the
class to instantiate, that is, the workbench description class
CAAAfrGeoCreationWkb, with the string Factory. This
gives CAAAfrGeoCreationWkbFactory.
To create this class, create:
CATDeclareConfigurationFactory
macroCATImplementConfigurationFactory
macro
#include "CATWorkshopConfigurationFactory.h" CATDeclareConfigurationFactory(CAAAfrGeoCreationWkb); |
The CATDeclareConfigurationFactory macro argument is the name
of the workbench description class.
#include <CAAAfrGeoCreationWkb.h>
#include <CAAAfrGeoCreationWkbFactory.h>

#include <TIE_CAAIAfrGeoCreationWkbFactory.h>

CATImplementConfigurationFactory(CAAAfrGeoCreationWkb,
                                 CAAIAfrGeoCreationWkbFactory);
|
The CATImplementConfigurationFactory arguments are the name
of the workbench description class and the name of the workbench factory
interface respectively. The CATDeclareConfigurationFactory and
CATImplementConfigurationFactory macros create the workbench
factory implementation class as a data extension of the
CATApplicationFrame component
CATApplicationFrame CAAIAfrGeoCreationWkbFactory libCAAAfrGeoCreationWbench |
CAAAfrGeoCreationWkb CAAIAfrGeoCreationWkbFactory |
At run time, the pathname of the directory that contains these dictionaries files is concatenated to other dictionary pathnames in the CATDictionaryPath environment variable.
[Top]
The CAAAfrGeoCreationWkb class implements the CATICAAAfrGeometryWksConfiguration interface exposed by the CAAGeometry workshop . It includes the following methods:
CreateCommands to instantiate the command headers for the
commands of the workbenchCreateWorkbench to create the containers for the workbench,
the menus, and the toolbars, and arrange the commands in the menus and
toolbarsGetCustomInterfaces which returns the names of the
interfaces exposed by the workbench to enable its customizationGetAddinInterface which returns the name of the interface
exposed by the workbench to create add-ins.You should:
#include "CATBaseUnknown.h"
#include "CATListPV.h"

class CATCmdWorkbench;

class CAAAfrGeoCreationWkb : public CATBaseUnknown
{
  CATDeclareClass;
  public:
     CAAAfrGeoCreationWkb();
     virtual ~CAAAfrGeoCreationWkb();

     void              CreateCommands();
     CATCmdWorkbench * CreateWorkbench();
     CATClassId        GetAddinInterface();
     void              GetCustomInterfaces(CATListPV * oDefaultIIDList ,
                                           CATListPV * oCustomIIDList) ;
  private:
     CAAAfrGeoCreationWkb(const CAAAfrGeoCreationWkb &iObjectToCopy);
};
|
The CAAAfrGeoCreationWkb class C++-derives from CATBaseUnknown.
The CATDeclareClass macro declares that the class
CAAAfrGeoCreationWkb belongs to a component. The class has a constructor,
a destructor, the four methods of the CATIWorkbench interface, and a
copy constructor. Note that the copy constructor is set as private. This
prevents the compiler from creating the copy constructor as public without
you know. This copy constructor is not implemented in the source file.
#include <CAAAfrGeoCreationWkb.h> #include <CATCommandHeader.h> // See Creating the Command Headers MacDeclareHeader(CAAAfrGeoCreationWkbHeader); #include <CATCreateWorkshop.h> CATImplementClass(CAAAfrGeoCreationWkb, Implementation, CATBaseUnknown, CATNull); #include <TIE_CATICAAAfrGeometryWksConfiguration.h> TIE_CATICAAAfrGeometryWksConfiguration(CAAAfrGeoCreationWkb); CAAAfrGeoCreationWkb::CAAAfrGeoCreationWkb() {} CAAAfrGeoCreationWkb::~CAAAfrGeoCreationWkb() {} void CAAAfrGeoCreationWkb::CreateCommands() { ... // See Creating the Command Headers } CATCmdWorkbench * CAAAfrGeoCreationWkb::CreateWorkbench() { ... // See Creating the Workbench and Arranging the Commands } CATClassId CAAAfrGeoCreationWkb::GetAddinInterface() { return "CAAIAfrGeoCreationWkbAddin"; } void CAAAfrGeoCreationWkb::GetCustomInterfaces(CATListPV * oDefaultIIDList, CATListPV * oCustomIIDList) {} |
The CAAAfrGeoCreationWkb class states that it implements the
CATICAAAfrGeometryWksConfiguration interface thanks to the
TIE_CATICAAAfrGeometryWksConfiguration macro. The
CATImplementClass macro declares that the CAAAfrGeoCreationWkb
class is a component main class [2], thanks to the
Implementation keyword, and that it OM-derives from
CATBaseUnknown [2]. The fourth parameter must
always be set to CATNull for component main classes.
The GetCustomInterfaces method must be empty. The names of
the interface exposed by the workbench to enable clients to create add-ins is
returned by the GetAddinInterface method. See
Creating the Workbench Exposed Interface to create this interface.
Update the interface dictionary, that is a file named, for example, CAAApplicationFrame.dico, whose directory's pathname is concatenated at run time in the CATDictionaryPath environment variable, and containing the following declaration to state that the CAAAfrGeoCreationWkb class implements the CATICAAAfrGeometryWksConfiguration interface, and whose code is located in the libCAAAfrGeoCreationWbench shared library or DLL. The update is in bold typeface:
CATApplicationFrame CAAIAfrGeoCreationWkbFactory libCAAAfrGeoCreationWbench CAAAfrGeoCreationWkb CATICAAAfrGeometryWksConfiguration libCAAAfrGeoCreationWbench |
[Top]
This is done by the CreateCommands method. Each command
available in your workbench must have a command header. A command header is an
instance of a command header class, and different commands can share the same
command header class to create their command header. Refer to The Command
Headers for more details.
A single command header class is created for the commands, named
CAAAfrGeoCreationWkbHeader using the MacDeclareHeader macro. You
can also create the class more classically if the command may be sometimes
unavailable. This is described in The Command Headers.
#include <CATCommandHeader.h> MacDeclareHeader(CAAAfrGeoCreationWkbHeader); |
The MacDeclareHeader macro creates the header file and the
source file for the CAAAfrGeoCreationWkbHeader class, and associates with
this class the resource files CAAAfrGeoCreationWkbHeader.CATNls and
CAAAfrGeoCreationWkbHeader.CATRsc. See Providing the
Resources and Inserting the Workbench into the Start Menu.
CreateCommands method. This method should contain one instantiation
statement of the command header class per command. Each statement has the
following form, for example for the Cuboid command.
void CAAAfrGeoCreationWkb::CreateCommands()
{
  ...
  new CAAAfrGeoCreationWkbHeader("CAAAfrCuboidHdr",
                                 "CAADegGeoCommands",
                                 "CAADegCreateCuboidCmd",
                                 (void *) NULL);
  ...
}
|
The command header constructor has the following arguments:
CAAAfruboidHdr is the identifier you need to assign to the
command header. It will be used afterwards:
CAADegGeoCommands is the name of the shared library or DLL
containing the Cuboid command's code, without the prefix lib, and without
the suffix depending on the operating system.CAADegCreateCuboidCmd is the name of the Cuboid command
class[Top]
This is the job of the CreateWorkbench method. To understand
how to do, let's remind of what the workbench is made of.
You should create:
The workbench contains its toolbars and its menu bar. Create the workbench
as an instance of the CATCmdWorkbench class using the NewAccess
macro.
CATCmdWorkbench * CAAAfrGeoCreationWkb::CreateWorkbench()
{
  NewAccess(CATCmdWorkbench,pCAAAfrGeoCreationWkb,CAAAfrGeoCreationWkb);
  ... // See Creating the Containers for the Toolbars and the Menu Bar
  return pCAAAfrGeoCreationWkb;
}
|
pCAAAfrGeoCreationWkb is the variable used to handle the
workbench instance pointer, and CAAAfrGeoCreationWkb is
the workbench identifier. Note that the workbench class name and the
workbench identifier must be identical to take into account the workbench
resources in the Start menu. They appear both in bold typeface. This
identifier is also used to name the workbench resource files
CAAAfrGeoCreationWkb.CATNls and CAAAfrGeoCreationWkb.CATRsc. The workbench
resources, and how to provide them, are described in Creating Resources for
Workbenches. See also Providing the Resources and Inserting
the Workbench into the Start Menu for an overview of all the resources to
create.
The toolbars and the menu bar are in turn containers for the commands and submenus.
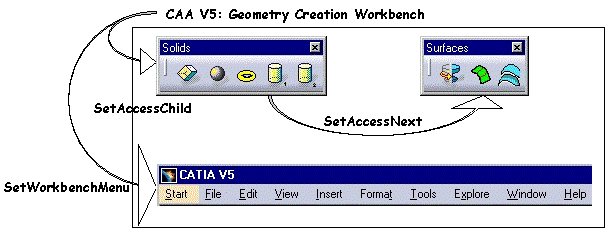
The code to create the toolbars and the menu bar is the following:
...
    NewAccess(CATCmdContainer,pCAAAfrSolidEltTlb,CAAAfrSolidEltTlb);
    SetAccessChild(pCAAAfrGeoCreationWkb, pCAAAfrSolidEltTlb);
    ...  // See Creating the Solids Toolbar Content
    AddToolbarView(pCAAAfrSolidEltTlb,1,Right);

    NewAccess(CATCmdContainer,pCAAAfrSurfacicEltTlb,CAAAfrSurfacicEltTlb);
    SetAccessNext(pCAAAfrSolidEltTlb,pCAAAfrSurfacicEltTlb);
    ...  // See Creating the Surfaces Toolbar Content
    AddToolbarView(pCAAAfrSurfacicEltTlb,-1,Right);

    NewAccess(CATCmdContainer,pCAAAfrGeoCreationMbr,CAAAfrGeoCreationMbr);
    ...  // See Creating the Menu Bar Content
    SetWorkbenchMenu(pCAAAfrGeoCreationWkb,pCAAAfrGeoCreationMbr);
...
|
Here is what's happen:
NewAccess macro. pCAAAfrSolidEltTlb
is the variable used to handle the Solids toolbar command container
instance pointer, and CAAAfrSolidEltTlb is the identifier used
to refer to it in the workbench resource files. This identifier must be
unique among all the toolbar identifiers that can be found within the
application. The Solids toolbar is set as the child of the workbench using
the SetAccessChild macro, and its default location is defined
using the AddToolbarView macro, where 1 means
that the Solids toolbar is visible by default (-1 means
invisible), and Right means that the toolbar is docked at the
right side of the application window.SetAccessNext macro. It is
invisible (-1 means invisible) by default, and is also docked at the right
side of the application window.pCAAAfrGeoCreationMbr
pointer. Its identifier is CAAAfrGeoCreationMbr and is used
for its resources. It is set as the workbench's menu bar using the
SetWorkbenchMenu macro.The toolbar resources, and how to provide them, are described in Creating Resources for Workbenches. See also Providing the Resources and Inserting the Workbench into the Start Menu for an overview of all the resources to create.

This toolbar contains four commands: Cuboid, Sphere, Torus, and Cylinder. You should, for each command:
NewAccess macroSetAccessCommand
macro, with the appropriate command header identifier defined in the
CreateCommands method
SetAccessChild and SetAccessNext macros
...
      NewAccess(CATCmdStarter,pCAAAfrTSolidEltCuboidStr,CAAAfrTSolidEltCuboidStr);
      SetAccessCommand(pCAAAfrTSolidEltCuboidStr,"CAAAfrCuboidHdr");
      SetAccessChild(pCAAAfrSolidEltTlb,pCAAAfrTSolidEltCuboidStr);

      NewAccess(CATCmdStarter,pCAAAfrTSolidEltSphereStr,CAAAfrTSolidEltSphereStr);
      SetAccessCommand(pCAAAfrTSolidEltSphereStr,"CAAAfrSphereHdr");
      SetAccessNext(pCAAAfrTSolidEltCuboidStr,pCAAAfrTSolidEltSphereStr);

      NewAccess(CATCmdStarter,pCAAAfrTSolidEltTorusStr,CAAAfrTSolidEltTorusStr);
      SetAccessCommand(pCAAAfrTSolidEltTorusStr,"CAAAfrTorusHdr");
      SetAccessNext(pCAAAfrTSolidEltSphereStr,pCAAAfrTSolidEltTorusStr);

      NewAccess(CATCmdStarter,pCAAAfrTSolidEltCylinder1Str,CAAAfrTSolidEltCylinder1Str);
      SetAccessCommand(pCAAAfrTSolidEltCylinder1Str,"CAAAfrCylinder1Hdr");
      SetAccessNext(pCAAAfrTSolidEltTorusStr,pCAAAfrTSolidEltCylinder1Str);

      NewAccess(CATCmdStarter,pCAAAfrTSolidEltCylinder2Str,CAAAfrTSolidEltCylinder2Str);
      SetAccessCommand(pCAAAfrTSolidEltCylinder2Str,"CAAAfrCylinder2Hdr");
      SetAccessNext(pCAAAfrTSolidEltCylinder1Str,pCAAAfrTSolidEltCylinder2Str);
...
|
Three macros are required for each command. For example, the Cuboid command is processed as follows:
NewAccess macro. pCAAAfrTSolidEltCuboidStr
is the variable used to handle a pointer to that instance, and
CAAAfrTSolidEltCuboidStr is its identifier.SetAccessCommand macro. The second parameter is the
Cuboid command header identifier defined as the first parameter of the
command header consrtuctor. Refer to Creating the Command
HeadersProceed in the same way for the other commands, except that they are set
as next of one another using the SetAccessNext macro.
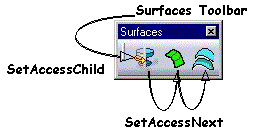
This toolbar contains three commands: Revolution Surface, Nurbs Surface, and Offset Surface. You should, for each command:
NewAccess macroSetAccessCommand
macro, with the appropriate command header identifier defined in the
CreateCommands method
SetAccessChild and SetAccessNext macros
...
    NewAccess(CATCmdStarter,pCAAAfrTSurfRevolStr,CAAAfrTSurfRevolStr);
    SetAccessCommand(pCAAAfrTSurfRevolStr,"CAAAfrRevolSurfHdr");
    SetAccessChild(pCAAAfrSurfacicEltTlb,pCAAAfrTSurfRevolStr);

    NewAccess(CATCmdStarter,pCAAAfrTSurfNurbsStr,CAAAfrTSurfNurbsStr);
    SetAccessCommand(pCAAAfrTSurfNurbsStr,"CAAAfrNurbsSurfHdr");
    SetAccessNext(pCAAAfrTSurfRevolStr,pCAAAfrTSurfNurbsStr);

    NewAccess(CATCmdStarter,pCAAAfrTSurfOffsetStr,CAAAfrTSurfOffsetStr);
    SetAccessCommand(pCAAAfrTSurfOffsetStr,"CAAAfrOffsetSurfHdr");
    SetAccessNext(pCAAAfrTSurfNurbsStr,pCAAAfrTSurfOffsetStr);
...
|
Three macros are required for each command. For example, the Revolution Surface command is processed as follows:
NewAccess macro. pCAAAfrTSurfRevolStr
is the variable used to handle a pointer to that instance, and
CAAAfrTSurfRevolStr is its identifier.SetAccessCommand macro. The second parameter
is the Revolution Surface command header identifier defined as the first
parameter of the command header consrtuctor. Refer to
Creating the Command HeadersProceed in the same way for the other commands, except that they are set
as next of one another using the SetAccessNext macro.
Menus and submenus are created as CATCmdContainer instances, and menu items as CATCmdStarter instances. The menu bar you create will be merged when the workbench is loaded or activated at run time with the workshop menu bar, itself resulting in the merge of the default menu bar, that is, the one that exists when no document is active, with the one defined for the workshop. You can neither remove a menu from the default menu bar or from the menu bar defined for the workshop, nor change the menu order, nor modify an existing menu item , nor add a submenu to an existing menu item.You can only add an item at first level of an existing menu with a submenu or not.

You should:
NewAccess macroNewAccessmacroSetAccessCommand
macro, with the appropriate command header identifier defined in the
CreateCommands methodSetAccessChild,
and SetAccessNext macrosInsert Menu - Solids Submenu
...
    NewAccess(CATCmdContainer,pCATAfrInsertMnu,CATAfrInsertMnu);
    SetAccessChild(pCAAAfrGeoCreationMbr,pCATAfrInsertMnu);

      NewAccess(CATCmdSeparator,pCAAAfrGeoCreationInsertSep,CAAAfrGeoCreationInsertSep);
      SetAccessChild(pCATAfrInsertMnu,pCAAAfrGeoCreationInsertSep);

      NewAccess(CATCmdContainer,pCAAAfrSolidEltSnu,CAAAfrSolidEltSnu);
      SetAccessNext(pCAAAfrGeoCreationInsertSep,pCAAAfrSolidEltSnu);

        NewAccess(CATCmdStarter,pCAAAfrMSolidCuboidStr,CAAAfrMSolidCuboidStr);
        SetAccessChild(pCAAAfrSolidEltSnu,pCAAAfrMSolidCuboidStr);
        SetAccessCommand(pCAAAfrMSolidCuboidStr,"CAAAfrCuboidHdr");

        NewAccess(CATCmdStarter,pCAAAfrMSolidSphereStr,CAAAfrMSolidSphereStr);
        SetAccessNext(pCAAAfrMSolidCuboidStr,pCAAAfrMSolidSphereStr);
        SetAccessCommand(pCAAAfrMSolidSphereStr,"CAAAfrSphereHdr");

        NewAccess(CATCmdStarter,pCAAAfrMSolidTorusStr,CAAAfrMSolidTorusStr);
        SetAccessNext(pCAAAfrMSolidSphereStr,pCAAAfrMSolidTorusStr);
        SetAccessCommand(pCAAAfrMSolidTorusStr,"CAAAfrTorusHdr");

        NewAccess(CATCmdStarter,pCAAAfrMSolidCylinder1Str,CAAAfrMSolidCylinder1Str);
        SetAccessNext(pCAAAfrMSolidTorusStr,pCAAAfrMSolidCylinder1Str);
        SetAccessCommand(pCAAAfrMSolidCylinder1Str,"CAAAfrCylinder1Hdr");

        NewAccess(CATCmdStarter,pCAAAfrMSolidCylinder2Str,CAAAfrMSolidCylinder2Str);
        SetAccessNext(pCAAAfrMSolidCylinder1Str,pCAAAfrMSolidCylinder2Str);
        SetAccessCommand(pCAAAfrMSolidCylinder2Str,"CAAAfrCylinder2Hdr");
...
|
The Insert menu command container is created, even if it already exists. Then the Solids submenu command container is created and set as the child of the Insert menu command container. Since no other positioning information is given, it should lay below the last submenu or command of the workshop menu bar, that is the Plane command. Then the Cuboid command starter is created and set as the child of the Solids submenu command container, and the others are cretaed and set next of one another.
Insert Menu - Surfaces Submenu
...
      NewAccess(CATCmdContainer,pCAAAfrSurfacicEltSnu,CAAAfrSurfacicEltSnu) ;
      SetAccessNext(pCAAAfrSolidEltSnu,pCAAAfrSurfacicEltSnu);

        NewAccess(CATCmdStarter,pCAAAfrMSurfRevolStr,CAAAfrMSurfRevolStr);
        SetAccessChild(pCAAAfrSurfacicEltSnu,pCAAAfrMSurfRevolStr);
        SetAccessCommand(pCAAAfrMSurfRevolStr,"CAAAfrRevolSurfHdr");

        NewAccess(CATCmdStarter,pCAAAfrMSurfNurbsStr,CAAAfrMSurfNurbsStr);
        SetAccessNext(pCAAAfrMSurfRevolStr,pCAAAfrMSurfNurbsStr);
        SetAccessCommand(pCAAAfrMSurfNurbsStr,"CAAAfrNurbsSurfHdr");

        NewAccess(CATCmdStarter,pCAAAfrMSurfOffsetStr,CAAAfrMSurfOffsetStr);
        SetAccessNext(pCAAAfrMSurfNurbsStr,pCAAAfrMSurfOffsetStr);
        SetAccessCommand(pCAAAfrMSurfOffsetStr,"CAAAfrOffsetSurfHdr");
...
|
The Surfaces submenu command container is created and set next to the Solids submenu command container. Then the Revolution Surface command starter is created and set as the child of the Surfaces submenu command container, and the others are cretaed and set next of one another.
The menu and submenu resources, and how to provide them, are described in Creating Resources for Workbenches. See also Providing the Resources and Inserting the Workbench into the Start Menu for an overview of all the resources to create.
[Top]
You should provide the resources for the workbench and for all its contents. These resources are classified as follows:
The resource files must have the workbench identifier as file name, that
is CAAAfrGeoCreationWkb. This identifier is declared in the
CreateWorkbench method of the workbench description class, as the
third parameter of the NewAccess macro that creates the
workbench.
NewAccess(CATCmdWorkbench,pCAAAfrGeoCreationWkb,CAAAfrGeoCreationWkb); |
The workbench resource files are then CAAAfrGeoCreationWkb.CATNls and CAAAfrGeoCreationWkb.CATRsc. These files are located in the CNext\resources\msgcatalog directory of the framework containing the workbench module. This directory includes subdirectories, one for each language into which the title and messages of the CAAAfrGeoCreationWkb.CATNls file can be translated. The resource files contain:
Each resource is provided using a key and a text, or a file name without
suffix, separated by the equal sign. The key is built as a concatenation of
the object identifier you defined as the third parameter of the
NewAccess macro, a dot, and a keyword designating the appropriate
resource. The message is enclosed using double quotes and ended using a
semicolon. For example, the CAAAfrGeoCreationWkb workbench title is defined
as follows:
CAAAfrGeoCreationWkb.Title = "CAA V5: Geometrical Creation"; |
This file contains:
The CAAAfrGeoCreationWkb.CATNls, is as follows:
//---------------------------------------------------------------------------- // WORKBENCH //---------------------------------------------------------------------------- CAAAfrGeoCreationWkb.Title = "CAA V5: Geometrical Creation"; CAAAfrGeoCreationWkb.ShortHelp = "Workbench to create Geometrical Elements"; CAAAfrGeoCreationWkb.Help = "Workbench to create Geometrical, Solid and Surfacic Elements"; CAAAfrGeoCreationWkb.LongHelp = "This is the CAA V5: Geometrical Creation Workbench. It is used to demonstrate workbenches. It contains two toolsbars: - One for some Solid Elements - The other for some Surfacic Elements"; //---------------------------------------------------------------------------- // TOOLBAR //---------------------------------------------------------------------------- CAAAfrSolidEltTlb.Title = "Solids" ; CAAAfrSurfacicEltTlb.Title = "Surfaces" ; //---------------------------------------------------------------------------- // SUB - MENU //---------------------------------------------------------------------------- CAAAfrSolidEltSnu.Title = "Solids" ; CAAAfrSolidEltSnu.Mnemonic = "S"; CAAAfrSurfacicEltSnu.Title = "Surfaces" ; CAAAfrSurfacicEltSnu.Mnemonic = "u"; |
This file contains the category, that is the submenu of the Start menu where the workbench should appear, and the names of the icons to be associated with the workbench for the Start menu.
CAAAfrGeoCreationWkb.Category = "Infrastructure" ; // Icons for the Welcome window 64x64 CAAAfrGeoCreationWkb.Icon.NormalPnl = "I_WkAsCAAAfrGeoCreationWkb"; CAAAfrGeoCreationWkb.Icon.PressedlPnl = "IP_WkAsCAAAfrGeoCreationWkb"; CAAAfrGeoCreationWkb.Icon.FocusedlPnl = "IF_WkAsCAAAfrGeoCreationWkb"; // Icons for the Start menu 32x32 CAAAfrGeoCreationWkb.Icon.NormalCtx = "I_WkNvCAAAfrGeoCreationWkb"; CAAAfrGeoCreationWkb.Icon.PressedlCtx = "IP_WkNvCAAAfrGeoCreationWkb"; CAAAfrGeoCreationWkb.Icon.FocusedlCtx = "IF_WkNvCAAAfrGeoCreationWkb"; // Icons for the workbench toolbar 24x24 CAAAfrGeoCreationWkb.Icon.NormalRep = "I_WkCAAAfrGeoCreationWkb"; CAAAfrGeoCreationWkb.Icon.PressedlRep = "IP_WkCAAAfrGeoCreationWkb"; CAAAfrGeoCreationWkb.Icon.FocusedlRep = "IF_WkCAAAfrGeoCreationWkb"; |
It is in this file that you declare if the workbench is warm start compliant [3]. The CAAGeometry document is not warm start compliant, so its workbenches are not compliant too.
CAAAfrGeoCreationWkbHeader.CAAAfrCuboidHdr.Category = "Element"; CAAAfrGeoCreationWkbHeader.CAAAfrCuboidHdr.Title = "Cuboid"; CAAAfrGeoCreationWkbHeader.CAAAfrCuboidHdr.ShortHelp = "Cuboid"; CAAAfrGeoCreationWkbHeader.CAAAfrCuboidHdr.Help = "Cuboid Command is not yet implemented"; CAAAfrGeoCreationWkbHeader.CAAAfrCuboidHdr.LongHelp = "Cuboid (Insert menu) The Cuboid command allows you to create a cuboid, but is not yet implemented."; ... |
For each command, the title, short help, help, and long help are declared.
CAAAfrGeoCreationWkbHeader.CAAAfrCuboidHdr.Icon.Normal = "I_CAACube"; ... |
This icon name is provided to display in the Solids toolbar where the Cuboid command is included. The icon is also displayed in front of the menu item in the menu.
More about Internationalization and resources can be found in Internationalizing Your Client Application.
[Top]
To enable client applications of your workbench to customize it with add-ins, you should provide the CAAIAfrGeoCreationWkbAddin interface the client application will implement. This enables the client application to add its own commands in one or several new toolbars.
The header file of this interface should be inserted in the ProtectedInterfaces or PublicInterfaces directory of your framework to make it available to client applications. To create the CAAIAfrGeoCreationWkbAddin interface:
#include <CATIWorkbenchAddin.h>        // Needed to derive from CATIWorkbenchAddin
#include "CAAAfrGeoCreationWbench.h"   // Needed to export the IID

extern IID ExportedByCAAAfrGeoCreationWbench IID_CAAIAfrGeoCreationWkbAddin;

class ExportedByCAAAfrGeoCreationWbench CAAIAfrGeoCreationWkbAddin : public CATIWorkbenchAddin
{
  CATDeclareInterface;
  public :
};
|
The CAAIAfrGeoCreationWkbAddin.h file contains the
ExportedByCAAAfrGeoCreationWbench definition that manages the DLL
interface for Windows, and is set to blank for UNIX. Don't forget the public
keyword required by the TIE compiler.
#include <CAAIAfrGeoCreationWkbAddin.h>

IID IID_CAAIAfrGeoCreationWkbAddin = {
    0xa4188b88,
    0xd4c1,
    0x11d3,
    {0xb7, 0xf5, 0x00, 0x08, 0xc7, 0x4f, 0xe8, 0xdd}
  };

CATImplementInterface(CAAIAfrGeoCreationWkbAddin, CATIWorkbenchAddin);
|
The CATDeclareInterface and CATImplementInterface
macros make an interface from this C++ class.
[Top]
|
|
I create a command starter for a command, and I arrange it in the menu bar or in a toolbar, but the command doesn't display in the menu bar or toolbar where I place it. |
|
|
The command starter is not associated with a command header, and is thus not displayed, since the command cannot be launched without command header. |
|
|
Check your CreateWorkbench method. The
command starter must be associated with a command header for the command
you want to display thanks to the SetAccessCommand macro. |
[Top]
A workbench gathers tools, that is commands you develop or pick-up among those existing to work on documents of a given type. A workbench is part of the workshop for that document type and can be selected from the Start menu.
Then you create the workbench files, declare the implemented interfaces CATIxxxConfiguration and pppIxxxWorkbenchFactory, where ppp is the prefix of your application (such as CAT for CATIA), and xxx is the name of your workbench, and the workbench factory, in the dictionary. You have to declare the headers of the commands you want to propose, arrange them in menus and toolbars, and create the necessary external resources. Your wokbench is ready to use.
You can create different workbenches in a workshop. Each workbench shares with the other workbenches the ability to work on your document, and usually shares with them a set of common commands. Each workbench gathers commands dedicated for specific process and one workbench can be activated by the end user at a time using the Start menu.
You should also provide the IxxxAddin interface with your workbench, where xxx is the name of your workbench, to enable client applications to customize it by adding new toolbars.
[Top]
| [1] | About Globally Unique IDentifiers |
| [2] | Object Modeler Component and Implementation Inheritances |
| [3] | Warm Start Incremental Backup |
| [Top] | |
| Version: 1 [Jan 2000] | Document created |
| Version: 2 [Sep 2003] | Warm start Integration |
| [Top] | |
Copyright © 2000, Dassault Systèmes. All rights reserved.