The information in this section will help you create and edit Point to Point operations in your manufacturing program.
Select Point to Point
![]() then set the strategy parameters
then set the strategy parameters
![]() for defining:
for defining:
Specify the tool
![]() to be used,
NC macros
to be used,
NC macros
![]() , and
feeds and speeds
, and
feeds and speeds
![]() as needed.
as needed.
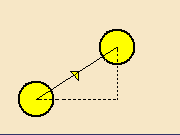
You can specify a single global axis that will be applicable to all points of the operation or different local axes for different points in the operation. If needed, a local axis can be specified for the following types of motion: Goto Point and Go Delta.
The global tool axis is the default axis that will be applicable to all points of the operation, if no local axis is defined. This axis is specified in the Strategy tab by first selecting the axis representation in the sensitive icon then specifying the direction in the Tool Axis dialog box that appears.
Defining the Tool Axis
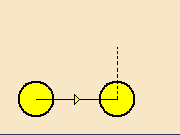
The tool axis can be defined while selecting the point itself. When
user clicks on Goto Point button on Motions tab, the following prompt appears
Select
Sketch, Point or Circle, indicate on Face and Select Edge, Line or double click
to exit. So the user has to first select a point, then user has an option
of either selecting an axis for that point or selecting another point.
The user can select either an axis for that point or
can select the next point.
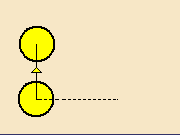
If user has not selected the axis and directly goes to the next point then for the previous point global axis would be used.
If user has selected an axis once for any point, and then for later points user does not select the axis, then the axis of the previous point would be used instead of the global axis.
A Goto point motion is created for each selected point; the tool axis of each Goto point motion depends on the axis selection (if any).
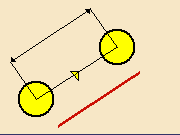
Example: creation for Goto Point motions
Create a new Goto Point motion (Goto Point command)
Select a point 1 (the tool axis used is the default one is the same tool axis of the
previous tool motion)
Select a point 2
Select a line (the tool axis for the point 2 depends on this selection)
Select a point 3 (the tool axis is same as for point 2)
Double click (ends the selection and Goto Point creation command).
Note: the tool axis orientation depends on the selected element (line, edge) own
orientation.
This orientation can be reversed or modified using the editing axis capabilities
Editing the Tool Axis
Once user completes the selection of any point,
it is still possible to edit the axis in one of the following ways:
- Right click on the motion in the list Motions
- Right click on the actual point in the viewer
- Select Local axis from the edit panel.
In the first two cases, contextual commands are available:
Edit local Axis
In this case user would be prompted
Select Line, edge or double click to exit.
So user can select axis in the viewer. If user double clicks without selecting
line or edge then no change would be registered.
Use Global Axis
In this case for that point Global axis would be used.
For the third case, user can only select the local axis from the edit panel. Once user clicks on any point in Motions tab, the Edit panel appears for that point. There user would have option to select the local axis.
Defining the Tool Axis
User can define the local axis for the point while specifying the Go Delta motion. Here user would be given an option to choose local axis.
If user does not specify the local axis while specifying the Go Delta Point then the Global axis will be used. But if there is a local axis specified for the previous point then the Go Delta point would use that axis rather than the global axis.
Editing the Tool Axis
Once user creates a Go Delta point, it is still possible to edit the axis in one of the following ways.
- Right click on the motion in the list Motions
- Right click on the actual point in the viewer
- Select Local axis from the edit panel.
In the first two cases, contextual commands are available:
Edit local Axis
In this case user would be prompted
Select Line, edge or double click to exit.
So user can select axis in the viewer. If user double clicks without selecting
line or edge then no change would be registered.
Use Global Axis
In this case for that point Global axis would be used.
For the third case, user can only select the local axis from the edit panel. Once user clicks on any point in Motions tab, the Edit panel appears for that point. There user would have option to select the local axis.
All Milling and Drilling tools can be used in this type of operation.
In the Feeds and Speeds tab page, you can specify feedrates for approach, retract and machining as well as a machining spindle speed.
Feedrates and spindle speed can be defined in linear or angular units.
A Spindle output checkbox is available for managing output of the SPINDL instruction in the generated NC data file. If the checkbox is selected, the instruction is generated. Otherwise, it is not generated.
Feeds and speeds of the operation can be updated automatically according to tooling data and the Rough or Finish quality of the operation. This is described in Update of Feeds and Speeds on Machining Operation.
In Point to Point operations, a local feedrate can be defined for all tool motions (except the first motion, which must be either RAPID or a specific feedrate). The local feedrate is applied instead of the machining feedrate during the tool motion to reach the tool position. For the operation start point, machining feedrate is taken into account.
You can define transition paths in your machining operations by means of NC Macros. These transition paths are built from elementary motions and are useful for providing approach and retract motion in the tool path.
You can use the following commands to define the elementary motions of macros in a Point to Point operation:
| | | | | | | | | | | ->
distance along a given direction | | ->
axial motion to a plane |
->
PP word ->
axial motion
The general procedure is described in Define Macros on a Milling Operation.