-
Prepare the Input file defining conversion parameters.
Example 1:
CATDMUUtility -f inputfile -cgr outputfile1 [-nolod] [-sag value] [-3dmap outputfile2] [-vox value2] [-unit value3]
Example 2:
CATDMUUtility -l inputliste -db VPM
-user username -pwd password -server servername
-cgr -cache
Example 3:
CATDMUUtility -l inputliste -cgr -wrl -cache
Example of input file:
- Under WINDOWS
"e:\New
A\CRIC_BRANCH_1.CATPart"
e:\B15doc\online\dmnug\samples\CRIC_BRANCH_1.CATPart
e:\B15doc\online\dmnug\samples\GARDENAATOMIZER.model
- Under UNIX
/usr/B05doc/online/dmnug/samples/CRIC_BRANCH_1.CATPart
Examples:
UNIX:
- CATDMUUtility -f CATDLN://TEST/model.model -cgr -cache
Windows:
- CATDMUUtility -f CATDLN://TEST\model.model -cgr CATDLN://model.cgr
- CATDMUUtility -f CATDLN://TEST\model.model -cgr e:\tmp\model.cgr
CATDMUUtility -l /tmp/list.txt -cgr -cache
(CATDMUUtility -l CATDLN://TEST/list.txt -cgr -cache would not work.)
The .txt file, of course, can contain DLNames, e.g.
CATDLN://TESTDLN/model.model
/tmp/users/mypart.CATPart
CATDLN://DLN/mycgr.cgr
Please find below the different options available input, output:
option used, the correct extension is added to the output filename. The only exception to this feature is the -box output option, with which you can choose any extension you wish.
Example:
If you type: CATDMUUtility -f .../MyPart.CATPart -cgr .../MyResult.CATPart
the resulting output file will be: .../MyResult.CATPart.cgr
Input Options
-db : Input database type: For processing data stored in a PDM database. For details on using the -db option, see Accessing Data in a PDM Database.
It is mandatory to use either:
- the -l option
- for database type ENOVIAVPM, the -coid, -compid, -catenv and -cattab options
- for database type ENOVIA V5 VPM, an appropriate identifier
You cannot use the -f option with the -db option.
Generic example for CATDMUUtility:
CATDMUUtility -db VPM -user $user_db -pwd $pwd_db -server $server_name -coid $coid_nb -compid $compid_nb -cattab $table_name -catenv $env_name -cgr (if you want to tessellate into a cgr) $output_file_path or -cache (if you want the outputfile to be placed in the cache)
The -db, -compid, -catenv and -cattab options are mandatory.
-compid : Input identifier of the ENOVIAVPM
data to convert.
The -db, -coid, -catenv and -cattab options are
mandatory.
-catenv : Input identifier of the ENOVIAVPM
data to convert.
The -db, -coid, -compid and -cattab options are
mandatory.
-cattab : Input identifier of the ENOVIAVPM
data to convert.
The -db, -coid, -compid and -catenv options are
mandatory.
Output Options
-xsize : Specifies the horizontal size of the generated jpg file
in pixels. An integer value is required.
-ysize : Specifies the vertical size of the generated jpg file in
pixels. An integer value is required.
Note: The default jpg size is 140 pixels * 120 pixels. Accordingly, if only one of the two parameters is specified, the other parameter be valuated to its default size.
-camera : Specifies the camera (viewpoint) used to generate the jpg file. A camera name is required. The specified viewpoint can be a standard view or a camera. A viewpoint name containing blanks should be surrounded by quotation marks, e.g. -camera "* iso".
Examples:
-camera "* iso"
-camera "Camera 1"
-viewmode : Specifies the view mode {shading, shadingedges, wireframe, material}. A mode name is required.
- shading for display shading representation
- shadingedges for display shading with edges representation
- wireframe for display wireframe representation
- material for display material representation
-bk : Specifies the background color of the generated jpg file. The color can be either white of the background color currently defined via Tools -> Options -> General -> Visualization:
Examples:
-bk 0 (specifies the currently defined background color)
-bk 1 (specifies a white background)
-NCGM : Output file for NCGM corresponding
to the input file. A path must be indicated after the option, if no path is
specified the output will be written into the cache by using the
-cache option. If no output file name is mentioned, output file
will be generated in input file directory.
-3dmap : Output file for 3dmap corresponding to the input file. A path must be indicated after the option, if no path is specified the output will be written into the cache by using -cache option. If no output file name is mentioned, output file will be generated in input file directory.
-wrl : Output file for vrml corresponding to the input file. A path must be indicated after the option, if no path is specified the output will be written into the cache by using -cache option. If no output file name is mentioned, output file will be generated in input file directory. Note: In batch mode, as there is no editor, the wrl file will not contain any viewpoints.
-product : Output file for CATProduct documents generation from
an assembly (MultiCAD or CATIA). The linked documents will be computed
if -cgr, -3dmap ... options are specified.
Example:
CATDMUUtility -f E:\Assembly.asm
     -product E:\Assembly.CATProduct
     -cgr -cache
-box : Switch to generate the bounding box corresponding to the input file. The -f option is mandatory. If the input file is not a cgr file, then the -cgr option is necessary. This option is not compatible with the -cache option.
Examples:
CATDMUUtility -f e:\tmp\mycgr.cgr
     -box e:\tmp\mycgr.cgr
The voxel size value can be specified using the –vox option. If the option –vox is omitted, the voxel size value will be retrieved from the CATSettings (default value = 5mm). The minimum voxel size value is 1mm.
The vps files accuracy can be specified using the –vpssag option. If the –vpssag option is specified, vps files are generated with the voxel size and triangle accuracy. If the option is omitted, computation is performed with only voxel size.
Example:
CATDMUUtility -f e:\tmp\mypart.CATPart -vps –vox 10 –cache
     -vpssag
Example:
CATDMUUtility -f e:\tmp\mypart.CATPart -3dxml –cache
Computing Options
Example: CATDMUUtility -l e:\tests\lists\list1.txt -cgr -cache -mp
The type of appended data must follow the -apps option:
- com for V4 comment pages
- lnf for V4 layers and filters
- all for V4 comment pages, layers and filters
The -cgr and -cache options are mandatory.
-sag : Optional switch to generate cgr with a specified sag value. A float value is required. Default value is defined in the settings.
Note: The sag option does not work with certain V4 models (e.g. solids).
Previously, if you modified the sag value, the cgr was not updated in the cache.
Example:
CATDMUUtility -f e:\tmp\model.model
-cgr -sag 0.2 -cache
Then CATDMUUtility -f e:\tmp\model.model
-cgr -sag 0.4 -cache
In the cache, you would find your cgr still had a sag value of 0.2.
Now, if you modify the sag value using the -sagon option, CATDMUUtility
will take the new value into account.
CATDMUUtility -f e:\tmp\model.model
-cgr -sag 0.4 -sagon -cache
In the cache, you will find your cgr now has a sag value of 0.4
If cgr doesn't exist, it is created with default sag value ( settings ).
Examples :
CATDMUUtility -f e:\tests\CATPart\cylinder.CATPart
-cgr e:\tmp\keepsag.cgr
-keepsag -force
CATDMUUtility -f e:\tests\CATPart\cylinder.CATPart
-cgr -cache -keepsag -force
CATDMUUtility -l e:\tests\list\list.txt
-cgr -cache -keepsag -force
-unit : Optional switch to compute
in the appropriate unit { mm, cm, m, inch, foot }
Default value is input millimeter : mm
-cache : Optional switch to generate files directly in the cache directory (note: this option is mandatory if you are using the -l option).
Examples :
CATDMUUtility -f e:\tmp\model.model -cgr -cache -log e:\tmp\logfile.txt CATDMUUtility -f e:\tmp\model.model -cgr -cache -log
-force: Rebuild the output file if the option is activated (You have generated an output file, and you want to update it : use the -force option) Limitation : Only available with -cache option
Examples :
Test 1 : CATDMUUtility -f e:\tmp\model.model
-cgr -cache
It generates a cgr file in the cache, (at 12h00min).
Then : CATDMUUtility -f e:\tmp\model.model
-cgr -cache -force
It rebuilds a cgr file in the cache (at 12h02min).
If the options are different, CATDMUUtility takes it into account :
Test 2 : CATDMUUtility -f e:\tmp\model.model
-cgr -sag 0.2 -cache
This generates a cgr file in the cache, with a sag of 0.2
Then CATDMUUtility -f e:\tmp\model.model
-cgr -sag 0.6 -cache -force
It forces the generation of a cgr file in the cache, with a sag of 0.6
Test 3 : CATDMUUtility -f e:\tmp\model.model
-3dmap -vox 20 -cache
This generates a 3dmap file in the cache, with a voxel size of 20 mm.
Then CATDMUUtility -f e:\tmp\model.model
-3dmap -vox 10 -cache
This forces the generation of a 3dmap file in the cache, with a voxel size
of 10 mm.
COID1 COMPID1 CATENV1 CATAB1
COID2 COMPID2 CATENV2 CATAB2
...
select Tools->Options->Infrastructure->Cache Management
-
Run the following shell to start the batch process:
On UNIX:
- Place yourself in the following directory:
cd $install_path/code/command - Run the command:
./catstart -run "CATDMUUtility -f inputfile -cgr outputfile1"
On Windows:
- Write a shell script containing the following lines:
cd $install_path\code\bin
CATDMUUtility -f inputfile -cgr outputfile1 - Run the shell.
Note: The $install_path is the path of the installation directory or folder. For more information on installing DMU, see the Installation User's Guide.
-
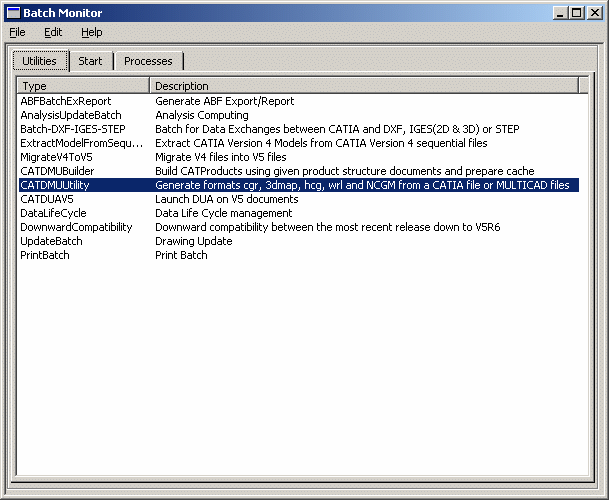
In the menu bar, select Tools -> Utility.
The Batch Monitor dialog box appears.

-
Select the CATDMUUtility batch from the proposed list.
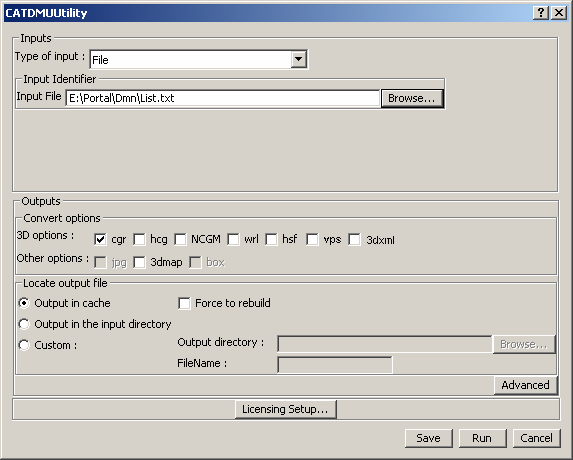
A dialog box will appear in which you can enter the same information you would otherwise have entered in a line command:
- Input documents
- Output options
- Output location
- Advanced options (accessed by clicking Advanced button)

-
Click the Save button to save all input data in an XML file for later use.
-
Click the Run button to run the batch job immediately.
-
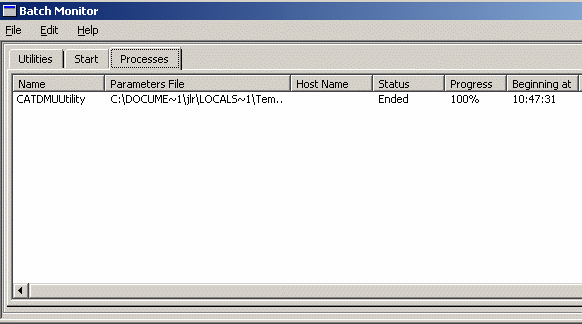
In the Batch Monitor dialog box, click the Processes tab to monitor the batch job execution.

For more information on using the Batch Monitor, see the Infrastructure User's Guide, Basic Tasks, Running Batches, Running Batches Using the Batch Monitor.
![]()