RADE Web Application Composer |
Web Application Builder |
Creating Your First Web ApplicationCreating a Login Application Using the Web Application Builder Basic Features |
| Use Case | ||
AbstractThe purpose of this article is to illustrate how to build and run a
wizard-like web application (based on the
CATJDialog framework architecture) using the Web Application Builder
product, which is a part of the WAC RADE solution.
|
This use case is intended to show you how to set up a CAA V5 build time environment required when using the Web Application Builder product. It will teach you how to design the layout of your application and how to graphically build the associated logic. Finally, it will help you through the testing phase of the generated web application on the Websphere Application Server (WAS) Test Environment embedded in IRAD.
In this use case, you are going to create a login window in which you are going to enter your ID and password. Then the password is going to be checked and a message login is going to be displayed on the second page.
| [Top] |
After installing IRAD, launch launchpad.exe and select
Install Websphere test environment V6.x.
|
|
Note that this installation only needs to be performed once. If Websphere® test environment V6.x is already installed, skip this step. |
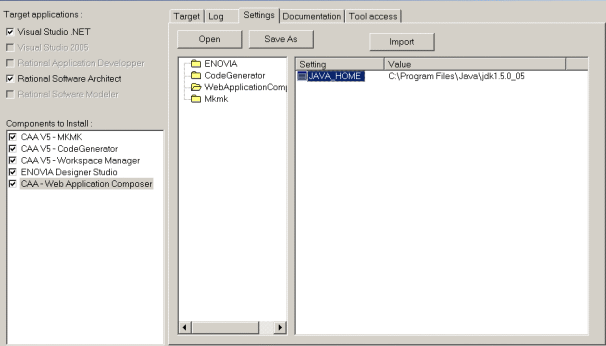
Before launching WAC, you need to set the JAVA_HOME
variable. Otherwise, the following message will be displayed when running the
Get prerequisites or the
Create/Update RuntimeView commands.
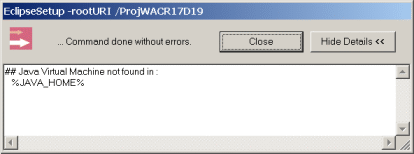 |
You can set this variable:
 |
| [Top] |
Start->Programs menu,
access the IBM Rational->IBM Rational Application
Developer v7.0->Rational Application Developer
application.Workspace Launcher
window, click Browse... to select
the directory that will contain the data. Click
OK. The application opens.File menu, select
New, then
Dynamic Web Project.New Dynamic Web Project
window, enter the name of your project in the
Name field and click the Advanced>
button (CAAWebApplication in this use case.)Servlet version combo
box, select 2.4.Target server combo box,
select Websphere Application Server v6.0
and click Finish.| [Top] |
Using Web Application Builder requires to work in a CAA V5 workspace. A CAA V5 file tree is mandatory because many files are created in specific directories from this file tree. Therefore you will need at least a workspace, containing a framework and a module. It is recommended to create a Java package in your module that will be used as a location where the generated classes will be stored.
There are 2 ways to set up such a workspace in IRAD:
|
Convert to WAC Project
window, select Mkmk (if need be),
the Tool level and
Next>. The levels available in the list
will depend on your install. The tools are initialized. Click
Close in the
Initializing tools... window.Add... in the
Convert to WAC Project window to define
the prerequisites of the CAA V5 workspace you are creating. A
Select Directory dialog box is displayed.
OK. Next> once your
prerequisites are defined. The Installing Prereqs dialog box is displayed.
Click Close when the installation
is done.Close in the
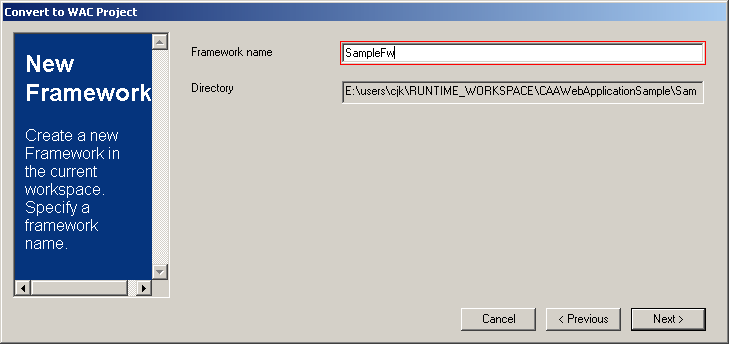
Eclipse Setup window.Framework name field,
enter the framework name: SampleFw and click
Next>.
 |
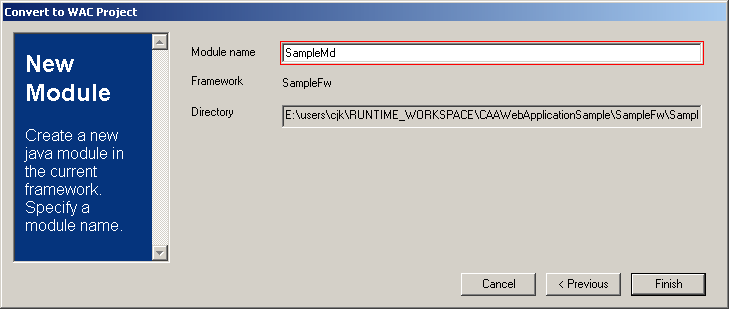
Module name field, enter
the module name: SampleMd and click
Finish.
 |
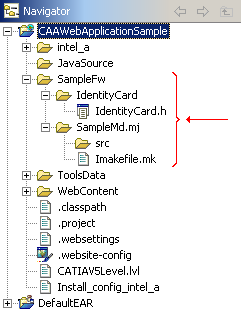 |
The Navigator
view now displays the generated folder and the files matching the
required CAA V5 workspace architecture (see picture opposite.) |
The final step consists in creating a new Java package for the generated classes that will contain the generated business logic driving the behavior of your web application.
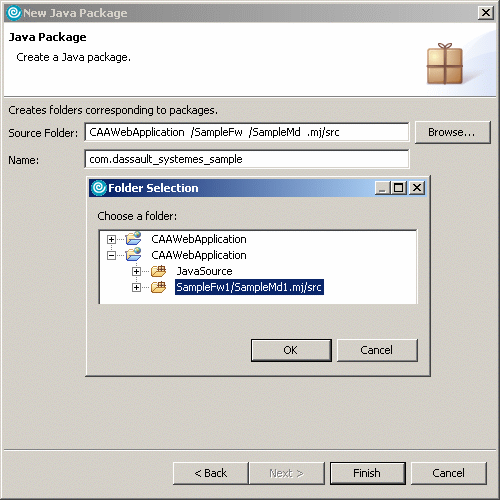
Navigator view.
New->Other->Java->Package to display the
window below. Click Next>.Name field, enter
com.dassault_systemes_sample1.Finish when done.
 |
| [Top] |
In this step you will create an e-wizard controller file (.XMLCtrl
file) and its dedicated resources (the generated files will be further
described).
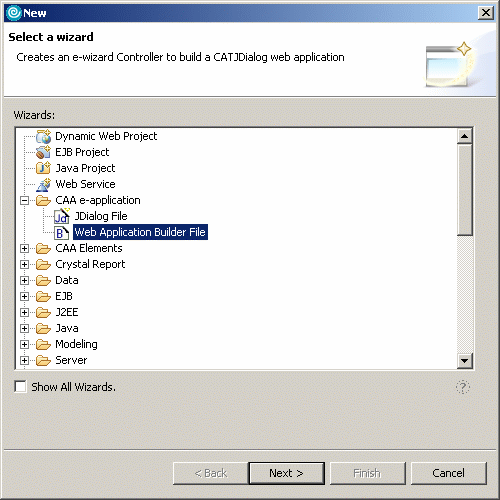
File menu, select
New->Other to display the window
opposite.CAA e-application-> Web Application
Builder File as shown below. Click
Next>.
 |
In the next window, you need to provide information such as the name of the generated e-wizard controller file, and the location that will be used when generating resources.
In the Create XMLCtrl window,
expand the CAAWebApplication folder and click the SampleFw folder.XMLCtrl
new
File field, enter CAAWebApplication.XMLCtrl. Module
field of the
Generated code information frame, click
Browse and select the
SampleMd.mj module in the dialog box. Click
OK.Package field, click
Browse, and select the
com.dassault_systemes Java package that you previously created. Click
OK.Finish in order to
generate the resources required.|
|
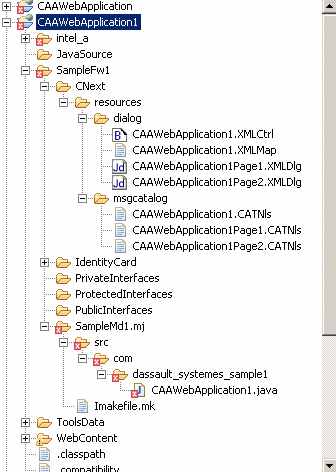 |
The file tree opposite gives you an overview
of the generated files inside the CAA V5 workspace environment previously
created:
|
You should now see the Web Application Builder editor if
Open file for editing when done was checked
in the creation window. If not, you can open it by double-clicking the
CAAWebApplication.XMLCtrl file in the
Navigator view. The Web Application Builder editor
contains three tab pages referred to in the documentation as the
Layout Editor,
Mapping Editor and the Behavior
Editor.
| [Top] |
The next step consists in defining the user interface of the sample web application. By default, it contains 2 main pages.
The end-user will be able to go from one page to the other through a custom
wizard-like toolbar located on top of every page. The
Next>/Previous/Cancel
buttons from the toolbar are available in every web application built with
Web Application Builder. It drives the workflow of your web application
related to navigation interactions.
The layout of both pages will be defined through the
Layout Editor. It is an embedded version of
Dialog Builder, another WAC RADE product. This scenario will give you
the basic knowledge required to define the layout. For more details about the
layout design, see
Working with Dialog Builder.
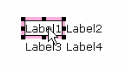
The login page must contain 4 widgets and have a layout made up of a table with 2 columns and 2 rows:
Jdialog Builder toolbar,
click the
|
|
JDialog Builder works with a type of layout called a Grid Layout. This layout manager is widely used among UI builders tools, and will offer much flexibility when designing your pages layout. If you experience issues when dealing with the layout, see Working with Dialog Builder. |
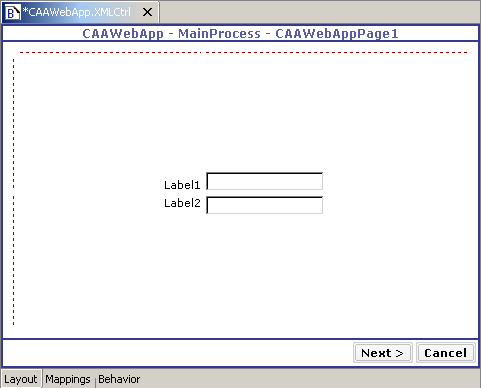 |
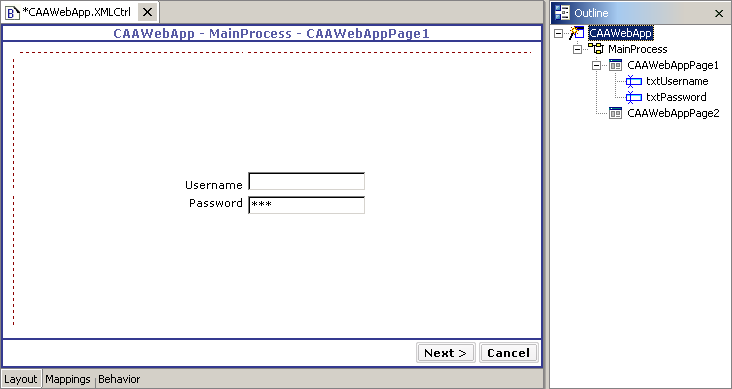
Once the layout is defined, you can edit the properties of the widgets called Label1 and Label2 that will display text when running the sample web application on a server. To do so, proceed as follows:
Properties.Title field, enter
Username: and click OK when done.
Properties.Title field, enter
Password:, check the Password
property to indicate that the value should be hidden, and click
OK when done. The login page should now
look like the one below. | [Top] |
Publishing widgets is mandatory in order to use them when graphically
building the behaviors of both the login and the display
pages. Publishing a widget in the process allows you to reference it in
behaviors. Once a widget is published, it appears in the
Outline view. Publish widgets when you know
that you will use them when defining the logic of your web application.
In the login page you need to publish the text fields to use them when defining their behaviors for this page (as explained later).
Properties....Password and enter
txtPassword in the variable name
property field. Click OK when done.Properties....txtUsername in the
variable name property field.OK when done.
 |
| [Top] |
The display page should contain 4 widgets and have a layout arranged like a table with 2 columns and 2 rows:
|
 |
Properties,
and enter Welcome: in the Title
field. Click OK to validate. Properties,
and enter Generated login expression: in the
Title field. Click
OK to validate. Properties,
and enter labUsername in the
variable name field. Click OK
to validate.Properties,
and labLoginExpression in the
variable name field. Click OK
to validate.
| [Top] |
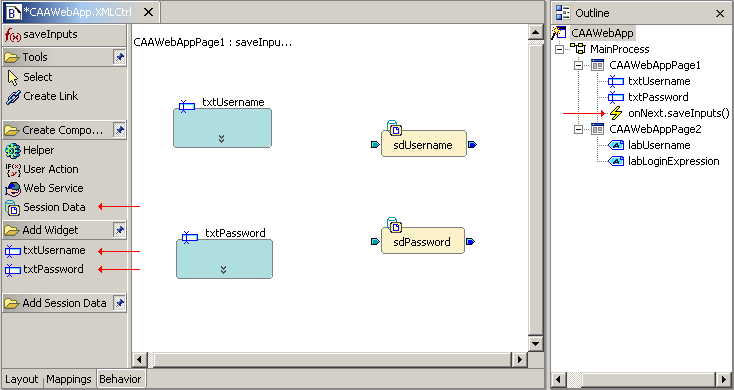
By using the Behavior Editor, you
will be able to graphically build the logic of your web application. The
operations defined can be performed at runtime with events that occur on pages
of your web application. These events can come from the page lifecycle or from
the widgets themselves. The widget events are the ones defined by the
CATJDialog framework architecture.
The operation that will be performed on the login page consists in
retrieving the user inputs data and in storing them into session. At runtime,
this task will be executed when the end-user clicks
Next> on the login page.
The operation that will be performed on the display page consists in reading those values, printing the username on screen and dynamically generating the login expression by concatenating the username and the password values separated with a ":" character. At runtime, this task will be executed right before rendering the page.
To design behaviors for both login and display pages, create them by
defining on which event they will occur through the
Properties window of both pages (behaviors
can also be created through the Properties
window of any widget on a page but this will not be illustrated in this use
case).
Once a behavior has been created, there are 2 ways to access it for editing:
Layout
Editor and then switch to the Behavior
Editor by selecting the
behavior tab Outline view and point
to an existing behavior.
Outline
View (or click Previous), and
right-click an empty area in the login page in the
Layout
Editor to display the
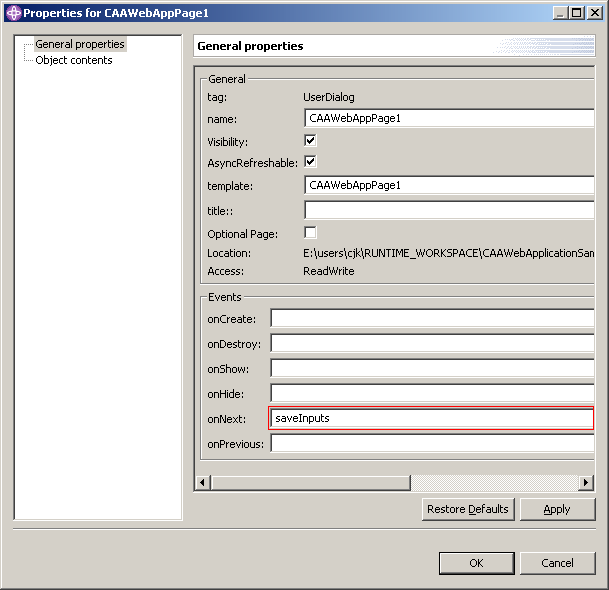
Properties window.saveInputs in the onNext
field (see graphic below) and click OK
to validate.
 |
Behavior tab or click
onNext.saveInputs() in the
Outline view.Add Widget
menu and click the drawing area. Session Data menu
item and click the drawing area. The Create a new
Session Data dialog box is displayed.
|
|
Add Widget
menu and click the drawing area.Session Data menu and
click the drawing area. The Create a new
Session... dialog box is displayed.
|
|
|
|
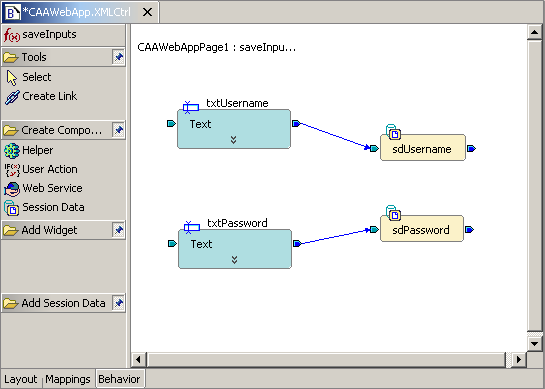
txtUsername widget
properties dialog box by clicking its double down arrow icon.Create Link sub-menu
in the Tools menu, and create a
link between the Text property of
the txtUsername widget and the
sdUsername session data. To select
both input and output for a link, you can either click the property name or
the plug next to it (use the left plug when the property is the output of a
link, and the right plug when it is the input.)
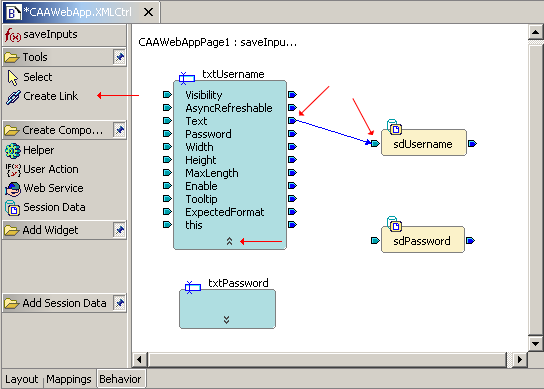 |
Create
Link sub-menu, and create a link between
the Text property of the
txtPassword widget and the
sdPassword session data. The Behavior
Editor should now contain the following components and links:
 |
| [Top] |
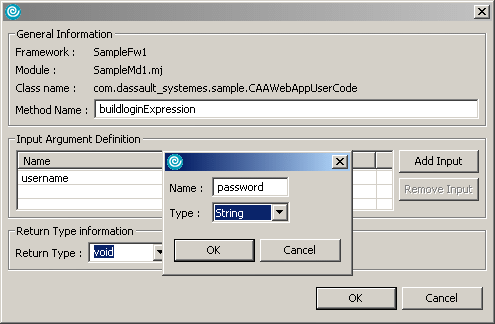
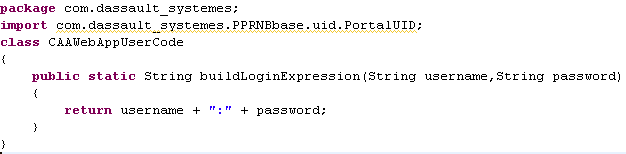
Creating a user action allows you to write code for specific needs. The code
will be invoked during the execution of the behavior. When the first user
action is defined for a web application, a new Java class is created. The file
is located in the same package as the Java controller class. In the sample web
application of this use case, the Java file for user action definitions is
CAAWebApplicationUserCode.java.
To create the user action, proceed as follows:
User Action sub-menu
from the Create Component menu and
click the drawing area in the Behavior Editor.buildLoginExpression in the
Method Name field.Add Input and add 2 input
arguments to the method.
|
|
|
|
|
buildLoginExpression generated method matching the
user action object that you created by inserting the following code in the
method: return username + ":" + password;
 |
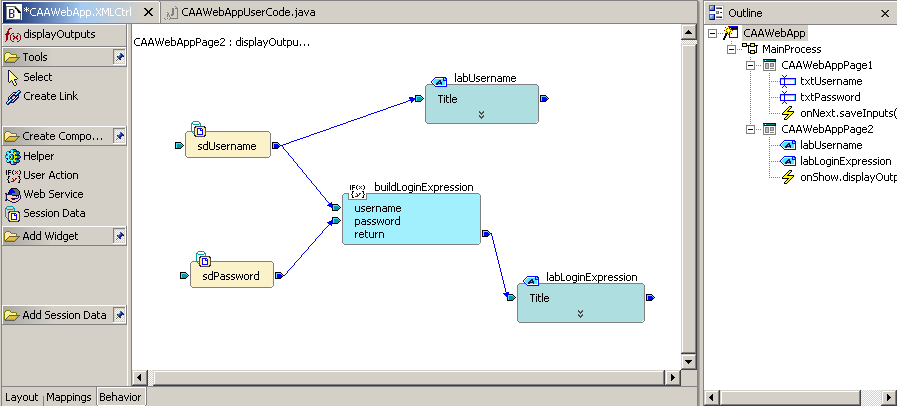
Now you are going to create the page behavior.
Outline view.
Layout Editor and select
Properties.onShow field, enter
displayOutputs. Click OK.
onShow.displayOutputs()
entry in the Outline view to
activate the Behavior tab or click the Behavior tab.labUsername and
labLoginExpression widgets from the
Add Widget menu and click the
drawing area.sdUsername and
sdPassword session data from the
Add Session Data menu and click the
drawing area.User Action sub-menu
from the Create Component menu and
click an empty region in the Behavior Editor.buildLoginExpression in the
Method Name field.Add Input and add 2 input
arguments to the method.
|
|
|
|
 |
| [Top] |
Activate the Web Application Builder editor and save your
CAAWebApplication.XMLCtrl file if not already done.
Although the IdentityCard.h file of the SampleFw and
the Imakefile.mk file of the SampleMd.mj module have
been updated automatically, you cannot directly build your project without
errors. The class path needs to contain the required Jar files.
There are two ways to solve these errors:
CAA Project menu, select
Update libpath based on makefile. This
will automatically update your class path. To know how to
create a workspace and a module, see
Generating a V5
Directory Structure. To know how to set up prerequisites,
see
Setting up Prerequisites.
|
CAA Project menu, select
Create/Update Runtime View.
| [Top] |
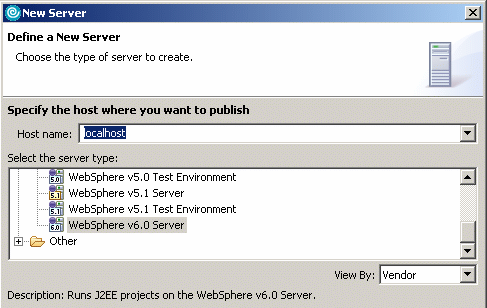
To test the generated code, you can use the WAS Test Environment embedded with IRAD. This chapter provides you with the required configuration steps before running your web application in a web browser.
Server perspective. To
do so, from the Window menu, select
Show View->Servers.Server Configuration
view, right-click and select New->Server.
The New Server dialog box is
displayed.WebSphere v6.0
Server and click
Finish.
 |
Servers
tab, right-click WebSphere v6.0
Server@localhost, and select
Start. CAAWebApplicationSample
web project name in the Navigator
view, and select Run->Run on Server.
Finish. Wait for the server process
completion: The "open for e-business" trace should be displayed in the
Console view output.
Server perspective, enter the following
URL: http://localhost:9080/CAAWebApplicationSample/html/Eapp/CAAWebApplication
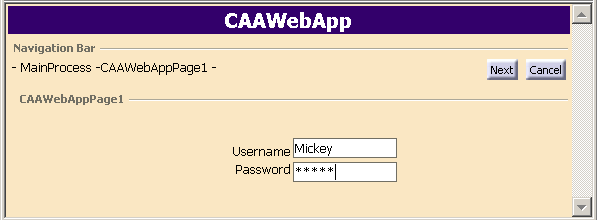 |
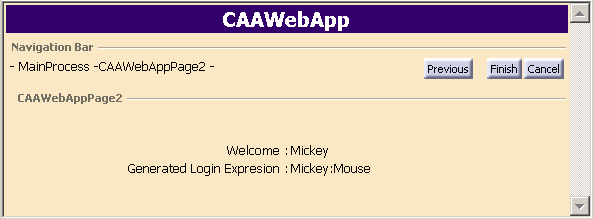
The following page is displayed. Click Finish.
 |
| [Top] |
To run your web application in the Web Application Frame, the only
thing that you need to do is to run CAA Project /
Create/Update Runtime View if not already done.
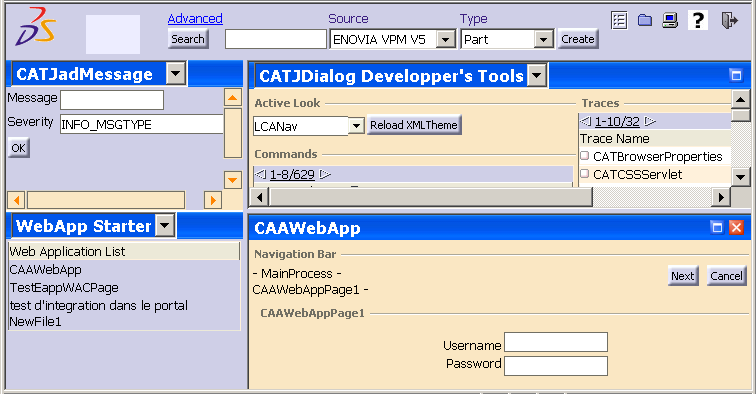
Now you can run your sample web Application in Web Application Frame. To do so, proceed as follows:
http://localhost:9080/WorkspaceName/portalCAAWebApplication
in the list. A page named CAAWebApplication
is displayed in the bottom part of the application frame, containing the
sample web application.
Next> to display the second page of the application.Finish, the
CAAWebApplication application
disappears.
 |
[Top]
| [1] | CATJDialog Overview |
| [2] | Java Interactive Dashboard |
| [3] | Working with Web Application Builder |
| [4] | Working with Dialog Builder |
| [5] | WAC Troubleshooting |
| [Top] | |
| Version: 1.05 [July 2005] | Update |
| Version: 1.04 [January 2004] | Update |
| Version: 1.03 [June 2003] | Update |
| Version: 1.02 [October 2002] | Update |
| Version: 1.01 [September 2002] | Creation |
Copyright © 1994-2006, Dassault Systèmes. All rights reserved.