Conversely, each machine has its own defnitions of TCKs and there is no communication between them.
By this way any client machine communicates with the server machine to retrieve TCK information and these information are managed on only one host.
RADE |
Environment Manager |
Using TCKs for Accessing ToolsUsing TCK commands for managing various tools' installations |
| Technical Article | ||
AbstractThis article is intended for people willing to know more about TCKs. There are two kinds of commands: user and administrator commands. The first section gives explanations about the purpose of the use of TCKs, the second one presents the user commands while the third section gives the command for administrating TCKs at a site level. |
TCK stands for Tool Configuration Key and is a label identifying a specific installation of a set of tools. Different TCKs can be defined for either
[Top]
Any TCK is defined by a set of attributes and a set of tools:
[Top]
TCKs can be created either locally on each user's machine or on a specific host that we call the TCK server host.
 |
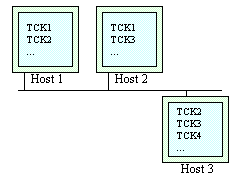
When a TCK is declared locally on a given machine, this TCK
is accessible for every users working on that machine. Conversely, each machine has its own defnitions of TCKs and there is no communication between them. |
 |
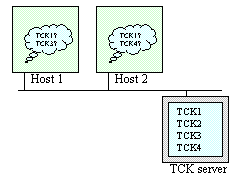
When a TCK is managed by a TCK server, any user is able to
use this TCK from his/her machine and any change performed on the server is seen by users.
By this way any client machine communicates with the server machine to retrieve TCK information and these information are managed on only one host. |
The ability to perform local registration or to retrieve information from a TCK server depends on the type of TCK installation chosen when installing the CAA2 Development Toolkit product:
To know which kind of installation has been set up on a machine, consult this section.
[Top]
TCK commands support two levels of registration:
Depending on the way TCKs are registered, there can be several definitions of the same TCK (site and local). Here is some explanations for understanding which TCK is chosen by TCK commands.
What is the interest of having a TCK defined both on current host and on the TCK server?
It is easier for installing new tools or new versions of tools to declare them on a single host (the TCK server host). However, if some tools are composed of big modules, the local network might be heavily loaded by users running the tools over the network. In this case it is interesting to install tools on users' machines to avoid network access:
Another interest of having two definitions of the same TCK is when testing an application based upon tools managed by TCKs. If a new version of a given tool must be tested, this new version of the tool can be installed on a host and declared locally the official TCK but with a different location for the associated tool.
[Top]
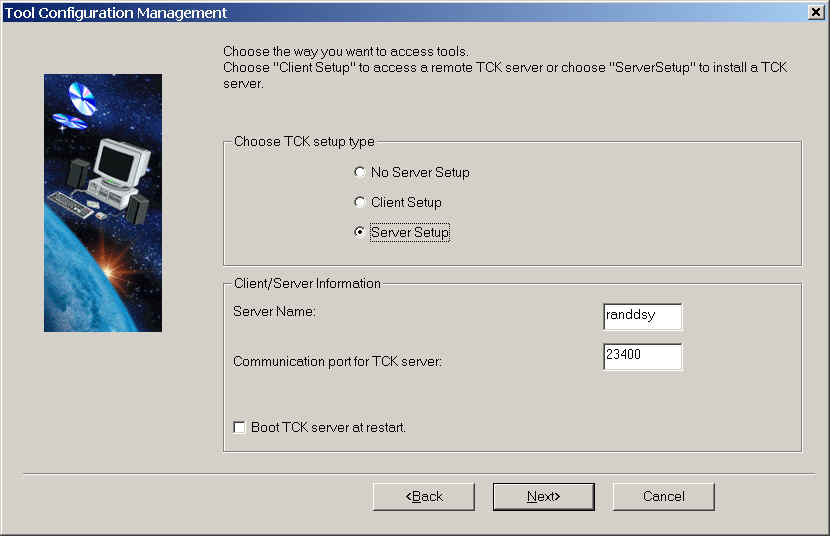
This section describes the different installations that are available from the TCK Box displayed when installing the CAA RADE V5 CD-ROM.
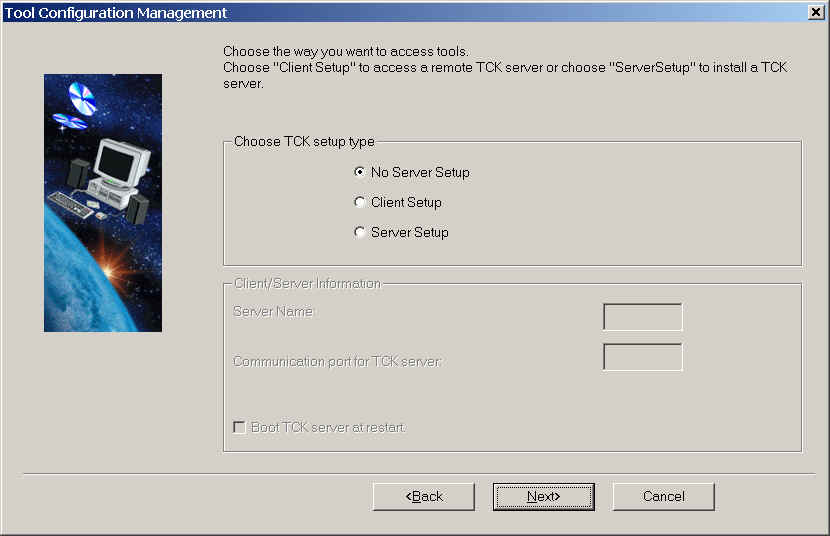
This installation corresponds to the choice "No Server Setup" in the figure hereafter. It is proposed by default and corresponds to an installation which is visible only from the current host. However it is shared by all users working on this host.
The TCKs corresponding to the new installation will be added to the ones that have been installed already on the current host (use tck_list to list them).
[Top]
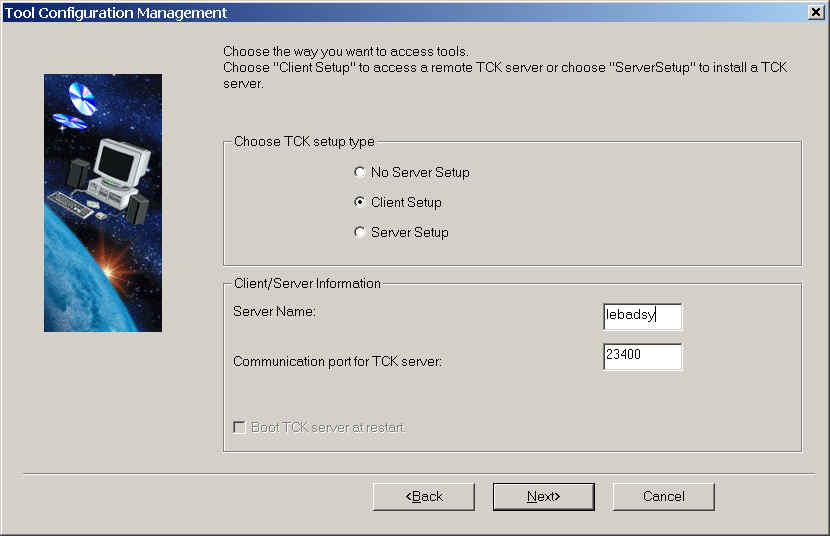
This installation corresponds to the choice "Client Setup" in the figure hereafter. The purpose of the "client" installation is to generate a tck_init profile which is suitable for accessing a TCK server that is running on the host specified in the "Server Name" field and using the port number specified in the "Communication port for TCK server" field.
The interest of choosing the "Client" installation is when a "Server" installation has been done on another host and for a CAA RADE installation path that is visible from the other hosts on the local network. In that case, the "Client" installation can be done on all other hosts by specifying the host where the "Server" installation has been done and the same port as given for this "Server" installation.
![]() If the "Server" installation was performed on a UNIX platform with the
user "root", it is mandatory to run other "Client" installations
with a user named "root" or "CAA". Otherwise the "Client"
installations will not be able to modify the TCKs created by the "Server" installation.
If the "Server" installation was performed on a UNIX platform with the
user "root", it is mandatory to run other "Client" installations
with a user named "root" or "CAA". Otherwise the "Client"
installations will not be able to modify the TCKs created by the "Server" installation.
At the end of the "Server" installation a TCK daemon has been started, running with the user "root". The TCKs created by this installation is owned by the user "CAA". When modifying an existing TCK, the server checks that you are the owner of this TCK or the same user that is running the TCK server. In this case, only the user "CAA" and the user "root" are allowed to modify the TCK. The "Client" installation on Windows, which will use the existing TCK server running on UNIX, will try to update the TCK on the server to add the Windows profiles for each tools (mkmk, mkCheckSource, SCM .). If the user used for the "Client" installation is neither "CAA" nor "root", the TCK server will not allow the modification of the TCK.
![]() It is important that the directory where the CAA RADE V5 CD-ROM has been
installed on the TCK server is seen with the same path from hosts where a
"Client" installation has been done.
It is important that the directory where the CAA RADE V5 CD-ROM has been
installed on the TCK server is seen with the same path from hosts where a
"Client" installation has been done.
![]() It is possible to specify a TCK server corresponding to an older RADE
installation. If this TCK server is running while installing the new version,
the new TCKs will be registered automatically in this server.
It is possible to specify a TCK server corresponding to an older RADE
installation. If this TCK server is running while installing the new version,
the new TCKs will be registered automatically in this server.
[Top]
This installation corresponds to the choice "Server Setup" in the figure hereafter. Its purpose is to install RADE on one host and to start a TCK server on this host in order to let other hosts to access this installation. Here are the steps to go through to achieve such an installation:
$ . P/solaris_a/code/command/tck_init $ tck_server Starting TCK server... $ |
$ mount X:P / $ |
$ . <local_client_installation_path>/solaris_a/code/command/tck_init $ tck_profile V5R11 ... |
![]() It is possible to specify a TCK server corresponding to an older RADE
installation. If this TCK server is running while installing the new version,
the new TCKs will be registered automatically in this server.
It is possible to specify a TCK server corresponding to an older RADE
installation. If this TCK server is running while installing the new version,
the new TCKs will be registered automatically in this server.
[Top]
User commands are the subset of TCK commands that can be useful for any users.
These commands are available as soon as the current environment has been set up [1].
[Top]
The tck_list command displays either TCK defined at site level or on current host.
tck_list [TCK] [-tool Tool] [-all] [-local|-server] [-off] [-admin] [-h|-help|-?][TCK]: when no TCK is specified, all TCKs are selected. If this parameter is set, all TCKs whose identifier contains the given string are selected. This parameter is not case-sensitive.
[-tool Tool]: this option is used to select TCKs containing the given tool
or containing at least one tool whose identifier contains the given string.
This parameter is not case-sensitive.
[-all]: this option is used to display all information about the selected TCKs.
Without this option, only TCK and tool identifiers are displayed.
[-local|-server]: these options are useful for selecting either TCK defined locally or in a TCK server.
When the -local option is used, only the TCKs that are defined locally are selected.
When the -server option is used, only the TCKs that are defined in a TCK server are selected.
Without any of these options, the command will select TCKs defined both locally and in a TCK server.
The -all option can be used to know where is defined a TCK or a tool.
[-off]: to restrict display to official TCKs only. Default is official and administration TCKs.
By default, any new TCK is created as an official TCK.
[-admin]: to restrict display to administration TCKs only. Default is official and administration TCKs.
By default, any new TCK is created as an official TCK.
The -local option is used to know if some local tool installations have been performed on current host.
$ tck_list |
To display all TCKs whose identifier contains the string "V5R4":
$ tck_list V5R4 |
To display all TCKs containing at least one tool whose identifier contains the string "Mkmk":
$ tck_list –tool Mkmk |
To display all information for all TCKs whose identifier contains the string "V5R4" and having at least one tool whose identifier contains the tring "Mkmk":
$ tck_list V5R4 –tool Mkmk –all |
To display all official TCKs and leaving hidden all administrative TCKs:
To use the -all option to know if a TCK or a tool is defined locally on current host:
$ tck_list –all
V5R9_T01 CAA 2002/11/30-06:55:13 local
 Type = Official
 Mkmk_V5R9_T09 2002/11/30-06:55:13 local
    Windows NT: C:\Program Files\Dassault Systemes\V5R9_T09\intel_a\code\command\mkinit.bat
 SCM_V5R9_T09 2002/11/30-06:55:13 local
    Windows NT: C:\Program Files\Dassault Systemes\V5R9_T09\intel_a\code\command\adl_profile_cli.bat
[Top]
Given a TCK identifier, the tck_profile command sets up the current environment to give access to the tools belonging to this TCK.
tck_profile [TCK] [-tool Tool …] [-ws ws_root_directory] [-update] [-force]
        [-h|-help|-?]
[TCK]: identifier of a TCK defined either on current host or at site level. This parameter is not case-sensitive.
[-tool Tool …]: this option is used for limiting the environment setting to the tools whose identifiers are specified.
Without this option, all tools belonging to the TCK are selected.
This parameter is not case-sensitive.
[-ws ws_root_directory]: this option is used to specified a path to a "CNext" workspace
and it leads to changing the current working directory to that directory.
The directory must be accessible from the current host.
[-update]: this option is meaningful only when TCKs are declared both on current host and on a TCK server host.
It is used for replacing the local information by those managed by the TCK server.
Note that if you want to change local information without taking them from a TCK server, you must use the tck_update_local command.
[-force]: this option ensures that the tool's profiles will be executed even the given TCK has been already used in the current environment.
If a path to a workspace is specified, it becomes the current working directory.
For performance considerations, the tck_profile command does not execute tool's profiles when it is called twice in the same environment for the same TCK. However the command checks for the last modification date of the TCK to know if its definition has changed since the last execution:
$ tck_init.bat $ tck_profile V5R4 ... some messages from tools' profiles ... $ |
To access tools associated with the "V5R4_SP1" TCK, on Unix platform, execute:
$ . tck_init $ tck_profile V5R4 ... some messages from tools' profiles ... $ |
[Top]
The tck_update_local command is used for registering or updating TCKs on the current host.
Its purpose is to declare on current host a profile for a given tool and for a given TCK. After the triplet (TCK, Tool, Profile) has been registered, the environment can be set up by executing the tck_profile command with the given TCK as parameter.
tck_update_local TCK -tool Tool [-profile profile_path] [-remove] [-h|-help|-?]TCK: identifier of the TCK for which the tool is being registered, modified or removed. This parameter is not case-sensitive.
-tool Tool: identifier of the tool being registered, modified or removed.
This parameter is not case-sensitive.
[-profile profile_path]: path to the profile to execute for setting the environment.
This profile must be suitable for the platform where the command is executed (Windows-NT or Unix).
[-remove]: this option is used for removing the association of the tool with the TCK.
The local tool definition is not destroyed since can be shared by several TCKs.
When a TCK is defined both on the TCK server and on a given host, any TCK command that is executed on that host will select tools from the local TCK (for those existing in both declarations). The figure below shows what profiles are selected regarding the declarations of TCKs:
| TCK Definition on Server | TCK Definition on Current Host | Executing tck_profile TCK will give |
||
|---|---|---|---|---|
TCK = {
 Tool1
  profile = file_1
 Tool2
  profile = file_2
}
|
X | nothing |  |
TCK = {
 Tool1
  profile = file_1
 Tool2
  profile = file_2
}
|
X | TCK = {
Tool1
profile = file_3
Tool2
profile = file_4
}
|
 |
TCK = {
Tool1
profile = file_3
Tool2
profile = file_4
}
|
TCK = {
 Tool1
  profile = file_1
 Tool2
  profile = file_2
}
|
X | TCK = {
Tool1
profile = file_3
}
|
 |
TCK = {
 Tool1
  profile = file_3
 Tool2
  profile = file_2
}
|
TCK = {
 Tool1
  profile = file_1
}
|
X | TCK = {
Tool3
profile = file_5
Tool4
profile = file_6
}
|
 |
TCK = {
 Tool1
  profile = file_1
 Tool3
  profile = file_5
 Tool4
  profile = file_6
}
|
$ tck_update_local V1 -tool TxxxV1 -profile e:\local\tools\TxxxV1\profile.bat $ tck_update_local V2 -tool TxxxV2 -profile e:\local\tools\TxxxV2\profile.bat $ |
To declare on current host the "Txxx" tool in two different TCKs: Note that the second command does not specify the profile because the same tool identifier is used and then the corresponding profile is already registered.
$ tck_update_local V1 -tool TxxxV1 -profile e:\local\tools\TxxxV1\profile.bat $ tck_update_local V2 -tool TxxxV1 $ |
To change the profile associated with a tool: Note that all TCKs owning the same tool will be impacted as well.
$ tck_update_local V1 -tool TxxxV1 -profile e:\local\tools\TxxxV1\Txxx_init.bat $ |
To replace, in "V1" TCK, the "TxxxV1" tool by the "TxxxV2" tool: Note that as there are two different identifiers for the two tool versions it is necessary to use the -remove option to remove the first tool.
$ tck_update_local V1 -tool TxxxV2 -profile e:\local\tools\TxxxV2\profile.bat $ tck_update_local V1 -tool TxxxV1 -remove $ |
[Top]
The commands listed below are available as soon as the current environment has been set up [1].
These commands are needed only when managing TCKs with a TCK server. If there is no TCK server, only the user commands can work.
[Top]
The tck_server command starts a TCK server on the current host.
It's usual to have a single TCK server registering tools' installations on a local network.
tck_server [-port port_number] [-h|-help|-?][-port port_number]: if the default port is busy, another port can be specified using this option.
If the launching is successful, the command ends but leaving the TCK server running in background.
If the -port option is used to specified another port than the default one, each client must be updated as well:
$ tck_server Starting TCK server... $ |
[Top]
The tck_server_admin command is used to stop a TCK server or to check if one is running.
tck_server_admin [-host host_name] [-port port_number] -ping|-stop [-h|-help|-?][-host host_name]: if the server is not running on the current host, this option is used to specify that host. [-port port_number]: if the default port is busy, another port can be specified using this option. -ping: this option causes the command to submit a request to the TCK server and returns a zero code if there a response to the request. -stop: this option is used for asking the server for stop.
$ tck_server_admin -ping The TCK server is running on "bjork", port 23400. $ echo %errorlevel% 0 |
To stop a server (from any host)
$ tck_server_admin -stop $ tck_server_admin -ping # TCK - 0406: The TCK server is not running on "bjork", port 23400. $ echo %errorlevel% 5 |
[Top]
The tck_create command is used to register a new TCK in the server, changes in an existing TCK can be done using the tck_modify command.
tck_create TCK [-from TCK] [-admin] [-h|-help|-?]TCK: identifier of the TCK to be created. This parameter is not case-sensitive.
[-from TCK]: this option takes as parameter the identifier of an existing TCK.
This TCK is used for proposing defaults when creating the new one (variables, associated tools).
[-admin]: this option indicates that the new TCK is not created for administration and not for all users.
See -admin and -off options of the tck_list command.
When the -from option is used to specify a reference TCK, the execution falls down in four steps:
When the -from option is used, it is not possible to skip a tool definition. The tck_remove command can be used afterwards for removing a tool definition.
Note: it is not possible to refuse to associate a variable with a TCK. Either the default value is kept or a new value is entered. If some variables are specific to some TCKs or tools, they should be set up in tool profiles and not defined in the TCK variable file.
Here are the different use cases:
Creation of a new "CXR4" TCK with two tools "mkmkcxr4" and "adl", these tools are not yet defined in the system. The command ends when no identifier is entered.
$ tck_create CXR4 Associated comment [ENTER to skip] = tools for level CXR4 Release [-] = CXR4 Tool identifier [ENTER to terminate]: mkmkcxr4 Unix profile [ENTER to skip]: /u/users/bsfr/mkmk_profile_cxr4 Windows NT profile [ENTER to skip]: //lisa/tools/mkmk_profile_cxr4.bat Tool identifier [ENTER to terminate]: adl Unix profile [ENTER to skip]: /u/env/adlbin/adl_profile Windows NT profile [ENTER to skip]: //lisa/tools/adl_profile.bat Tool identifier [ENTER to terminate]: $ |
Creation of a new "CXR4" TCK with two tools "mkmkcxr4" and "adl", the "adl" tools already exists in the system.
$ tck_create CXR4 Associated comment [ENTER to skip] = tools for level CXR4 Release [-] = CXR4 Tool identifier [ENTER to terminate]: mkmkcxr4 Unix profile [ENTER to skip]: /u/users/bsfr/mkmk_profile_cxr4 Windows NT profile [ENTER to skip]: //lisa/tools/mkmk_profile_cxr4.bat Tool identifier [ENTER to terminate]: adl Unix profile = /u/env/adlbin/adl_profile Windows NT profile = //lisa/tools/adl_profile.bat Tool identifier [ENTER to terminate]: $ |
In this example, the -from option is used to get the same tools as those associated with the reference TCK.
$ tck_create CXR5 –from CXR4 Associated comment [ENTER to skip] = tools for level CXR5 Release [CXR4] = CXR5 Tool identifier [mkmkcxr4]: Unix profile = /u/users/bsfr/mkmk_profile_cxr4 Windows NT profile = //lisa/tools/mkmk_profile_cxr4.bat Tool identifier [adl]: Unix profile = /u/env/adlbin/adl_profile Windows NT profile = //lisa/tools/adl_profile.bat Tool identifier [ENTER to terminate]: $ |
[Top]
The tck_modify command is used for changing the definition of an existing TCK managed by a TCK server. For modifying an existing local TCK, use the tck_update_local command instead.
tck_modify TCK [-tool Tool] [-h|-help|-?]TCK: identifier of the TCK to be modified. This parameter is not case-sensitive.
[-tool Tool]: identifier of a tool associated with the TCK.
This option is used for limiting modifications to the tools whose identifier contains this string.
This parameter is not case-sensitive.
When the -tool option is used, only tools whose identifier contains this string are proposed for modifications and the command ends when they have been listed (no new tool can be specified).
When a tool identifier is changed, the profiles associated with the old tool are proposed as defaults.
If one tool profile is modified, all TCKs having the same tool are impacted automatically.
There are time stamps for TCKs and tools, here is how they works:
In the following examples, the TCK variable file contains only one variable ("Release").
Defaults are proposed between '[]'.
In the following example, the "mkmkcxr3" tool is replaced by the "mkmkcxr4" tool.
$ tck_modify CXR4 -tool mkmkcxr3 Tool identifier [mkmkcxr3]: mkmkcxr4 Unix profile [ENTER to skip] = /u/users/bsfr/mkmk_profile_cxr4 Windows NT profile [ENTER to skip] = //lisa/tools/mkmk_profile_cxr4.bat $ |
In the following example, the location of the Windows-NT profile of the "mkmkcxr4" tool is modified. Note that all TCKs having the "mkmkcxr4" tool will see this new location.
$ tck_modify CXR4 -tool mkmkcxr4 Tool identifier [mkmkcxr4]: Unix profile [/u/users/bsfr/mkmk_profile_cxr4] = Windows NT profile [//lisa/tools/mkmk_profile_cxr4.bat] = //ginger/tools/mkmk_profile_cxr4.bat $ |
In the following example, no option is specified and all information are proposed for modifications.
$ tck_modify CXR4 TCK identifier [CXR4] = Type (O|A) [Official] = Associated comment [Tools for level CXR4] = Release [CXR4] = Tool identifier [mkmkcxr3] = mkmkcxr4 Unix profile [/u/users/bsfr/cxr3/mkmk_profile] = /u/users/bsfr/cxr4/mkmk_profile Windows NT profile [\\lisa\tools\mkmk_profile_cxr3.bat] = \\lisa\tools\mkmk_profile_cxr4.bat Tool identifier [adl] = Unix profile [/u/env/adlbin/adl_profile] = Windows NT profile [\\lisa\tools\adl_profile.bat] = Tool identifier [ENTER to terminate] = $ |
[Top]
The tck_remove command is used for removing a TCK or the association between a tool and a TCK.
tck_remove TCK [-tool Tool] [-h|-help|-?]TCK: identifier of the TCK to remove or from which a tool is to be removed. This parameter is not case-sensitive.
[-tool Tool]: identifier of a tool to removed from the TCK.
This parameter is not case-sensitive.
Only the tool is removed, the TCK remains valid.
If a tool is shared by several TCKs, it is removed only in the given TCK.
This command cannot be used for removing the variable in a TCK because only variables meaningful for any TCK should have been defined in the TCK server. The only way for removing a variable is to remove its definition in the the variable file and to restart server, then to use the tck_modify command for removing the variable from each TCK.
$ tck_remove CXR4 -tool mkmk |
[Top]
When using a TCK server, a set of environment variables can be associated with all TCKs managed by this server. Note that the purpose of this feature is not to defined different variables for different TCKs but for all TCKs: the setting of particular variable might be done inside tools' profiles.
The variables names are defined in the file whose path is given by the TCK_VAR_FILE environment variable. This variable is set in the working environment after having executed the tck_init [1] file.
Each time a new TCK is being created (see tck_create), or an existing TCK is being modified (see tck_modify), the command prompts the user for setting each variable.
The TCK_VAR_FILE can be edited for addiing, modifying or removing some variables: the file can contain empty lines or lines of the form
# a comment
or
VARIABLE VALUE
A variable must be defined only once.
Spaces or tabulations before a variable name or between the name and the value are ignored
but are kept when found in value.
After the file has been edited, the TCK server must be restarted because the server loads the file in main memory.
Note that the new definition set has no direct impact on defined TCKs but the changes will be taken into account by TCK editing commands:
[Top]
This information is useful when deciding to manage TCKs by a server and checking that the TCK installation on a given host is a "Client" installation.
To retrieve this information
In the case where you need to access a TCK server from a host where there is a "NoServer" installation, you must (re)install the CAA2 Development Toolkit products and select the "Client" setup in the TCK installation panel.
[Top]
| [1] | Getting Access to the CAA V5 Tools |
| [Top] | |
| Version: 1 [Mar 2000] | Document created |
| Version: 1.1 [Nov 2002] | Update of tck_list command |
| [Top] | |
Copyright © 2000, Dassault Systèmes. All rights reserved.