Creating a Toolbar CAA RADE
- Create the Framework
- Create a Module
- Set the module as the "Startup Project"
- Locate Pre-requisite workspaces
- Adding a component: A "Component" is something that
implements an "Interface". By inserting a "Component" we let
the macro automatically link our code with some workbench in
CATIA by giving it certain "TIE" commands.
- Insert the Component

- Give it a name

- Add a "TIE mode". This is where we link the component to an existing interface
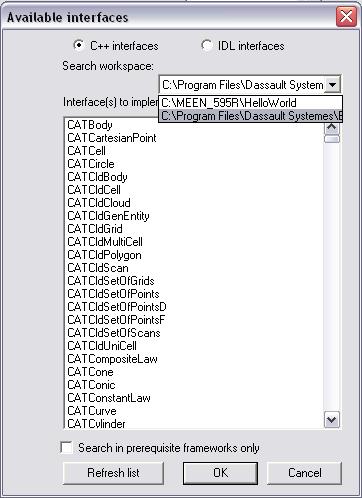
- click the ellipses button

- find the TIE called CATIAfrGeneralWksAddin
- In the "Search workspace" pulldown menu find
"c:\Program Files\Dassault Systems\B18"
- Insert the Component
#include "TIE_CATIAfrGeneralWksAddin.h"
TIE_CATIAfrGeneralWksAddin(toolbar);
- These two lines are the result of what the macro did to "TIE" our component to an interface (in this case the GeneralWksAddin Interface).
MacDeclareHeader(ToolHeader);

void toolbar::CreateCommands()

{
    new ToolHeader("CommandButton1", "FirstProject","MyCommand", (void *)NULL);
}
- I really don't understand this too well yet, but the MacDeclareHeader function makes it possible to create a command button in our toolbar.
- The new ToolHeader instantiates the header
declared with the MacDeclareHeader function.
- The first input must be the same as the name in quotes in SetAccessCommand (see below)
- The second input must be the name of the module that the component is a part of
- The third input is the name of a header file that defines a CATCommand which is where you will define what the button actually does
- and the purpose of the fourth input is unknown.
CATCmdContainer * toolbar::CreateToolbars()
{

     NewAccess(CATCmdContainer,ptool,AwesomeToolBar);

     NewAccess(CATCmdStarter,pButton1,Button1);
     SetAccessCommand(pButton1,"CommandButton1");
     SetAccessChild(ptool,pButton1);

     AddToolbarView (ptool,1,Top);


return ptool;

}
The Toolbar
- NewAccess is used to allocate the toolbar
- The first input to allocate a toolbar is CATCmdContainer
- The second input is the name of the pointer to the toolbar that you want. This call actually creates the pointer, you do not need to initialize it or instantiate it before hand.
- The third input is the name of the toolbar object. Just like the pointer, this object does not need to be instantiated or even declared in advance.
- AddToolbarView displays the toolbar (Pointer of toolbar to show, 1 or 0 = show or hide, Where to dock the toolbar)
- The function must return a pointer to a CATCmdContainer
The Commands
- New Access is again used to allocate the button
in the toolbar
- The first Input of CATCmdStarter signifies that it is allocating a button (as opposed to a toolbar)
- The other inputs are the same as before
- SetAccessCommand is used to link the button
pointer to the command listed in the CreateCommands()
function.
- The first input is the pointer of the button to which a command is going to be assigned
- The second input must match the first input of the ToolHeader() command which .
- SetAccessChild allocates a set of children for a
toolbar starting with the first child
- The first input is the toolbar to which you want to set a child
- The second input is the child to be assigned to the toolbar
- Note To add more buttons to this toolbar you do not need to use SetAccessChild again. Instead you use SetAccessNext (see CAA documentation)