 |
This task explains the concept of
work packages and how to create them. You can save work packages in an
ENOVIA database, or save them to a local drive or server. You should also
refer to Connections Between Work Packages
and Managing Publications. |

|
Work packages are necessary for efficient data
organization and concurrent engineering. The biggest benefit, perhaps, is
that they allow you to organize data in easily manageable units. Concurrent
engineering refers to the practice of having several people, maybe even
hundreds, work on the same project. If the design is created in one
document then only one person can work on it. Creating several work
packages provides the answer, by creating several documents under one root
document.
Each document (or work package) contains the portion of design that one
person is working on - such as placing equipment in one compartment of a
ship. Publications are automatically (see below) created at the locations
at which different documents connect. Each work package thus knows where
it belongs within the product. If something is moved - say equipment to
which a run connects - then the user will be alerted about it. The steps
central to using work packages are explained below.
Work packages must be organized in a certain way. See
Organizing Work Packages to learn how to do
it. |
 |
1. |
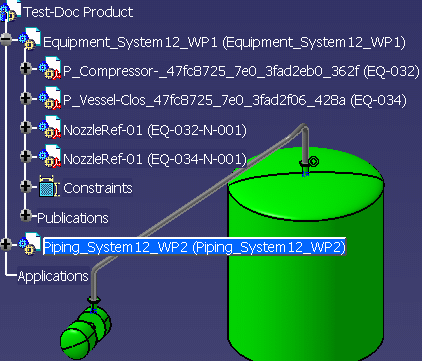
CREATE A WORK PACKAGE: To
create a work package, select the product and, in the menu bar, click Insert
- New Product. In the simple example below, two work packages have been
created. One contains the equipment and the other contains the run and
piping that connect the two pieces of equipment. Thus, the person who owns
the equipment work package can open the document at the same time that the
piping engineer is working on his work package.
|
|
2. |
ADD DOCUMENTS: However, in
order to be able to route from the equipment, the piping engineer will need
to be able to see the equipment. In order to do this the piping engineer
will need to import the equipment document. See
Importing a Product for more information. Once he has imported both
documents, he can make the piping document active and begin routing in it.
When he saves, the piping information will be saved in the piping document. |
|
|
3. |
PUBLISH CONNECTORS: Cross
document connections can only be created between published connectors. A
cross document connection is established when a connection is created
between two objects in different work packages. (A cross document
connection consists of two one-half connections, one in each of the
involved work packages.) When working between two work packages:
- When you do not have write access to the other work package, the
connector that you are connecting to in this other work package must
be published.
- When you have write access to the other work package, the
connector that you are connecting to need not be published. However,
when you connect to this other work package, a publication between
the two work packages is created automatically.
- You cannot connect to an object in another work package when
its connector is not published, and you do not have write access.
- If you are placing equipment from one work package, owned by
you, on a run that is in a second work package, owned by a second
user, you need to do the following. Publish the connector on the run
on which you will place the equipment. You also need to click the
button Place New Part Under Active Parent
 ,
which is located in the General Environment Toolbar. This ensures
that the equipment will be placed in the correct work package, which
is the one owned by you. If you do not do this an attempt will be
made to place the equipment in the work package containing the run,
and you will get an error message because you do not own it. ,
which is located in the General Environment Toolbar. This ensures
that the equipment will be placed in the correct work package, which
is the one owned by you. If you do not do this an attempt will be
made to place the equipment in the work package containing the run,
and you will get an error message because you do not own it.
|
|
|
To learn how to create connectors
and publish/unpublish them see Creating Connectors. |
|
|
|
|