Analyzing Schematic Driven Design
|
|
This task explains how to analyze
a 3-D document created using a schematic driven process. This function allows
you to determine that parts placement is in accordance with the schematic
drawing. You can also associate objects in a 2-D schematic with objects in a 3-D document when the schematic function is not associated with any of the 3-D objects. |
|
|
|
This procedure allows you to compare your 3-D document to the schematic from which it was created for errors and inaccuracies. You can only analyze equipment and parts, not routes. | |
|
|
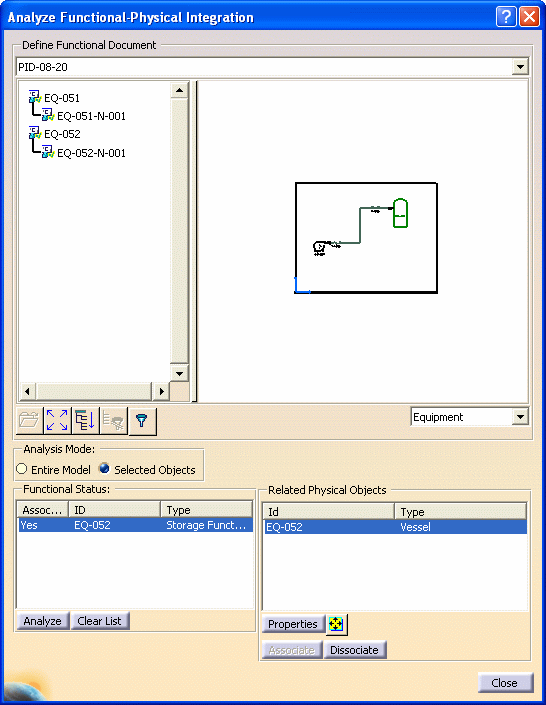
1. | With the 3-D document open, select from the
menu bar: Analyze - Functional Physical Integration - Analyze Functional Physical Integration Status The Analyze Functional Physical Integration dialog box displays with the associated schematic drawing. If your 3-D document and schematic are not associated, click the Open button, navigate to the schematic and select it.
The left side of the dialog box (the tree section) displays the 2-D/3-D integration status of the listed equipment. The status updates automatically when the dialog box displays. A green checkmark
A red X
|
|
|
You can manually update the 2-D/3-D
integration status of the objects.
However, you must set your Tools - Options as follows: From the menu bar, select Tools - Options - Equipment and Systems. On the Design Criteria tab, uncheck the Automatic 2D/3D Integration Status Check checkbox. Now when you display the
Analyze Functional Physical Integration dialog box,
the integration status does not update, and you see yellow question marks
You also see the Update Integration Status
button
|
|
To update the 2-D/3-D integration status
manually:
|
||
| 2. | Select the Selected Objects option and click
on an object in the schematic. Information about the object displays in the
Functional Status frame.
NOTE: You can select another element from the drop down list on the right side. For this example, Equipment is used. If the schematic function is associated with a 3-D object, the relevant information displays in the Related Physical Objects window. The two can be dissociated by clicking the Dissociate button. If the schematic function you selected is not associated with an object in the 3-D document, the Related Physical Objects window suggests 3-D objects to which it can be associated, if there are any. If you want to associate it, select an object and click the Associate button. |
|
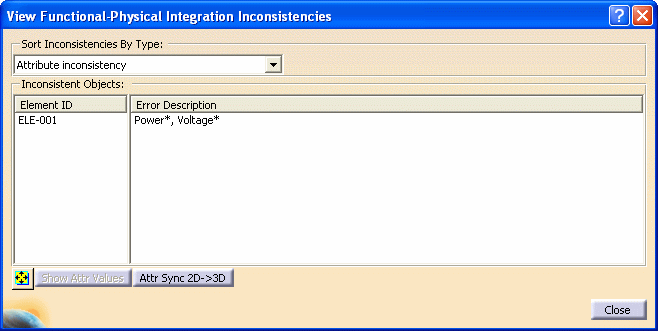
| 3. | Click the Analyze button.
The View Functional-Physical Integration Inconsistencies dialog box displays and lists errors, if any. In the example below, the Error Description indicates the inconsistent attributes.
|
|
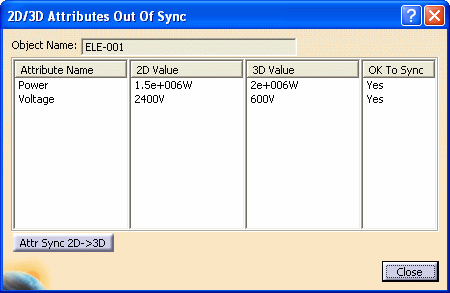
| 4. | To fix the inconsistencies between the 2-D
and 3-D documents: Select an inconsistent object under the Element Id column, and click the Show Attr Values button (enabled when you select the Element ID). The 2D/3d Attributes Out of Sync dialog box displays.
Click the Attr Sync 2D>3D button. The dialog box clears the information, indicating the attributes are synchronized. Click Close. If the View Functional-Physical Integration Inconsistencies dialog box lists other inconsistencies between the 2-D and 3-D documents, you can fix these by following this same process. |
|
|
|
You can also
associate a schematic function with a 3-D object by using the Analyze
function in the menu bar.
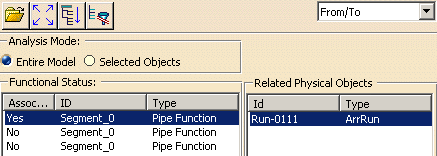
With your 3-D document open, select Analyze - Functional Physical Integration - Associate Functional Physical Objects. When the Associate Functional Physical Objects window displays, click the Open button to open the schematic you want to use, and select the function you want to associate. Make sure From/To is selected from the drop down list on the right side, and select Entire Model. The window displays the 3-D objects you can associate to. Select one and click Apply and OK. NOTE: It is possible to associate one schematic run segment to more than one 3D run.
You can create an Exception for certain objects, and you will not be able to associate to them. These objects are also overlooked by the Analyze function. With your 3-D document open, click Analyze - Functional Physical Integration - Manage Exceptions. The Exception Manager displays. Select the object for which you want to create an exception and click Create. You can use the same procedure to remove the Exception. You can use the Clear List button to clear the entries in the Functional Status frame. Select an entry and click the Properties button if you want to see its properties. |
|
|
|
||