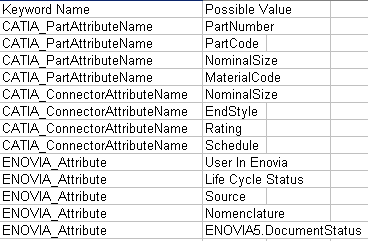
Create a file that contains a list of the
attributes whose values you want to see displayed in the report. Use a
text editor like WordPad to create the file. Create two column headings:
Keyword Name and Possible Value. The keyword names
you can have are:
- CATIA_PartAttributeName. Used for part attributes.
- CATIA_ConnectorAttributeName. Used for connector attributes.
- ENOVIA_Attribute. Used for ENOVIA attributes. This only works if you have
set up the ENOVIA-CATIA attribute mapping table as described in ENOVIA
documentation.
- CatalogName. Use this if you want to enter the names of catalogs
from which to generate reports. You can also select a catalog using
the procedure described below.
- CatalogReportPath: Use this to enter the location of the output
file. You can also specify this using the procedure described below.
Enter the attributes as shown below: under the column Keyword
Name enter the correct keyword. Under the column Possible
Value, enter the attributes as defined in the parts catalog. You
can have as many entries as you want.

NOTE: You can also enter the names of catalogs from which you want to
generate reports. If you do this, then the
Catalog Name
field explained in Step 5 below will not be available. The catalog
name(s) should be entered in the following format. The directory path is
for the sample catalog - replace with your own path if needed:
Keyword Name: CatalogName
Possible value: ...\intel_a\startup\EquipmentAndSystems\Piping\PipingDesign\ComponentCatalogs\
Parametric\PipingParts.catalog. If you are generating a report from a
catalog in ENOVIA, then use the catalog name only, not the directory
path.
You can enter the location of the output report also, in which case the
Output
Directory field explained in Step 4 will not be enabled. To
enter the output directory use the Keyword Name "CatalogReportPath" and
enter the path in the Possible Value column. |