For the rare situations when you have started the design process using heavy objects, and determine that they be replaced with light objects, you can replace them. See Replacing Heavy Parts with Light Parts below.
When you are adding a connector to a light part, you do not need to select geometry because light parts do not have the kind of geometry needed to add connectors.
- Weld
- Straight routable part
- Bendable
Explaining the Difference Between a Light and Heavy Part
When you place a heavy part (refers to a parametric part that is not created as a light object) in your document, you end up creating a separate document for each unique reference. This is not the case when you place a resolved part. The placed part simply points to the catalog, and a unique document is not necessary.
The light object approach applies the concept of a resolved part to a unique reference. When you build a part as a light object, you do not create the geometry of the part. Instead, you build the part, and designate it as a light object, as described the section Building Parts, and place it in a catalog. When you place the part in a document, this application will automatically create the visualization for it.
You should also note that differing lengths of a placed light object do not result in the creation of a separate document for each placement. As an example, when you first place a 10-inch pipe in a document, a separate document is created for that part. However, when you place a 10-inch pipe again in the same document, a separate document is not created. All instances of a 10-inch pipe will refer to the first document that was created.
- Click the Build Part button to display the Create Part dialog box.
- Click the Display Class Browser button next to the Component Type field. The Class Browser appears. The Class Browser allows you to select the type of part you want to create. Navigate to the type you want by clicking on the "plus" sign next to each directory, or by using the three navigation buttons at the bottom. You can also filter for certain types. For instance, you can enter "elbow" in the Filter field and select enter to see all elbow types. Click OK after making your selection.
- If you select a type in the class browser that can be created as a
light part, then the Create Part dialog box will display the
checkbox Make light object
 . The default is checked. If
you do not want to create a part as a light object then uncheck
this.
. The default is checked. If
you do not want to create a part as a light object then uncheck
this. - Follow Step 5 onward in the task Creating a Part.
Object Naming Rules for HVAC Ducts
If you want to place heavy HVAC duct, you need to change the file that defines the object naming rules. (You do not need to make any change if you are placing 'light' parts.)
If you are placing heavy parts then navigate to the directory ...intel_a\startup\EquipmentAndSystems\HVAC\DataDictionary.
The default files are named sch-CATHvaHVACXXXXDuct1.xml where XXXX represents a shape like FlatOval. Rename this file so that the application does not recognize it - you can add a SAVE at the end, for instance. You need to use the corresponding file that has the _HV at the end of the file name. This file is in the same directory, and normally directly beneath the file for light parts.
To use this file simply remove the _HV. As an example:
- Rename sch-CATHvaHVACXXXXDuct1.xml to sch-CATHvaHVACFlatOvalDuct1_SAVE.xml
- Remove the _HV from the file sch-CATHvaHVACFlatOvalDuct1_HV.xml
Replacing Heavy Parts with Light Parts
NOTE: If any other part in the catalog has the same part number as the added light part references, you will not be able to replace the heavy parts.
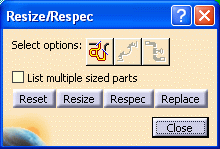
Click the
Resize/Respec Part
button
![]() ,
and the
Resize/Respec
dialog box displays.
,
and the
Resize/Respec
dialog box displays.
You can see the heavy parts that you selected display under the From column.
Select a heavy part from the From column, and the Options list becomes available.
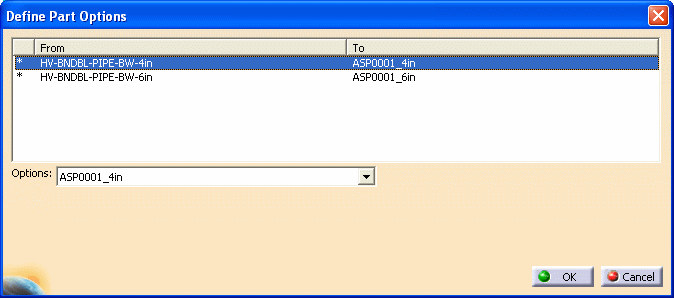
NOTE: Make sure you select only light parts from the Options list.
You can see your selections display under the To column.
Click OK when you have chosen an option for all of the heavy parts listed.