 |
This task shows you how to use the
step input box and construction elements for more control over routing and
placing of resources and item reservations. |
 |
The value entered in the
step input box is used for accurate
routing and resource placement. You can only route in multiples of the
value in the step input box. If the value is 0.25 meters you cannot create
a run that is 0.33 meters in length, but you can create runs that are 0.50,
0.75 meters and so on.
The value in the step input box works with some of the construction
elements to further refine your routing and resource placement, as
explained below. |
 |
1. |
To enter a value in the step input box, select
the increment field  and key in a value. You can also click on the down
arrow and select a value, if it is appropriate for your task. The following
sections explain how the step input box is used together with some of the
construction elements.
 |
|
2. |
Click on the down arrow and select the
Snap to steps off current axis
 button.
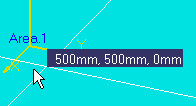
This allows you to snap to points that are multiples of the value entered
in the step input box measured from the current axis (also called
origin). As you move your mouse pointer a label will show the distances
(coordinates) from the current axis in multiples of the value entered in
the step input box. In the illustration below, the label is showing that
the distance is 500 mm from the axis along the X axis, and 500 mm
from the axis along the Y axis. When routing you will only be able to
create segments whose length is in multiples of 500 mm. Similarly, you will
only be able to place (or move) a resource at points that are measured in
multiples of 500 mm from the axis. You can change the value in the step
input box at any time. button.
This allows you to snap to points that are multiples of the value entered
in the step input box measured from the current axis (also called
origin). As you move your mouse pointer a label will show the distances
(coordinates) from the current axis in multiples of the value entered in
the step input box. In the illustration below, the label is showing that
the distance is 500 mm from the axis along the X axis, and 500 mm
from the axis along the Y axis. When routing you will only be able to
create segments whose length is in multiples of 500 mm. Similarly, you will
only be able to place (or move) a resource at points that are measured in
multiples of 500 mm from the axis. You can change the value in the step
input box at any time.

|
|
3. |
Snap to steps off
last position
 . This will allow you
to snap to points that are multiples of the value in the step input box
measured from the last point at which you clicked. When you select this
option the label will first show the distances from the current axis. After
you click, it will show the distances from the last point where you
clicked. You can change the value in the step input box after a click if
you want to route a segment of a certain length or place a resource an
exact distance away from where you last clicked. . This will allow you
to snap to points that are multiples of the value in the step input box
measured from the last point at which you clicked. When you select this
option the label will first show the distances from the current axis. After
you click, it will show the distances from the last point where you
clicked. You can change the value in the step input box after a click if
you want to route a segment of a certain length or place a resource an
exact distance away from where you last clicked. |
|
4. |
Snap to XY
construction planes
 . This option allows you to
snap to the XY grids on a construction plane.
You first create a grid using the Construction Planes command. If you have
an XY grid you will only be able to place resources at, or route to, the
intersections of X and Y grids. If you have only X or Y grids you will only
be able to place resources at, or route to, the grid lines. . This option allows you to
snap to the XY grids on a construction plane.
You first create a grid using the Construction Planes command. If you have
an XY grid you will only be able to place resources at, or route to, the
intersections of X and Y grids. If you have only X or Y grids you will only
be able to place resources at, or route to, the grid lines. |
|
5. |
Snap to all construction planes
 . Choosing this option
allows you to snap to the X, Y or Z grids. . Choosing this option
allows you to snap to the X, Y or Z grids. |
|
6. |
Snap to elevation planes
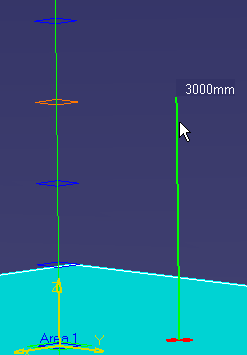
 . Selecting this
option allows you to snap to the elevation planes of a Z grid. In the
illustration below the user is routing on the Z axis and snapping to the
elevation planes of the Z grid. . Selecting this
option allows you to snap to the elevation planes of a Z grid. In the
illustration below the user is routing on the Z axis and snapping to the
elevation planes of the Z grid.

|
|
7. |
Snap to Drafting
elements  . This option is used when attaching the drafting view of a 2D drawing to
an area. By using this option you will be able to snap to the elements of
the 2D drawing. For instance, if you are attaching the 2D drawing of a
conveyor belt to an area, by choosing this option you will be able to use
the Conveyor Reservation function to select the drawing (you select by
clicking on different elements of the drawing). This will allow
creation of an identical conveyor layout in 3D.
 |
|
 |


![]()