The information in this section will help you create and edit Rough Turning operations in your manufacturing program.
The Rough Turning operation allows you to specify:
The following topics are dealt with in the paragraphs below:
The following tooling may be used:
Note that the following attributes may influence machining (they are located on the Insert-holder's Technology tab):
These attributes take tooling accessibility into account and may reduce the
machined area.
However, you can use the Insert-Holder Constraints option on the operation
editor to either ignore or apply these tooling attributes. You can replay the
operation to verify the influence of these attributes on the generated tool
path.
Note that the Insert-Holder Constraints setting does not influence the Leading and Trailing Safety Angles defined in the operation editor.
Part and Stock profiles are required. They can be specified as follows:
Multiple areas are not managed. If a profile with multi-domains is selected manually or by means of the automatic stock selection capability, only a single area is taken into account for machining.
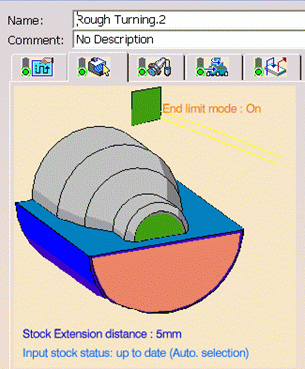
The End Limit option allows you to specify a point, line, curve or face to relimit or extrapolate the selected part profile. If a face is specified, the end element is the intersection of the face and the working plane. The position of the end of machining is defined with respect to this element by one of the following settings: None / In / On / Out.
The Stock Extension distance allows you to extend the stock in the machining direction and, to any desired length. This can be useful in Rough turning scenarios, where you want to machine beyond the stock profile. This extension is taken into account for toolpath computation when an End limit element is defined and used on the operation (when End limit mode is different from None).
The extension distance defines the extended domain for toolpath computation. Note that the end limit is respected only when it is specified (according to the In / On / Out mode) inside the extended domain.
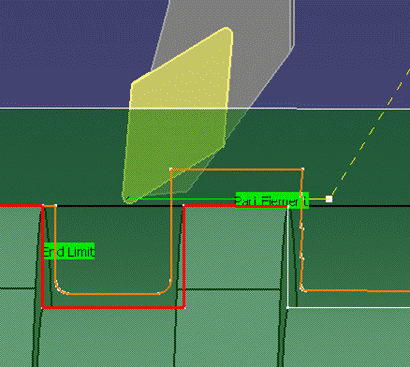
The figures below show that an End limit is defined (selected and mode different from None) and a Stock Extension distance is defined (greater than 0).


The tool moves beyond the stock (extension distance). This distance defines the machining domain extension for toolpath computation.
Note that in this particular case, the limit is not reached (In / On / Out) because it is outside the extended machining domain.
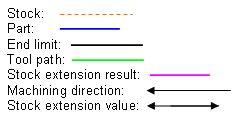
In the following examples, the following key is used to illustrate various cases of stock extension:
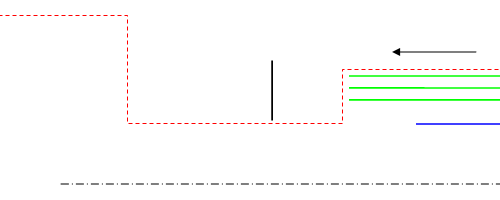
Example 1: End limit beyond stock with no stock extension
Example 2: End limit beyond stock but inside stock extension
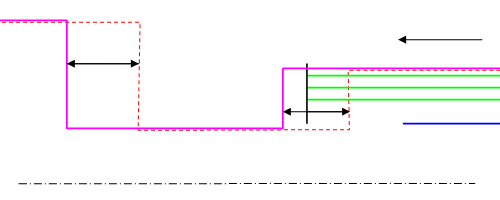
Example 3: End limit beyond stock and stock extension
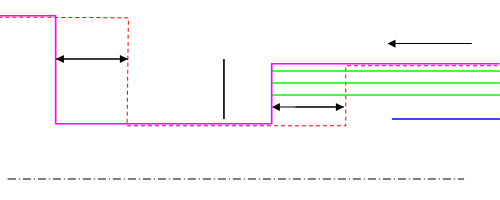
Example 4: Stock extension with no End limit
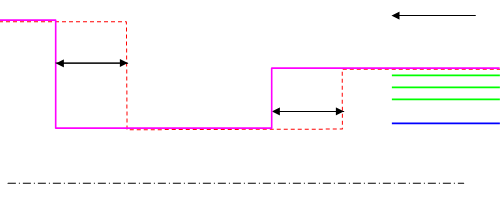
Example 5: End limit inside stock and no stock extension
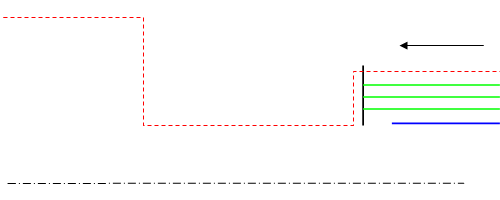
Relimiting the area to machine by means of limit elements
If you specify a point, it is projected onto the part profile.
A line through the projected point parallel to the radial axis delimits the
area to machine.
If you specify a line, its intersection with the part profile is calculated
(if necessary, the line is extrapolated).
A line through the intersection point parallel to the radial axis delimits the
area to machine.
If you specify a curve, its intersection with the part profile is calculated
(if necessary, the curve is extrapolated using the tangent at the curve extremity).
A line through the intersection point parallel to the radial axis delimits the
area to machine.
The following Orientations are proposed: Internal, External and Frontal (for Face and Parallel Contour Rough Turning only).
The selected Orientation defines the type of geometric relimitation to be done between the stock and part geometry in order to determine the area to machine. Selected part and stock profiles do not need to be joined (see the following figures).
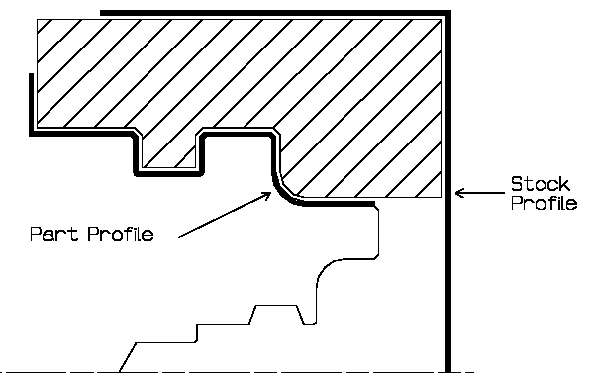
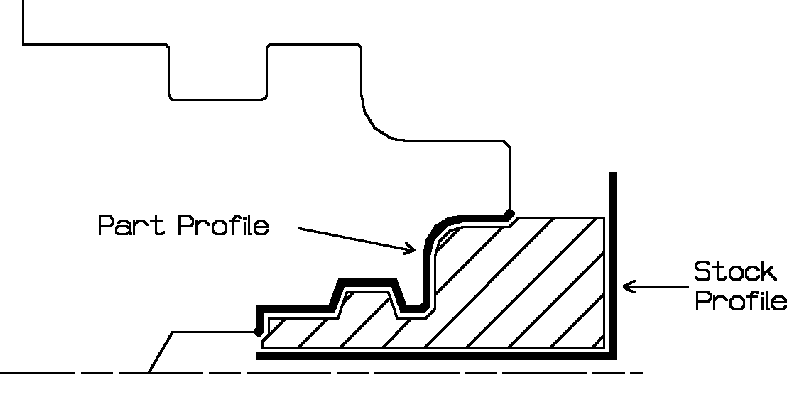
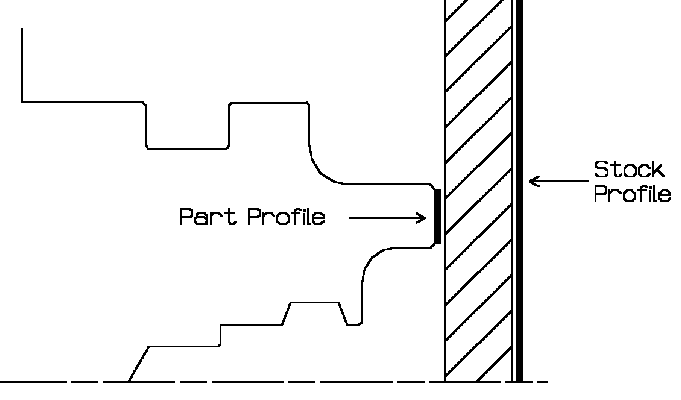
Frontal machining is proposed for face Rough Turning. In that case, the minimum and maximum diameters of the area to machine are determined by the stock profile dimensions.
For example, in the following figure the area to machine is relimited by the spindle axis because the stock profile is also relimited by the spindle axis.
Offsets can be positive or negative with any absolute value. The global offset applied to the part profile is the resulting value of the normal, axial and radial offsets.
The following machining Locations are proposed:
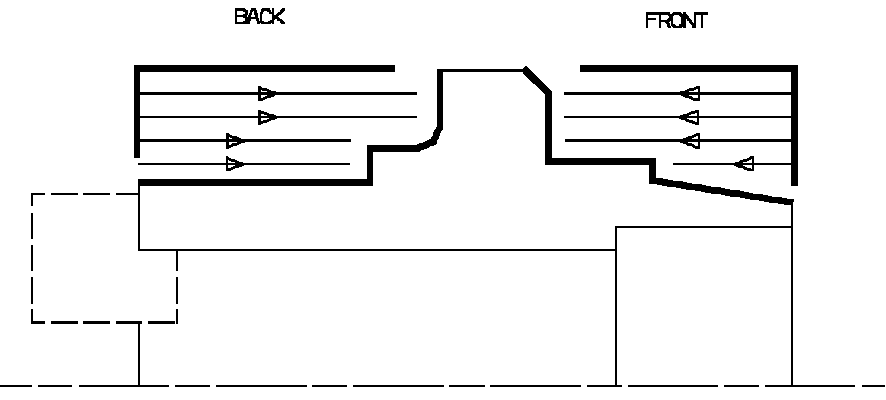
Orientation and Location settings determine the way the program closes the area to machine using radial, axial, axial-radial or radial-axial relimitation.
The following options allow you to restrict the area to machine that is pre-defined by the stock and part. You may want to restrict this area due to the physical characteristics of the tool and the type of machining to be done.
Maximum Machining Radius (for internal machining)
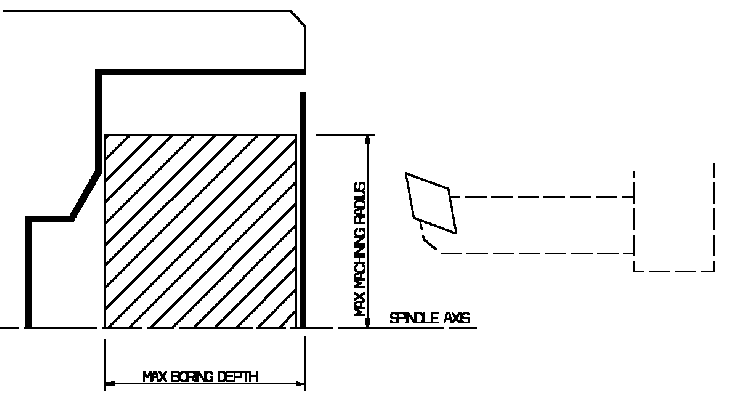
Note that Max Boring Depth is defined on the tool.
Axial Limit for Chuck Jaws (for external or frontal machining): Offset defined from the machining axis system.
The following options are proposed for recess machining:
- Plunge Distance and Plunge Angle (for longitudinal and face Rough Turning)
Define the plunge vector before each new pass with respect to the cutting direction.
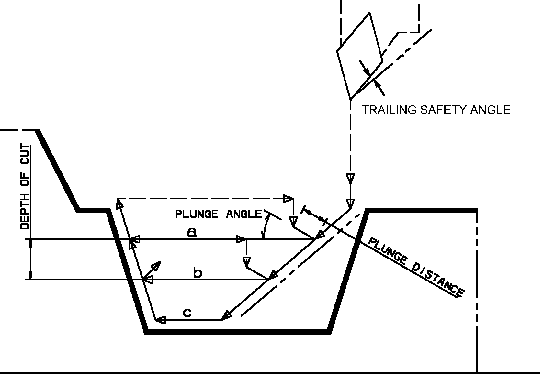
In the figure above the tool motion is as follows:
Note that Trailing angle is defined on the tool.
Machining in Parallel Contour Rough Turning is done by means of successive
offsets of the toolpath: the offset depends on the axial and radial depth of
cut values.
The following recommendations describe how to set the axial and radial depth
of cuts to ensure a collision free toolpath.
Parallel contour principle:
The parallel contours of the toolpath are obtained by first shifting the last
pass then shifting each successive pass depending on the axial and radial depth
of cut values.
Then the passes are relimited taking into account the stock definition.
Correct combination of axial and radial depth of cuts
Compared with the left and right angles on the insert, the axial and radial
depth of cut values define a shift direction that must be compatible with the
insert.
The shift direction must be inside the limit angles defined on the tool insert otherwise a collision may occur. In collision cases, the collision is on the first pass, not on the last passes of the toolpath.
Example of a correct combination
Example of an incorrect combination (right of tool)
The parallel contour toolpath is in collision because the shift does not respect the tool insert angle on the right side.
These options allow penetration into the workpiece at a reduced feedrate in order to prevent tool damage. Once the attack distance has been run through, the tool moves at machining feedrate.
Lead-in distance takes the stock profile and stock clearance into account. The tool is in RAPID mode before this distance.
If no lead-in angle is requested, the lead-in path is normal to the cutting direction.
For Longitudinal and Face Rough Turning the lead-in angle can be applied as follows:
- no angle applied to lead-in path
- lead-in angle applied to each path
- lead-in angle applied to last path only.
For Parallel Contour Rough Turning, the Lead-in angle is applied to each path.
For Longitudinal or Face Rough Turning, lift-off occurs:
For Parallel Contour Rough Turning, lift-off occurs when the end of the pass has already been machined by a previous pass.
then you can give a Machining Speed value.
The following feedrates can be set to either Angular units (length per revolution) or Linear units (length per minute):
Feedrates in units per minute are also available
for air cutting such as macro motions and path transitions.
Note that RAPID feedrate can be replaced by Air Cutting feedrate in tool trajectories
(except in macros) by selecting the checkbox in the Feed and Speeds tab page
![]() .
.
Dwell setting indicates whether the tool dwell at the end of each path is to be set in seconds or a number of spindle revolutions.
Please note that decimal values can be used for the number of revolutions. For example, when machining big parts that have a large volume, it can be useful to specify a dwell using a value of less than one revolution (0.25, for example).
You can select a tool compensation number corresponding to the desired tool output point. Note that the usable compensation numbers are defined on the tool assembly linked to the machining operation. If you do not select a tool compensation number, the output point corresponding to type P9 will be used by default.
These capabilities are available only on a Turning operation belonging to a program assigned to a turret set as a 'Mill Turret'. A suitable machine must be referenced by the Part Operation: for example, a 'Mill Turret' can be specified on a multi-slide lathe machine. Refer to Multi-Slide Lathe Machining User's Guide for more information about this type of machine.
A Tool Axis symbol on the Turning operation's Strategy tab page
![]() allows the B-axis orientation to be set and eliminates
the need for a tool change activity.
allows the B-axis orientation to be set and eliminates
the need for a tool change activity.
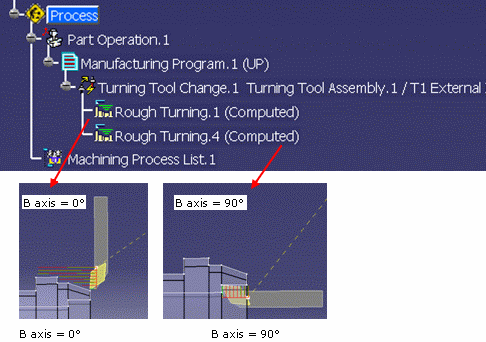
Tool axis definition for turning operation
Tool axis is defined on turning operations linked to a mill turret (managing
a B-axis). Information that B-axis is managed on turret will be defined on the
machine
Turret type will be defined as ‘mill turret’ on the NC machine.
No tool axis need to be defined on operations defined on a rotary turret.
Tool axis will be defined according to the Spindle axis system.
Note for multi spindle machine:
A Spindle axis system is defined on each Spindle.
Tool axis is defined on the main spindle axis.
Today, for all machining operations affected to the counter spindle, the tool
path computation is always done according to the main spindle axis system.
If capability to compute coordinates in the counter spindle is provided, the
tool axis of operation affected to the counter spindle will be defined in the
counter spindle axis system.
Tool axis is defined by geometry selection or manually (component values
or angle value)
Angle orientation is defined from the Radial axis to the Axial axis of the Spindle
axis system.
Tool Path Replay
For operation defined on a mill turret (on which B axis is defined), the
tool is displayed according to the orientation defined by the tool axis.
The tool axis specified by the user will be displayed on the tool path replay
panel and is generated in the APT output.
For operation defined on another turret (not a mill turret), the tool axis is
vector normal to the turning plane.
Output File Generation
New BAXIS NC command is output at the beginning of operation defined on a mill turret.
$$ OPERATION NAME : Rough Turning.1

			$$ Start generation of : Rough Turning.1

			$$

			FEDRAT/ 0.3000,IPR

			SPINDL/ 70.0000,RPM,CCLW

			BAXIS/1.000000, 0.000000, 0.000000

			GOTO / 58.63072, 0.00000, 136.34210

			GOTO / 58.63072, 0.00000, 134.34210

			FEDRAT/ 0.4000,IPR

			GOTO / 58.63072, 0.00000, 81.85882

			FEDRAT/ 0.8000,IPR

			GOTO / 58.84286, 0.00000, 82.07095
This syntax contains valuation of I,J,K coordinates of the operation tool axis (defining the B-axis orientation). Coordinates are defined in the machining axis (spindle axis).
Example: BAXIS/1,0,0
Turret axis orientation components (I,J,K) are generated in the output file (according to the 'Tool motion statement' option defined in NC Output option panel).
Note: TLAXIS syntax (that is output for a machine axis change) is not modified: coordinates of TLAXIS statement are the components of the vector normal to the turning plane.
For the following statement the output depends on the the 'Tool motion statement' option
Operation defined on a mill turret
Tool motion statement = (X,Y,Z):
X, Y, Z
BAXIS/I,J,K
TLAXIS/Inormal, Jnormal, Knormal (components of the normal to the turning plane)
Tool motion statement = (X,Y,Z,I,J,K):
X, Y, Z, I, J, K
Operation defined on another turret
Tool motion statement = (X,Y,Z):
X, Y, Z
TLAXIS/Inormal, Jnormal, Knormal (components of the normal to the turning plane)
Tool motion statement = (X,Y,Z,I,J,K):
X,Y, Z,Inormal, Jnormal, Knormal
Inormal, Jnormal, Knormal are the components of the axis vector normal to
the turning plane
I, J, K are the components of the tool axis orientation vector that define the
B axis position.
Note: TLAXIS will not be output in the APT file for a Turning operation, unless an explicit Machine Axis Change is added by the user. An exception to this is when there is a change from Milling Operation to a Turning Operation. In this case, TLAXIS/ Inormal, Jnormal, Knormal will be output before the Turning Operation.
Machine Simulation
B axis move is simulated according to the tool axis defined on the turning operation.
APT source Import
Import of APT source file on which I,J,K coordinates are defined: tool axis is defined with the I,J, K coordinates.
Note: At Replay and Simulation, if tool axis is not correct (not in the turning plane) Radial axis is used for tool assembly orientation.
BAXIS syntax can be correctly interpreted by APT import functionality only
when the syntax is defined with a known order of parameters (the required parameters
of the syntax must respect the default syntax).
Tool path can be correctly replayed only when:
Major word and parameters must be set as follows:
BAXIS,/%MFG_MILL_TURRET_I_AXIS, %MFG_MILL_TURRET_J_AXIS, MFG_MILL_TURRET_K_AXIS
Change of Turrets
User changes the turret assigned to a Machining Program from one turret type to another type. ie. from Rotary to Mill Turret or vice versa. The Machining Operation will be marked as ‘not up to date’ in this scenario.
Cut/Copy/Paste
If you Cut, Copy and Paste a machining operation related to one Turret type to another Turret type (for example, from Rotary Turret to Mill Turret or inversely), the operation will have status Not up to date.
The C-axis
inversion check box on the Turning operation's Strategy tab page
![]() provides a C-axis rotation (0/180 degrees) without requiring a tool change activity.
provides a C-axis rotation (0/180 degrees) without requiring a tool change activity.
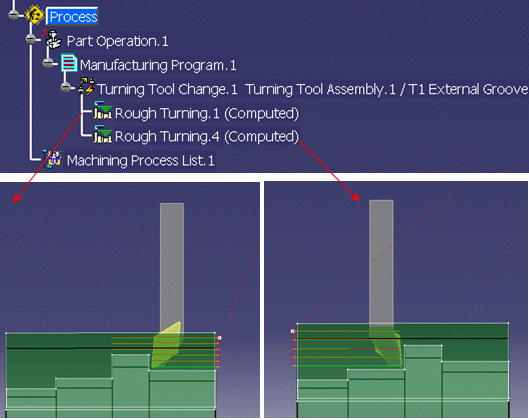
This allows machining of different areas (front and back areas of a part, or part on main spindle and part on a counter-spindle) using the same tool assembly. Only the tool orientation (inversion) differs when machining the different areas or parts.
The following Approach
and Retract macro modes are proposed: Direct, Axial-radial,
Radial-axial, and Build by user.
The selected macro type (Approach or Retract) defines
the tool motion before or after machining.
Various feedrates are available for the approach and retract motions (RAPID, lead-in, lift-off, and so on). Local feedrates can be set to either Angular units (length per revolution) or Linear units (length per minute).
Linking macros, which comprise retract and approach motion can also be used on Rough Turning operations. Approach and retract motions of linking macros are interruptible. It can be useful to interrupt an operation when the foreseeable lifetime of the insert is not long enough to complete the machining.
See Define Macros on a Turning Operation for more information.