This task will show you how to work in Analysis Assembly context to build an assembly of:
Only available with the Generative Assembly Structural Analysis (GAS) product.
Open the
Assembly.CATProduct from the samples directory.
The product structure is the following:
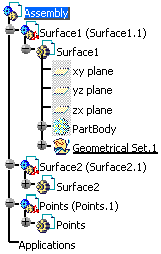
- Do not associate the same sub-analysis to several instances
of a part.
In case of a sub-analysis is associated to several part instances, the sub-analysis will be ignored when creating the assembled analysis. - You cannot point a published object referenced in a
geometry under a sub-analysis.
You have to create a publication inside the assembled analysis and point directly at the assembled analysis.
Assembly of Analysis on Part
Two methodologies are available to attach a sub-analysis to a product structure:
-
The sub-analysis is attached as an alternate shape of a part instance of the product.
To do this, you will use the Manage Representations... contextual menu. -
The sub-analysis is attached directly in the product structure as a new component of the product.
To do this, you will use the Existing Component contextual menu.
Associating a Sub-analysis as an Alternate Shape
-
Associate one or several analysis to the Surface1 part and activate one analysis representation.
-
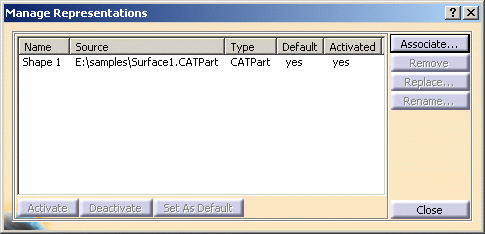
Right-click the Surface.1 part and select Representations > Manage Representations...
 .
.
Make sure you work in a product context.
To work in a product context, double-click the root product in the specification tree (in this particular example, double-click Assembly.The Manage Representations dialog box appears.
-
Click the Associate... button in the Manage Representations dialog box.
The Associate Representation dialog box appears.
-
Select the AnalysisSurface11.CATAnalysis document in the sample directory and click the Open button.
-
Click the Associate... button in the Manage Representations dialog box, select the AnalysisSurface11.CATAnalysis document in the sample directory and click the Open button.
The Manage Representation dialog box is updated:
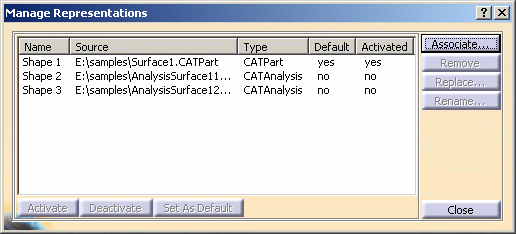
Note that:
- the two associated representations are deactivated.
- you can remove, replace or rename a selected shape.
For more details, refer to Managing Representations - Product Structure User's Guide.
-
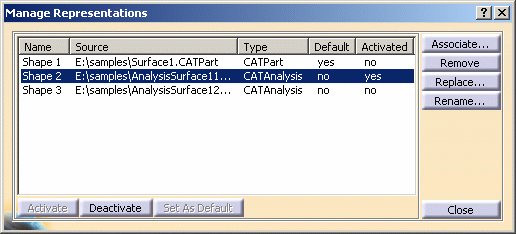
Select AnalysisSurface11.CATAnalysis in the Manage Representations dialog box and click the Activate button.
The Manage Representation dialog box is updated:
-
Click Close in the Manage Representations dialog box.
Note that an Analysis Manager appears under the Surface1 part in the specification tree:
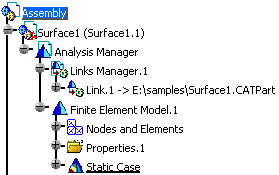
-
-
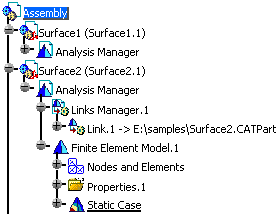
Associate the AnalysisSurface2.CATAnalysis document to the Surface2 part and activate this representation.
The specification tree is updated as shown below:
-
Enter the Generative Structural Analysis workbench.
To do this:
-
Select Start > Analysis and Simulation > Generative Structural Analysis.
-
Select Static Case and click OK in the New Analysis Case dialog box.
The specification tree is updated as shown below:
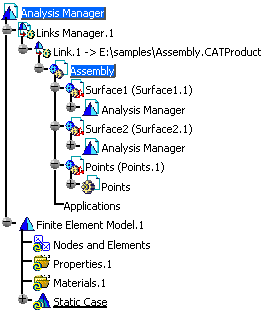

The Nodes and Elements, Properties and Material sets are empty in the specification tree.
The Mesh Visualization contextual menu is available.
-
-
Create the pre-processing specifications either in the sub-analysis or in the assembled analysis.

-
To activate an analysis, double-click the associated Analysis Manager.
-
At any time you can add/remove a shape, activate/deactivate an associated shape or add/remove a product component.
For more details, refer to Analysis Assembly 2D Viewer.
At this step, you can open the sample14.CATAnalysis document in which all the analysis specifications have been already defined and follow the scenario.
-
-
Compute the solution.
To do this:
-
Click the Compute icon.
-
Select the All option.
-
Click OK in the Computation dialog box.
-
-
Define the post-processing specifications.
Any analysis shape which is not active at creation will be ignored in the assembly.
In case of several analysis shapes are associated to the
same product instance, only the active shape will be taken into account in
the assembled analysis.
To check the content of the assembled analysis, you can use the Shape
Management command.
Associating a Sub-analysis as a Component of a Product
You have to use the Existing Component contextual menu.
-
Open the Assembly.CATProduct product.
The product structure is the following:

-
Right-click the root product. In this example, right-click Assembly.
-
Select Components > Existing Component....
The File Selection dialog box appears.
-
Select a .CATAnalysis document.
In this particular example, select the AnalysisSurface11.CATAnalysis document in the File selection dialog box.
-
Click OK in the File Selection dialog box.
A new part instance is created in the product structure:
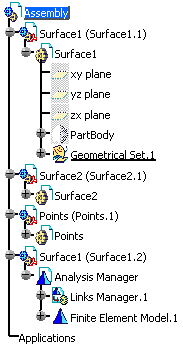
-
Enter the Generative Structural Analysis workbench.
To do this:
-
Select Start > Analysis and Simulation > Generative Structural Analysis.
-
Select Static Case and click OK in the New Analysis Case dialog box.
-
-
Define the analysis pre-processing specifications, compute the analysis and define the post-processing specifications.
Assembly of Orphan Analysis (Imported Mesh)
You can find here the methodology for orphan analysis creation.
-
Create an new analysis document.
-
Use the Import Mesh command of the Advanced Meshing Tools workbench to import an .dat file.
For more details, refer to the Advanced Meshing Tools User's Guide. -
Complete the property set in the Generative Structural Analysis workbench.
-
Insert the orphan analysis in the product structure using the Existing Component command.