![]()
ATOMIZER.cgr
BODY_1_2.cgr
BODY_2_2.cgr
LOCK.cgr
NOZZLE_1_2.cgr
NOZZLE_2_2.cgr
REGULATION_COMMAND.cgr
REGULATOR.cgr
TRIGGER.cgr
VALVE.cgr
![]()
-
Adjust the view parameters (zoom, rotation, etc.) of the document to define the desired camera location.
-
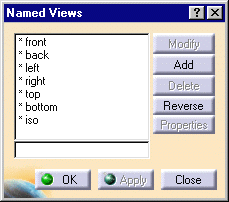
Select the View -> Named View command from the menu bar.
The Named Views dialog box displayed.
-
Click the Add button.
A camera appears in the view list.
-
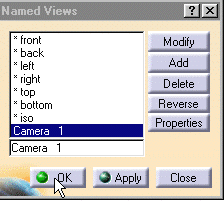
Click OK to create the camera.
A camera is created at the current viewpoint. -
Double-click Camera 1 in the specification tree.
")
-
Zoom out and rotate the model to see the 3D representation.
")
-
Click anywhere in the geometry area to de-select the camera and see the camera symbol.
")
![]()
-
Select Window -> Camera Window from the menu bar.
All cameras created are listed. -
Select the cameras of interest from the list.
A new window showing the camera viewpoint is opened for each camera selected. -
To organize the opened windows horizontally, select Window -> Tile Horizontally from the menu bar.
")
-
To organize the opened windows vertically, select Window -> Tile Vertically from the menu bar.
")
-
To organize the opened windows so that they overlap one another, select Window -> Cascade from the menu bar.
")
![]()