 |
This procedure describes how to
add or
alter a viewpoint activity
to a simulation. A viewpoint activity shows rotations in the
presentation of the geometry so that the user can see the simulation
from a different viewpoint. The viewpoint activity may give the
illusion that the parts or resources in the geometry are being moved,
but in actuality, only the user's perspective on the geometry is being
altered. To move parts or resources, the user must use one of the
move activities associated with a particular product. |
|
The example below demonstrates the role of
the viewpoint activity. The first image shows the initial
viewpoint, which the user selected to best show a particular move
command: |
|
 |
|
The user then alters the viewpoint to best
showcase a subsequent move activity. |
|
 |
|
In order for this subsequent viewpoint to
appear in the simulation, the user inserts a viewpoint activity in the
simulation. |
 |
This procedure assumes that the PPR tree
contains the products and resources needed for the simulation. |
 |
|
| |
-
Manipulate the compass in the top right corner to
select the viewpoint you wish to appear in the simulation.
 |
You can simultaneously depress the left and middle mouse
buttons to directly manipulate the compass or you can use the
Rotate command or other commands from the View
toolbar to manipulate the compass. For more information on
how to manipulate the compass, see the DELMIA Infrastructure
User's Guide. |
| |

 |
-
On the PPR tree, select the process or activity under
which you wish to create the simulation.
|
|
If you have not previously created a process, there is only
the initial process under Process List. In the
case of the example above, a move activity is the activity
selected; the initial viewpoint activity enables users to see the
move from a viewpoint other than the default viewpoint. |
| |
 |
-
Click
Viewpoint Activity
 from the Simulation Activity Creation toolbar.
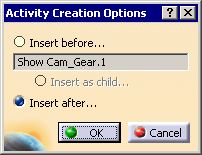
| The Activity Creation Options dialog box appears
asking where to place the activity. |
 |
-
Select the location for the activity, and click
OK.
| A viewpoint activity appears in the PPR tree under
(that is, after) the selected process or activity. |
|
|
In some cases, you may choose not to see the effects of
viewpoint activities on the geometry as you are creating a
process, or running the simulation commands (e.g., Process
Simulation). To control whether or not you see the
effects of this activity, see Tools > Options > DELMIA
Infrastructure > Simulation. |
| |
You can reverse the order of steps 2 and 3, if desired.
However, you must have altered the viewpoint in the geometry
before selecting Viewpoint Activity. |
|
|
|
| |
-
Alter the viewpoint so that it reflects what you want
using any of the compass manipulation methods described
above.
-
Use one of the following methods to alter the
definition of viewpoint activity:
- on the PPR tree, double-click the viewpoint activity on the
PPR tree
- on the PPR tree, right-click the viewpoint activity, and
selecting Edit > Change Viewpoint object > Definition
(an example of a context menu appears below)
- select the activity with the left mouse button and then
select Edit > Change Viewpoint object > Definition
from the menu bar.
|
 |
|