Attaching Elements

A Manufacturing Assembly represents a collection of parts that are the result of one or more manufacturing processes, often as an intermediate sub-assembly to be consumed by downstream processes in the product flow. Manufacturing assemblies can be created from existing parts, or can be initially empty (i.e., containing no parts).

The Attach command allows selection of Products, and the Manufacturing Assemblies. You will be able to select a Manufacturing Assembly for attachment in addition to a product or resource. 


Workflow
Clicking on the Attach command and then select a parent and a child for attachment. If any of the parent or child is a Manufacturing Assembly (MA), the attachment will take place depending on the following scenarios.

  • MA to MA attachment
  • MA to Product attachment
  • Product to MA attachment:
  • Product to Product attachment:
     
An attachment is created between the parent MA or product and the child MA or product.
  • When the parent is moved the child moves maintaining the relative position. In case the child is an MA, the MA moves, with all products maintaining their relative positions among themselves and with the parent.
  • When the child is moved, the parent is not moved.
  • When any product of an MA is moved there is no change in the position of any other product
Note: This maintains the existing behavior in case of product to product attachment.
 

If the Parent and Child of any attachment have a common product between them, an error message is thrown for the user saying "Cannot create connection on the parent object itself. Please select a different object as child".

This procedure explains how to attach elements.

When you create an attachment, the element getting the attachment behaves like a master or parent and the element that gets attached behaves like a slave or child.  When the parent moves, the child moves along with it.  When the child moves, the parent does not move.

ascenari.gif (1223 bytes)
  1. Click Attach .

  2. Select the parent element.

  3. Select the child element.

    The system asks for confirmation:
  4. Click OK.

    The parent and child objects are attached. The geometry shows the relationship:
You can verify that these elements are attached by moving the parent element using the compass.  The attached (child) element should follow the master element.
Attach considers devices as a whole.  If a device part is selected, the entire device is considered as selected.
  Attach creates an attachment object.  You can right-click on this object in the geometry and select Delete to remove the attachment.
Here is a example using the Tools / Options / Resource Detailing/ Resource Layout tab "Attachment display options. 


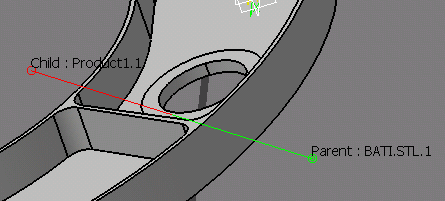
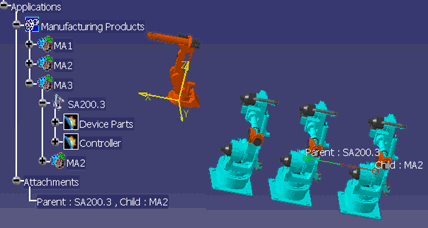
After you select the Attach command, and selects an MA as a parent or a child, the selected Assembly along with its child components, is highlighted as shown.


When an attachment involving any MA is created, the Parent Child connection is visualized both as a connection between the Products, and as an attachment node in PPR Tree, displaying the name of the parent and child Product/MA (as shown below).