- to define the core-cavity separation,
- to position the molded part in the mold.
More information about the parameters is available in the Pulling Direction Parameters chapter.
-
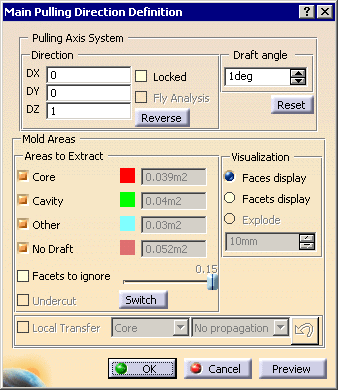
Click Pulling Direction
 in the
Pulling Direction toolbar. The dialog box is displayed.
in the
Pulling Direction toolbar. The dialog box is displayed.
The compass is snapped automatically onto the current axis system.
-
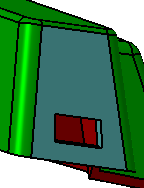
Pick the part in the viewer.
The visible part of the part becomes green (Cavity, oriented in the pulling direction, up to 1 degree).
If you turn it over you will see that the underside is red (Core, oriented away from the pulling direction).
Areas that cannot be associated to either Core or Cavity areas are shown in either pink (for virtually vertical surfaces, as here) or blue (Other, i.e. undecided cases). You can see that two faces of the hole are in pink.
After having defined the main pulling direction, you will transfer the two other faces of the hole and the surrounding front face to Other.

-
Select the Locked check box to lock the pulling direction.
-
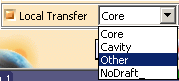
Select the Local Transfer check box and select Other in the list.
-
Select the faces as shown in blue.
-
Explode has become available to visually spread apart Core and Cavity areas.
Enter 70 mm in the field below to define the spread.
In the exploded view, you can see the Core side in green, the Cavity side in red and the Other side in blue.
Note that the Other area has not moved: Explode takes only the Core side and the Cavity side into account.
-
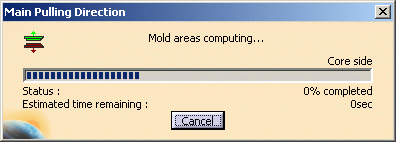
Click OK. A progress bar indicates the advancement of the computation.
Click Cancel to stop the computation, if necessary.
An axis system is created in the specification tree, under the Axis Systems body.
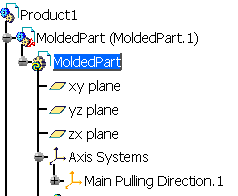
Main Pulling Direction contextual menu
The Main Pulling Direction contextual menu concerns the main pulling
direction that is created
in the specification tree under Axis Systems as explained above.
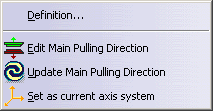
Edit Main Pulling Direction calls up the main pulling direction so that you can edit the parameters.
Update Main Pulling Direction allows you to update the parameters (for instance the scaling ratio) after modification.
When there are several axis systems, you can make one of them the current one using Set as current axis system.
Display Options
In the case of large models, some faces may not be seen and, as a result,
can cause holes to appear in the core or cavity side.
This occurs when the relative size of a face is small with respect to the
overall model.
You can avoid this problem by changing the Pixel Culling value to 0
in Tools > Options > General > Display so that all the
faces in the model are used in the pulling direction computation.
![]()
![]()