| |
Before you start
In order to take full advantage of this scenario, you need to be
familiar with the basic vocabulary:
- "Viewer" is the screen area in which 3D objects are drawn
- "View" is a part of the viewer. Usually, the viewer has one single
view but it can also be divided into 4 parts representing a different
view each. When a viewer is split into several views, it is identified as
a "multi-view" viewer
- "Viewpoint" is the set of parameters required for defining a 3D view
volume, i.e. the eye of the user, the view direction, the focus point and
the axis system defining the position of the user. It can be defined as
the position in model coordinates at which the eye is looking.
Bear in mind that the configuration remains active throughout the whole
Version 5 session but it is not saved when selecting File > Save As.
For instance, if you apply a specific configuration then save and close
your document before reopening it, this document is displayed using the
last active view before the save.
However, the view direction and orientation you define in this tab are
stored in the CATSettings directory and therefore, you can reuse your
customization from one session to another by clicking Create
Multi-View
 in the View toolbar. If no customization has been defined for a
standard view, the default standard view is applied.
 |

|
-
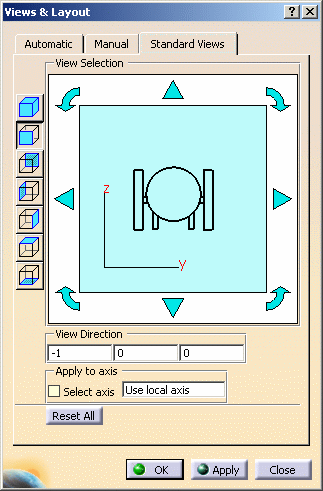
Select View > Navigation Mode > Multi-View Customization
to open the Views and Layout dialog box then select the
Standard Views tab:
 |
|
Note that you can also access the Standard Views
tab by selecting View > Named Views then choosing a view
from the list before clicking Properties. |
This dialog box is made up of six areas:
- standard views icons let you select the standard view to be
customized
- View Selection lets you modify the direction and orientation
of the selected standard view
- View Direction lets you manipulate the viewpoint
- Apply to axis lets you specify the axis to which the
modification will be applied
- Reset All lets you restore all the standard views to their
original default direction and orientation
- Confirmation: lets you validate or cancel the configuration.
|
-
Select a standard view to customize by clicking one of
the icons displayed to the left. By default, Front View is
selected. In our example, we click Back View
 . .
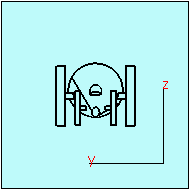
When a standard view is selected, the preview displayed in the View
Selection area is updated:
 |
| The standard views displayed in this dialog box are
identical to those available in the
Quick View
toolbar: |
 |
Isometric View |
 |
Front View |
 |
Back View |
 |
Left View |
 |
Right View |
 |
Top View |
 |
Bottom View |
|
-
Click Apply then
OK to apply Back View to the current viewer:
-
Re-select View > Navigation Mode > Multi-View
Customization to re-open the Views and Layout dialog
box: Back View is still selected and we can now start
customizing the view.
-
Use the four translation arrows (such as
 ) to shift the selected standard
view by 90 degrees in the arrow's direction. ) to shift the selected standard
view by 90 degrees in the arrow's direction.
-
Use the four rotation arrows (such as
 ) to change the orientation of
the current view: one click on an arrow rotates the view by 90 degrees in
the arrow's direction. ) to change the orientation of
the current view: one click on an arrow rotates the view by 90 degrees in
the arrow's direction.
Below is an example using repeatedly the
 arrow with starting
position displayed to the left: arrow with starting
position displayed to the left: |
 |
| Note that if the current standard view is an
isometric view, the view is rotated by 60 degrees: |
 |
-
Use the three boxes displayed in the View Direction area
to change the direction of the current view.
| This area indicates the direction of the selected
standard view along the X, Y and Z axis (as shown below): |
 |
To change the direction, you can enter one of
these three values in the desired field: -1, 0 or 1 before clicking
Apply.
Note that if the selected view is not an isometric view, you can
enter a value only in one of the tree fields: as soon as a value is
entered in a field, the other two are automatically filled with the
value "0". On the contrary, if the selected view is an isometric
view, you can enter a value in the three fields.If you enter a
positive value other than "1", it is changed to "1" and if you
enter a negative value other than "-1", it is changed to "-1".
For instance, entering "-1" instead of "1" in the first box to the
left inverts the view direction along the X axis: |
|
|
-
Use the Apply to axis area to position the selected
standard view according to the local axis or to the axis you select:
-
when Use local axis is displayed, it
means that the standard view is positioned according to the
active (i.e. current) local axis.
If no local axis is active, the standard view is positioned
according to the global axis system (displayed in the bottom
right corner of the screen) of the UI-active object. For
instance, if a part is activated, the standard view uses the
part's axis as reference.
To set an axis as current, right-click it in the specification
tree or in the geometry area then select xxx object > Set As
Current.
-
select the Select axis check box lets
you position the standard view according to a specific axis: to
select the axis to be used, first select the text No
Selection then click the axis to be used in the geometry
area. The name of the selected axis is displayed in the box:
|

|
The directions of the
selected axis are saved in the CATSettings directory and are
applied to the standard view.
As these directions are stored in the settings, this means that the
standard view is always positioned according to them and this,
whatever the orientation changes you might make afterwards (for
instance, if you change the compass orientation). If you want to
apply new directions to the standard view, you need to select
another axis.Note that the Select axis option remains
activated even if you select another standard view. Therefore, do
not forget to deactivate the option if you want to use the local
axis. |
In case your current axis
sytem is left-handed, the standard views are positioned according
to the global axis system.
For detailed information about defining a three-axis system
locally, refer to
Axis System. |
 |
If you want to restore all the standard views to
their original direction and orientation, click Reset All. |
-
When satisfied with your configuration, click OK
(or Apply then OK) to validate and close the
Views and Layout dialog box.
-
In the View toolbar, click the icon of the
standard view you have just customized (Back View in our
example).
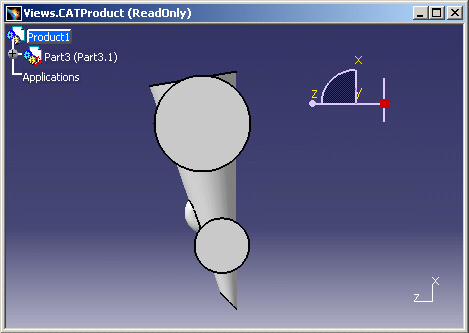
| The modified standard view is applied to the
current viewer and you see that the result is totally different
from the one in step 3 where the original
standard Back View has been applied: |
 |
|