Installing the Clash Server Inside the Installation Procedure
If you already unloaded ENOVIA DMU Navigator and ENOVIAV5VPM code onto the same machine, and then set up the clash server, make sure that the ENOVIAV5VPMEnvironmentName environment is correctly referenced in the following file:
$installpath/startup/orbix/config/Repositories/ImpRep/CATIAServerManager.imp
and in the file:
$installpath/os_a/EnvName.txt
before setting up the clash server.
Clash Server Administrator
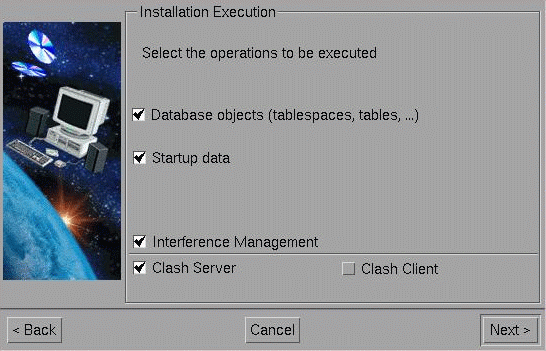
the Clash Server Administrator dialog box will be displayed later:
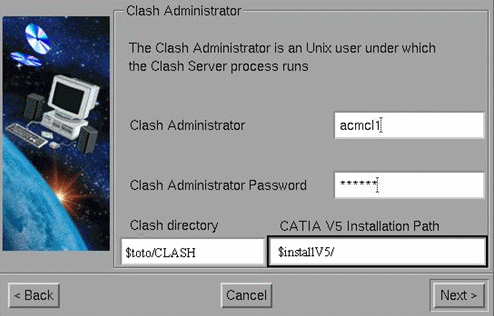
All files generated for interference analysis will be stored under the designated Clash Directory path. The analysis is computed using the CATIA V5 ITFCHECK batch. These files are the .ft5 .in .out and .result. The clash server log file is also stored in this directory.
The Clash Administrator:
-
must already exist as a UNIX User
-
must exist as an ENOVIA User
-
may be the same User as the ENOVIA Administrator.
The ITFCHECK process requires a P2 license to work properly on the clash server machine. Make sure that the CATSettings exist and are set correctly. If not, use the CATOptionsMgt tool to choose the license.
- Key in the user name of the Clash Administrator in the Clash Administrator field.
- Key in the password for the Clash Administrator in the Clash Administrator Password field.
- Key in the Clash Directory path in the Clash directory field.
- Key in the Directory Path in the CATIA V5 Installation Path field.
- Click the Next> button to move to the next step.
Clash Server Host Name (Clash Client Installation)
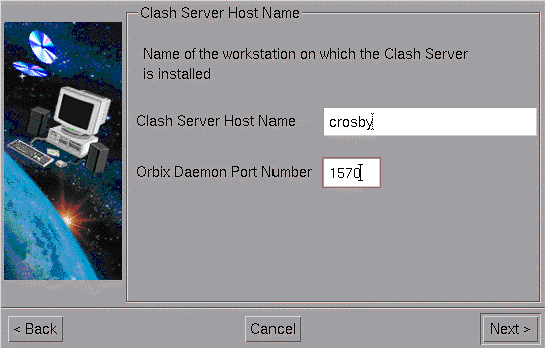
This dialog box allows you to specify the server host name of the machine on which the Clash server has already been / or will be installed. The orbix daemon port on which the Clash Server is registered is also required.
- Key in the Server Host Name of the machine on which the Clash has been installed in the Clash Server Host Name field.
- Key in the Port Number in the Orbix Daemon Port Number field.
- Click the Next> button to move to the next step.
Installing the Clash Server Manually
Phase 0: Installation Prerequisites
The daemon orbix must be running.
Phase 1: Register the Clash server to the orbix daemon
$Unload_Dir/$OS/code/command/catstart -run
     RegisterEnovClashStarter
A new file ENOVIAClashServer.imp is created under the following directory:
$Unload_Dir/$OS/startup/orbix/config/Repository/ImpRep
Phase 2: Modify the shell RunEnovClashStarter
$Unload_Dir/$OS/code/command/
This shell is launched by orbix daemon every time the clash server has to be started.
Two variables has to be set in this shell: VPMADM_UID & VPMADM_GID
The UNIX uid and gid numbers of the ENOVIA Administrator has to used to value them.
Phase 3: Customize the RunEnovClashServer shell
$Unload_Dir/$OS/code/command/
The $HOME of the CLASH Administrator has to be exported in this shell (e.g. export HOME HOME=/u/users/clashadm).
The CLASH_OUTDIR variable can be customized. This variable define the working directory of the clash server. All the output data are generated in this directory. The default directory is /tmp.
Phase 4: Customize the ENOVIAClash.CATSettings
$Unload_Dir/$OS/code/command/catstart -run "VPMSettings -f
       ENOVIAClash -a -n parameter_name -v parameter_value"
To check the modification, run the following command:
$Unload_Dir/$OS/code/command/catstart -run "VPMSettings -f
       ENOVIAClash -l"
After customization, check the setting file is located in a directory referenced by the $CATUserSettingPath variable.
The next clash application parameters can be customized using this setting file.
ENOVIABatchClashAutomatic
When this parameter is set to "NO" the data used for the Clash Analysis are stored into input files (.ft5 and .in) but the analysis is not computed. The default value is "YES".
ENOVIAClashClearance
This parameter is used to define the value used as clearance for the Clash Analysis. It is modifiable in the advanced clash analysis command.
ENOVIAVolumeFilterClearance
Before the Clash Analysis is computed, a volume filter is applied to restrict the area of analysis. This parameter is used to define the clearance value used for this filter. This phase is only processed during an advanced clash analysis.
ENOVIAClashServerName
This parameter defines the name of the Clash Server. The name has to be the same as the one defined by the SERVER_NAME variable in the RegisterClashStarter shell. By default, it is ENOVIAClashServer.
ENOVIADefaultClashServer
This parameter is used to define both the host name of the clash server machine and the communication port. It has to be defined as follows:
<HOST_NAME>:<port_number>
This parameter customization is mandatory.
The port_number value can be checked in the $Unload_Dir/$OS/startup/orbix/Orbix.cfg file.
This parameter is used to define the types of document which can be selected for the clash analysis. By default, this parameter is set to "NONE". In this case only the first document associated to a part instance is selected for the analysis.
If this parameter is set with another string, only the documents which the V_typerep attribute is identical to the specified string can be selected for the analysis.
Several types can be defined, each type has to be separated by a "/" as follows:
"TYPE1/TYPE2/TYPE3".
ENOVIASendUserNotification
This parameter is used to specify if an email notification will be sent to the end user once an interference analysis is completed.
When the parameter is set to "YES" (the default value) an email will be sent, otherwise no user notification is sent.
The email address used is the one stored in the P&O (People and Organization) database.
This parameter is used to specify whether the volume filter analysis (performed to retrieve the surrounding parts during an advanced clash analysis) is to be computed with "SpaceMap" or "BoundingBox".
When the parameter is set to "YES" (the default value) "SpaceMap" mode is used. When it is set to "NO", "BoundingBox" mode is used.
This parameter is used to specify which geometrical description will be used during clash calculation.
When the parameter is set to "YES", an attempt is made firstly to perform the clash calculation only on the CGRs generated by the introspection mechanism. If this does not succeed, the clash calculation is based on the CAD documents.
When it is set to "NO" (the default value), the calculation is based on the CAD document (CATPart, .Model...).
Phase 5: Customize the Enovia_ITFCHECK shell
This shell is located under the directory: $Unload_Dir/$OS/code/command/
It is used to launch the CATIA V5 ITFCHECK utility from the Clash Server.
The two variables IT_DAEMON_PORT and CATIAV5installPath has to be set. The first one defines the orbix daemon port, and the second one the CATIA V5 installation path.
Complementary modifications
Check the UNIX file attribute of the $Unload_Dir/$OS/code/bin/ENOVIAClashStarter file is set to sticky bit. If not, use the following commands to modify the attribute of the file under the user root.
chown root:<group of root> ENOVIAClashStarter
chmod +st ENOVIAClashStarter
Automatic Name Generation for the Clash Server
Automatic name generation is an optional function. If you want to implement it, perform the following steps during the manual installation:
1. Create a global directory with Read/Write access for all users.
2. Create the global settings file ENOVIAIDGenerator.CATSettings with the following information:
- "path" (mandatory): contains the path of the global directory created above
- "projectFileName" (mandatory): name of project file for generating the ID. For example: myProject.xml. It will be stored in the "path" directory.
- "IDLength" (optional): number of digits in the sequence number in the generated name. A name (ID) is generatd using the following form:
PREFIX-XXXwhere "XXX" is a sequence number starting at "1".
If IDLength is 3, for example, the IDs generated will be as follows:
PREFIX-001, PREFIX-002 , (...), PREFIX-18988 etc.If no value is set, the default value is "3".
![]()