This page deals with the following categories of options in the View tab:
These options do not apply to the Interactive Drafting workbench.
These options define the properties of views created from 3D.
Note that you cannot define the properties of a view created from another view (i.e. projection view, auxiliary view, section view and detail view). These views have the same properties as their parent view. However, in these views, the properties of 3D points, 3D wireframes and 3D specifications can be modified.
Geometry Generation / Dress-up
This category of options lets you specify what kind of geometry and dress-up elements you want to generate when generating views.
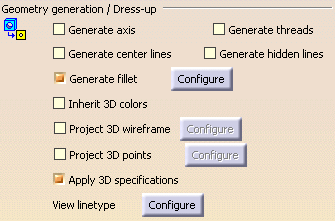
Generate axis
Select this option to generate axis lines.
By default, this option is not selected.
Generate threads
Select this option to generate threads.
By default, this option is not selected.
Generate center lines
Select this option to generate center lines.
By default, this option is not selected.
Generate hidden lines
Select this option to generate hidden lines.
By default, this option is not selected.
Generate fillets
Select this option to generate fillets.
By default, this option is selected.
Additionally, click the Configure button to configure fillet generation. You can choose to generate either of the types of fillets described below.
By default, Boundaries is selected.
Thin lines, representing the mathematical limits of the fillets.
Boundaries will not be projected if they correspond to two faces which are continuous in curvature. They will be projected only if they correspond to a smooth edge which is situated between two faces whose curvature radii vary. This mode will be used automatically to represent a connection between two faces which are not joined by a fillet, no matter what option you select.
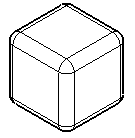
Original edges, projected in a direction that is normal to each corresponding surface.
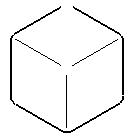
Original edges, at the intersection of the two surfaces joined by the fillet.
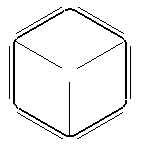
Original edges, projected on fillet surfaces in the direction of the view projection.
This projection mode is equivalent to the CATIA V4 fillet projection mode.
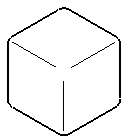
- Dimensions on such fillets are not associative.
- Such fillets cannot inherit 3D colors (see below). Likewise, when using generative view styles, such fillets cannot inherit the 3DInheritance view dress-up parameters (defined in Tools > Standard > generativeparameters > *.XML file, Drafting > ViewDressup > 3DInheritance).
Inherit 3D colors
Select this option if you want the colors of a part to be automatically generated onto the views.
In the case of white parts, the views generated with this option selected will be white, and will therefore not be displayed properly.
By default, this option is not selected.
Project 3D Wireframe
Select this option to visualize both the wireframe and the geometry on generated views.
By default, this option is not selected.
Additionally, click the Configure button to configure the 3D wireframe projection mode. You can choose whether projected 3D wireframe can be hidden (3D wireframe geometry will follow standard removal of hidden lines) or is always visible (3D wireframe geometry will not follow standard removal of hidden lines and will always be visible). Whichever option you choose, note that linear elements will not be projected as points when they are perpendicular to the projection plane, in section views and projection views, in section views and projection views.
The section cut is a particular case: after the cut operation, it considers a wireframe as a series of points. To visualize them, check the two options Project 3D wireframe and Project 3D points are selected (in Tools > Options > Mechanical Design > View tab).
By default, Can be hidden is selected.
Project 3D Points
Select this option to project points from 3D (no construction element).
By default, this option is not selected.
Additionally, click the Configure button to select the type of points visualized in the projected drawing. In the 3D Point Projection dialog box, you can choose between keeping the symbols that are used in the 3D or using a new symbol.
By default, the X symbol is selected.
Apply 3D specification
Select this option to specify whether, in an assembly, the properties assigned to given parts (also called components) will be applied in the view.
The following 3D specifications may be defined for components in the Product Structure workbench:
- The component will, or will not, be cut when projected in section views (Do not cut in section views).
- The component will, or will not, be projected in views (Do not use when projecting).
- The component will, or will not, be represented with hidden lines (Represented with hidden lines).
For more information, refer to Modifying Component Properties in the Product Structure User's Guide.
By default, this option is selected.
View linetype
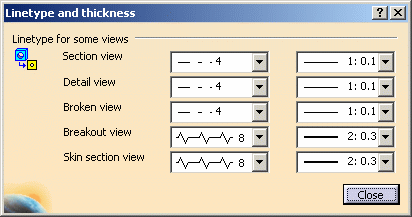
Click the Configure button to configure linetypes and thicknesses for specific types of views: section view, detail view, broken view, breakout view, skin section view (in the case of wireframes and surfaces). In the Linetype and thickness dialog box, select the line type and the thickness you want for each type of view, from the associated fields. Click Close when you are done.
By default, linetypes and thicknesses are configured as shown above.
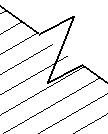
If you choose the zigzag linetype (linetype #8), note that this linetype is just a graphical dress-up of the view. This means that if one line is relimited on the breakout line, then it will be relimited on the theoretical line as shown here, and not on the visualized zigzag line.
Generated geometry
Keep graphical dress-up specifications
Select this option if you want the graphical dress-up specifications to be persistent through the update of the view.
By default, this option is selected.
View generation
View generation mode
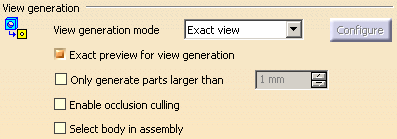
From this list, select how you want to generate views.Exact view
By default, Exact view is selected.
A short description of the various view generation modes is provided below. For a detailed description (including the advantages and restrictions pertaining to each mode), refer to View Creation > About the View Generation Modes.
Generates exact views from the Design mode, i.e. views for which the geometry is available. The exact generation mode will be the best option in most cases.
Generates views using the CGR format (CATIA Graphical Representation). CGR corresponds to a data format containing a graphical representation of the geometry only, which is available with the Visualization mode (as opposed to the exact geometry, which is available with the Design mode). With CGR, only the external appearance of the component is used and displayed; the geometry is not available. The corresponding .cgr file, if it exists, is inserted from the cache system.
Generates views in Approximate mode. Although Approximate views are not as high in precision and quality as exact views, this generation mode dramatically reduces memory consumption. Performances may also be improved, depending on how you fine-tune precision. Therefore, the Approximate mode is particularly well-adapted to sophisticated products or assemblies involving large amounts of data.
You can fine-tune the generation options according to your needs. Click the Configure button. The Approximate mode dialog box is displayed, allowing you to set the precision (that is the level of detail - LOD) with respect to the performances (that is generation time - Time).
The level of detail corresponds to the precision with which the application determines which edges are hidden and which are not. As a result, decreasing this precision may lead to smaller geometry being visible whenever it should not be, and vice-versa. The higher the precision, the lower the performances. In any case, memory consumption will not be impacted.
Proceed as follows:
Specify the level of detail in the dedicated field, or move the cursor to set the precision in the graphic area on the right.
Click Close when you are done.
Generates quickly generate overall views for large products or assemblies, regardless of drawing quality. Such views are associative to views as images. This enables you to the 3D geometry and can be updated when the part or product changes.
To optimize disk space and memory consumption, it is recommended that you do not select the Inherit 3D colors option when generating raster views.
You can configure the raster mode options according to your needs. Click the Configure button. The Raster Mode Options dialog box is displayed.
Proceed as follows:
From the Mode list, select the mode that you want to use:
Dynamic Hidden Line Removal: By default, this mode is displayed.
Shading, Shading with edges. These modes are equivalent to the 3D rendering styles. For more information, refer to Using Rendering Styles in the Infrastructure User's Guide.
Shading, no light source, Shading with edges, no light source: these modes display the exact RGB coding colors of a 3D element, face or edge.
If you want the colors of a part to be used when generating Raster views using the Shading or Shading with edges mode, remember to select the Inherit 3D Colors option. Otherwise, the view will be generated using shades of grey. Now, set the level of detail (i.e. the definition, in dpi) that will respectively be used to visualize and to print the drawing. You can choose between three pre-defined modes (Low quality, Normal quality and High quality) and a custom mode (Customize). If you choose to customize the definition yourself, set the dpi for visualization and for print in the appropriate fields.
The level of detail applies to the scale of the view. In some cases (when the view would print with a considerable height or width), there may be too many pixels to generate the view. In this case, the view will be displayed as a red cross-mark. If this happens, try to reduce the scale of the view and/or the level of detail. Click Close when you are done.
![]()
|
|
By default, this option is not selected.
Exact preview for view generation
Make sure this check box is selected if you want an exact preview when generating views. Note that exact previews show exactly what will be projected.
In this case, the part or product will be loaded in Design mode when previewing the view to generate, even if you are working in Visualization mode.Clear this check box to get a quick preview of the 3D document when generating views. Note that quick previews do not necessarily show what will be projected, but show exactly what is visualized in 3D.
In this case, a part or product open in Visualization mode will not be loaded in Design mode for the preview, which optimizes memory consumption.
By default, this option is selected.
Only generate parts larger than
To specify that you only want to generate parts which are larger than a certain size, select this option and indicate the appropriate size by providing a value in millimeters in the appropriate field.
By default, this option is not selected.
Enable occlusion culling
Select this option if you want to save memory when generating exact views from an assembly which is loaded in Visualization mode (i.e. when the Work with the cache system option is active). This will load only the parts which will be seen in the resulting view (instead of loading all of them, which is the case by default), which optimizes memory consumption and CPU usage.
To ensure the efficiency of this option, make sure that the Exact preview for view generation option is not selected.
In the case of an assembly which is loaded in Design mode, or in the case of a part, the Enable occlusion culling option will help increase performance by reducing CPU usage.
Keep the following restrictions in mind when selecting the Enable occlusion culling option:
- The Project 3D points option will be disabled.
- The only option available for Project 3D wireframe is Can be hidden.
- If you choose to project 3D wireframe, you will need to make sure that your wireframe elements have been taken into account when the CGR data was created: this is the case if you activated the Save lineic elements in cgr option from Tools > Options > Infrastructure > Product Structure > Cgr Management before the creation of CGR data (i.e. before you launched the part or product in Visualization mode). If not, you need to activate the Save lineic elements in cgr option and then re-create the CGR data. To do this:
- Close all open parts and products and exit the application.
- Delete your CGR data from the cache. (The cache location is specified in Tools > Options > Infrastructure > Product Structure > Cache Management tab, Path to the local cache field.)
- Re-open the product in Visualization mode.
By default, this option is not selected.
Select body in assembly
By default, the box is not checked and the following error message is displayed if you try to generate a view from a body.

- Positioning of the different parts in the assembly is not taken into account in the resulting view and parts might be superimposed,
- Changes such as rotation or translation in the assembly are not taken into account,
- Modification of an instance properties such as visibility or colors are not taken into account,
- Overload properties is disabled as it is linked to the assembly's properties,
- Creation of balloons is not possible,
- Edit/ Links option references only two parts.
Clipping view

Put in no show dimension on non-visible geometry
Select this check box if you want to put automatically in no show mode the dimensions which are attached to geometry which is not visible in clipping views.
If you do not select this check box, dimensions are displayed in
clipping views using the colors defined in Tools > Options >
Mechanical Design > Drafting > Dimension tab, Analysis Display
Mode area. For more information, refer to
Analysis display mode.
The color used depends on whether the dimension is interactive (that is,
created manually) or generated automatically:
- interactive dimensions are displayed using the color defined for dimensions on non-visible geometry (light blue by default).
- generated dimensions are displayed using the color defined for dimensions generated from 3D constraints (light green by default).
![]() By default, this option is selected.
By default, this option is selected.
View From 3D

Keep layout and dress-up of 2D extracted annotations
Select this option if you want the layout and dress-up applied to 2D extracted annotations to be preserved when updating a view from 3D (Functional Tolerancing and Annotation workbench).
- 2D dress-up modifications are kept when updating design changes from 3D.
- Associativity of the annotations or their leader with the 3D geometry is taken into account.
- Associativity between annotations is taken into account.
![]() By default, this option is not selected.
By default, this option is not selected.
Generate 2D geometry
Select this option if you want to generate 2D geometry (i.e. wireframe and 2D points) when generating a view from 3D from a layout view (2D Layout for 3D Design workbench).
![]() By default, this option is selected.
By default, this option is selected.
Generate red cross on annotation
![]()

