3D PLM Enterprise Architecture |
JDialog |
Grid Contraint LayoutDefine a complex layout using Grid Constraint |
| Use Case | ||
AbstractThis article shows how to define a complex layout using Grid Constraint. |
This use case is intended to show you how to use Grid Constraint layout to define a complex layout.
[Top]
CAAGCUseCase is a use case of the CAAJDialog.edu framework that illustrates CATJDialog framework capabilities.
[Top]
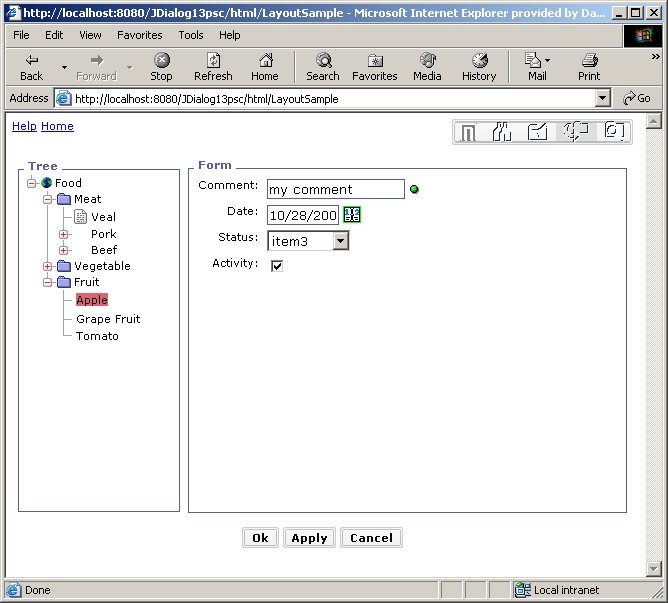
Here is a snapshot of the User Interface we want to build:

[Top]
To launch CAAGCUseCase, you will need to set up the build time environment, then compile CAAJdgXMLModels.mj along with its prerequisites, set up the run time environment, and then execute the use case [1].
This use case is made of a unique JDialog command: "CAAGCUseCase"
[Top]
The CAAGCUseCase use case is made of a single command, without any java controller (that means the command has no behavior). It uses the following resource files:
[Top]
The JDialog CATFrame is the only widget that allows positioning its children widgets. It offers this capability through a Grid Constraint Layout implementation.
The Grid Constraint Layout is a flexible layout definition that aligns widgets vertically and horizontally, without requiring that the widgets be of the same size. It allows defining rectangular grid of cells, with each widget occupying one or more cells, called its display area.
Each CATFrame children widget is associated with a set of GC attributes that specify how it is laid out within its display area:
Note: obviously when a widget is horizontally justified, it's horizontal alignment has no real meaning (since it will spread horizontally through its entire display area).
Another information is required by the Grid Constraint Layout to distribute free space among cells. This is done by defining a weight on rows and columns: free space (if any) is then divided proportionally to columns and rows weight. Default rows and columns weight is 0.
Notes:
[Top]
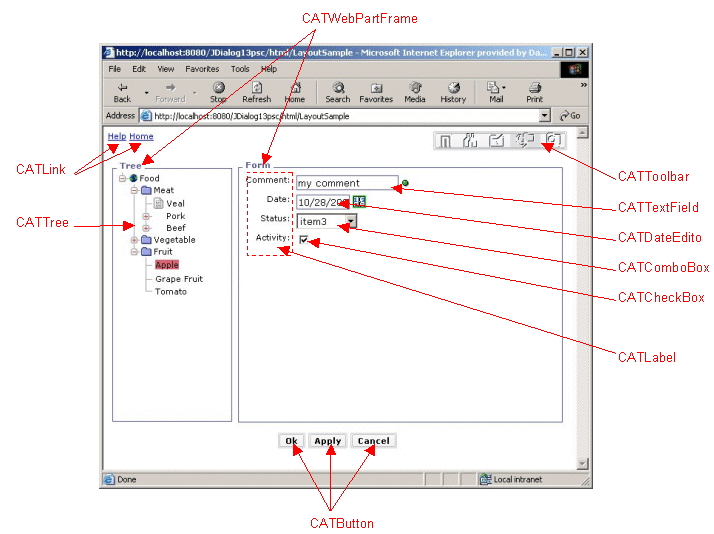
Here is the detail of used widgets:
[Top]
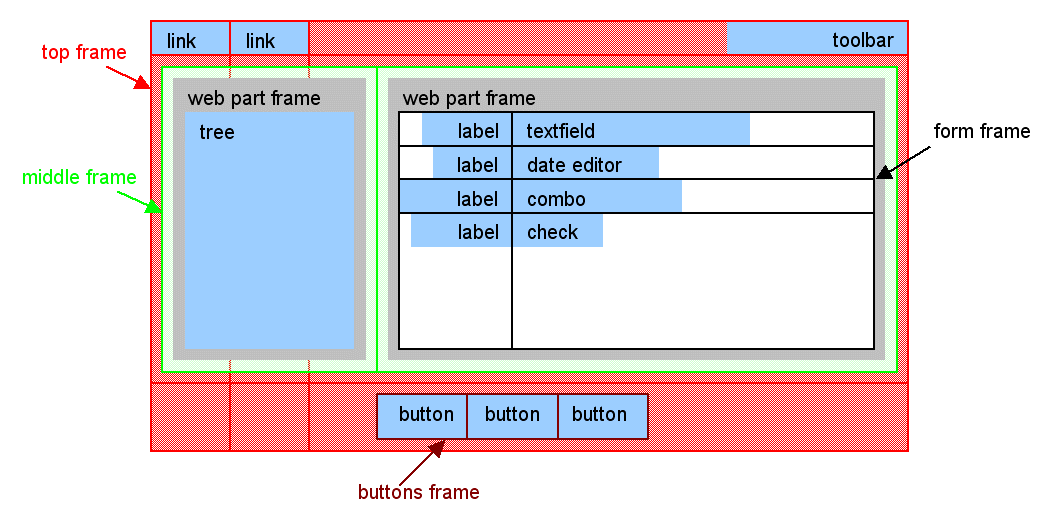
Here is a drawing of how widgets are arranged on the panel:
[Top]
The above drawing gives the following widgets hierarchy:
Frame
  |
  +--Link
  |
  +--Link
  |
  +--Toolbar
  |
  +--Frame
  |   |
  |   +--WebPartFrame
  |   |   |
  |   |   +--Tree
  |   |
  |   +--WebPartFrame
  |       |
  |       +--Frame
  |           |
  |           +--Label
  |           |
  |           +--TextField
  |           |
  |           +--Label
  |           |
  |           +--DateEditor
  |           |
  |           +--Label
  |           |
  |           +--ComboBox
  |           |
  |           +--Label
  |           |
  |           +--CheckBox
  |
  +--Frame
      |
      +--Button
      |
      +--Button
      |
      +--Button
|
[Top]
We will now have a look into detail at the Grid Constraint layout definition for each frame of the user interface.
[Top]
Here is a drawing of the detailed Grid Constraint definition for the top frame:
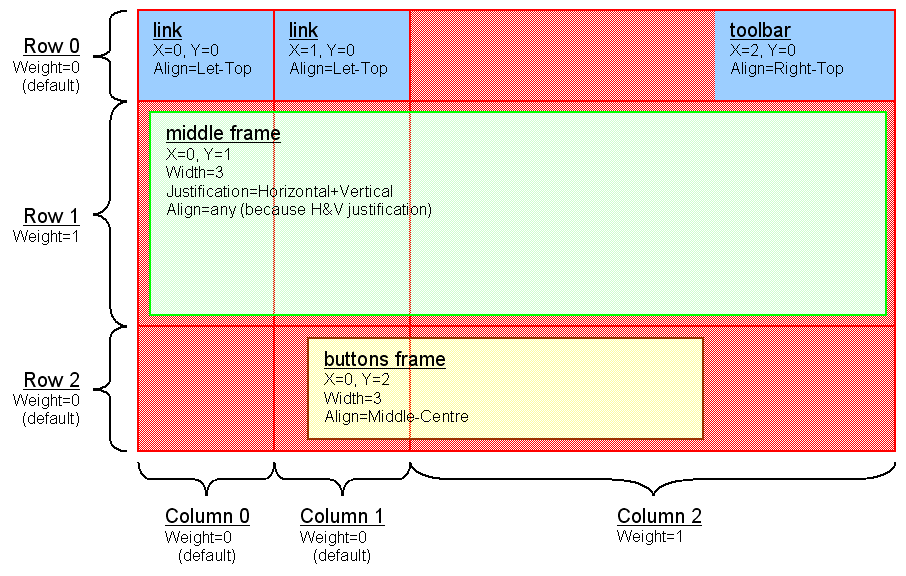
Explanations:
Remarks:
[Top]
Here is a drawing of the detailed Grid Constraint definition for the frame containing the buttons:

Explanations:
[Top]
Here is a drawing of the detailed Grid Constraint definition for the frame containing the 2 WebPartFrames:
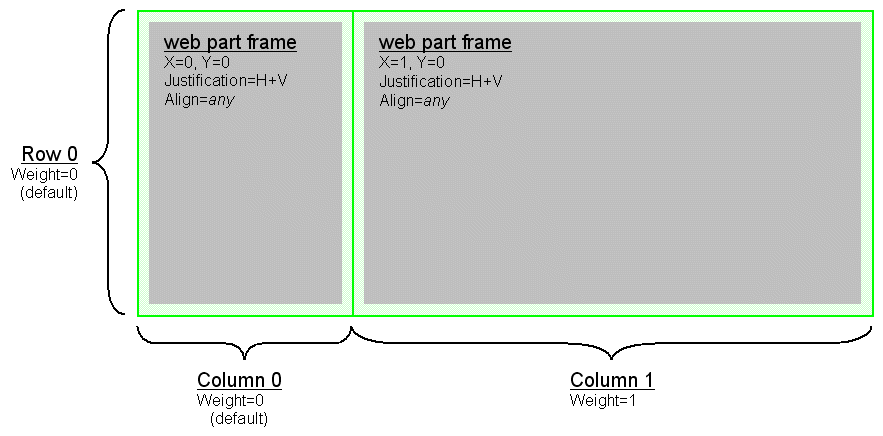
Explanations:
[Top]
Here is a drawing of the detailed Grid Constraint definition for the frame containing the textfield, date editor, combo box and checkbox:
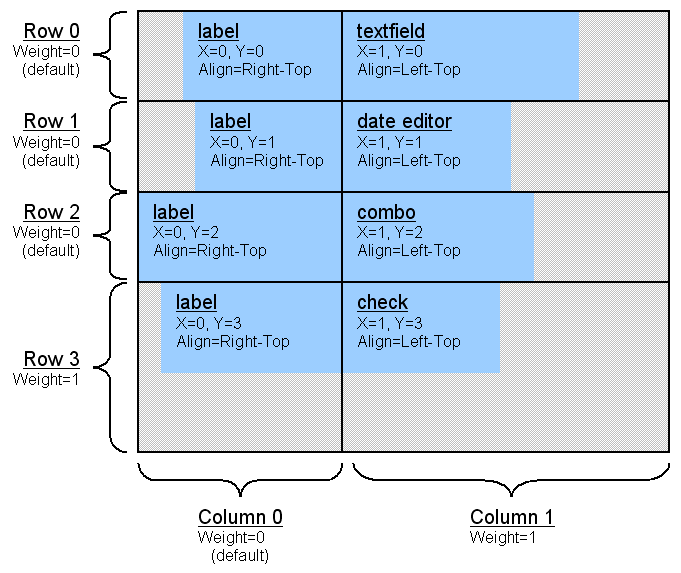
Explanations:
[Top]
Here is the XMLDlg file that defines the User Interface with required layout (CAAJDialog.edu/CNext/resources/dialog/CAAGCUseCase.XMLDlg):
<?xml version="1.0"?>
  <Frame Name="LayoutSampleCtrl">
    <Link Name="HelpLink"/>
    <GC A="LT" W="1" Name="HelpLink" H="1" Y="0" X="0"/>
    <Link Name="HomeLink"/>
    <GC A="LT" W="1" Name="HomeLink" H="1" Y="0" X="1"/>
    <Toolbar Name="Toolbar" ModelURL="com.dassault_systemes.caajdialog.caajdgxmlmodels.CATXMLMenuModel@sample/JDialog/SampleToolbarMenu.xml"/>
    <GC A="RT" W="1" Name="Toolbar" H="1" Y="0" X="2"/>

    <Frame Name="MiddleFrame">
      <WebPartFrame Name="TreeWPFrame">
        <Tree Name="Tree" ModelURL="com.dassault_systemes.caajdialog.caajdgxmlmodels.CATXMLTreeModel@sample/JDialog/FoodTree.xml"/>
      </WebPartFrame>
      <GC A="CM" W="1" Name="TreeWPFrame" J="HV" H="1" Y="0" X="0"/>

      <WebPartFrame Name="FormWPFrame">
        <Frame Name="FormFrame">
          <Label Name="TextfieldLbl"/>
          <GC A="RT" W="1" Name="TextfieldLbl" H="1" Y="0" X="0"/>
          <Label Name="DateEditorLbl"/>
          <GC A="RT" W="1" Name="DateEditorLbl" H="1" Y="1" X="0"/>
          <Label Name="ComboLbl"/>
          <GC A="RT" W="1" Name="ComboLbl" H="1" Y="2" X="0"/>
          <Label Name="CheckLbl"/>
          <GC A="RT" W="1" Name="CheckLbl" H="1" Y="3" X="0"/>
          <TextField Name="TextField" ExpectedFormat="."/>
          <GC A="LT" W="1" Name="TextField" H="1" Y="0" X="1"/>
          <DateEditor Name="DateEditor"/>
          <GC A="LT" W="1" Name="DateEditor" H="1" Y="1" X="1"/>
          <ComboBox Name="ComboBox">
	        <Item Title="item1"/>
	        <Item Title="item2"/>
	        <Item Title="item3"/>
	        <Item Title="item4"/>
	        <Item Title="item5"/>
	        <Item Title="item6"/>
	      </ComboBox>

          <GC A="LT" W="1" Name="ComboBox" H="1" Y="2" X="1"/>
          <CheckBox Name="CheckBox"/>
          <GC A="LT" W="1" Name="CheckBox" H="1" Y="3" X="1"/>
          <Column W="1" X="1"/>
          <Row W="1" Y="3"/>
        </Frame>
      </WebPartFrame>
      <GC A="CM" W="1" Name="FormWPFrame" J="HV" H="1" Y="0" X="1"/>
      <Column W="1" X="1"/>
    </Frame>
    <GC A="LT" W="3" Name="MiddleFrame" J="HV" H="1" Y="1" X="0"/>

    <Frame Name="ButtonsFrame">
      <Button Name="OkButton"/>
      <GC A="LT" W="1" Name="OkButton" H="1" Y="0" X="0"/>
      <Button Name="ApplyButton"/>
      <GC A="LT" W="1" Name="ApplyButton" H="1" Y="0" X="1"/>
      <Button Name="CancelButton"/>
      <GC A="LT" W="1" Name="CancelButton" H="1" Y="0" X="2"/>
      <Column W="1" X="0"/>
      <Column W="1" X="2"/>
    </Frame>
    <GC A="CT" W="3" Name="ButtonsFrame" H="1" Y="2" X="0"/>

    <Column W="1" X="2"/>
    <Row W="1" Y="1"/>
</Frame> |
Remarks:
Here is the associated message catalog file in English (CAAJDialog.edu/CNext/resources/msgcatalog/CAAGCUseCase.CATNls):
// --- links titles HelpLink.Title = "Help"; HomeLink.Title = "Home"; // --- web frame part titles MiddleFrame.TreeWPFrame.Title = "Tree"; MiddleFrame.FormWPFrame.Title = "Form"; // --- form label titles MiddleFrame.FormWPFrame.FormFrame.TextfieldLbl.Title = "Comment: "; MiddleFrame.FormWPFrame.FormFrame.DateEditorLbl.Title = "Date: "; MiddleFrame.FormWPFrame.FormFrame.ComboLbl.Title = "Status: "; MiddleFrame.FormWPFrame.FormFrame.CheckLbl.Title = "Activity: "; MiddleFrame.FormWPFrame.FormFrame.CheckBox.Title = ""; // --- buttons titles ButtonsFrame.OkButton.Title = "Ok"; ButtonsFrame.ApplyButton.Title = "Apply"; ButtonsFrame.CancelButton.Title = "Cancel"; |
[Top]
[Top]
| [1] | Building and Launching a CAA V5 JDialog Use Case |
| [Top] | |
| Version: 1 [Jan 2002] | Document created |
| [Top] | |
Copyright © 1994-2002, Dassault Systèmes. All rights reserved.